1. Overview
1.1. Accessing Swagger UI
Many services expose a Swagger UI on port 80 and the path
/swagger-ui/index.html. Use docker ps to find the host port mapping:
docker ps --format 'table {{.Names}}\t{{.Ports}}'
If a container’s port 80 is mapped to 9130 you would access Swagger using the
URL http://localhost:9130/swagger-ui/index.html.
1.2. Folder Structure
This project has the following folders:
| Folder | Content | Description |
|---|---|---|
client/ |
Client-side components |
Simulated client applications |
├─ card-terminal-client-simservice/ |
Electronic health card terminal simulator |
|
└─ vsdm-client-simservice-java/ |
VSDM2 client simulator |
|
server/ |
Server-side components |
Backend services and proxies |
├─ popp-server-mockservice/ |
PoPP token generation service |
|
├─ vsdm-server-simservice/ |
VSDM2 data provider |
|
├─ zeta-pdp-server-mockservice/ |
Zero Trust Policy Decision Point |
|
└─ zeta-pep-server-mockservice/ |
Zero Trust Policy Enforcement Point |
|
lib/ |
Reusable libraries |
Shared functionality across services |
├─ card-client-lib-java/ |
Card terminal operations library |
|
├─ popp-client-lib-java/ |
PoPP authentication client library |
|
├─ vsdm-fhir-lib-java/ |
FHIR resource handling for VSDM |
|
└─ zeta-client-lib-java/ |
ZeTA integration utilities |
|
test/ |
Test suites |
Integration and end-to-end tests |
└─ vsdm-testsuite/ |
VSDM2 workflow test suite |
|
doc/ |
Documentation and scripts |
Build and deployment automation |
├─ bin/vsdm/ |
Build and Docker Compose scripts |
|
├─ docker/vsdm/ |
Docker Compose configuration |
|
└─ k8s/ |
Kubernetes deployment manifests |
|
images/ |
Static assets |
Images for README documentation |
jenkinsfiles/ |
CI/CD pipelines |
Jenkins pipeline definitions |
2. Example Workflows using Curl
2.1. VSDM Data Retrieval
curl -X GET 'http://localhost:8220/vsdm/data' \
    -H 'Authorization: Bearer <ACCESS_TOKEN>'
2.2. Card Terminal Operations
curl -X POST 'http://localhost:8000/card/load' \
    -H 'Content-Type: application/json' \
    -d '{"cardPath": "cards/egk/valid-egk.xml"}'
2.3. Token Exchange (OAuth 2.0 RFC 8693)
curl -X POST 'http://localhost:9100/token' \
    -H 'Content-Type: application/x-www-form-urlencoded' \
    -d 'grant_type=urn:ietf:params:oauth:grant-type:token-exchange&subject_token=<SMC_B_TOKEN>&subject_token_type=urn:ietf:params:oauth:token-type:access_token'
3. Configuration
3.1. Environment Variables
Each service can be configured via environment variables. Key configuration options:
3.2. Docker Compose Profiles
The Testhub supports different startup profiles for various use cases:
| Profile | Description |
|---|---|
|
Backend + Tiger-Proxies + Clients via proxy. Use this for normal development and testing. |
|
Backend + Tiger-Proxies + Clients via proxy. Use this for normal development and testing using mocked PoPP tokens instead of the Gematik sample implementation. |
|
Backend + Tiger-Proxies + Clients with direct backend access. Use this for performance testing as it bypasses the Tiger-Proxy. |
|
Backend services only (no Tiger-Proxies, no clients). Use this when you want to run your own client implementation against the backend. |
3.2.1. Starting with Profiles
Use Docker Compose with the appropriate profile:
# Build Docker images first
./mvnw clean install -Pdocker -DskipTests

# Start full stack
docker compose -f doc/docker/compose-local.yaml --profile perf up -d

# Start with mocked popp components
docker compose -f doc/docker/compose-local.yaml --profile mock-popp up -d

# Start with performance profile (clients bypass Tiger-Proxy)
docker compose -f doc/docker/compose-local.yaml --profile perf up -d

# Start backend only (no clients)
docker compose -f doc/docker/compose-local.yaml --profile backend-only up -d

# Stop all containers (all profiles)
docker compose -f doc/docker/compose-local.yaml --profile perf --profile backend-only down -v4. Architecture
The Testhub implements a Zero Trust Architecture with multiple layers of services communicating through authenticated channels.
4.1. Key Components
The Testhub consists of several interconnected services:
Client Services:
-
VSDM Client SimService - Simulates VSDM2 client operations
-
Card Terminal Client SimService - Simulates electronic health card (eGK) terminal operations
Server Services:
-
VSDM Server SimService - Provides VSDM2 data for testing
-
PoPP Server MockService - Simulates Proof of Possession authentication server
-
ZeTA PDP Server MockService - Policy Decision Point for Zero Trust Architecture
-
ZeTA PEP Server MockService - Policy Enforcement Point proxy service
Libraries:
-
Card Client Library - Reusable card terminal operations
-
PoPP Client Library - PoPP authentication client functionality
-
VSDM FHIR Library - FHIR resource handling for VSDM
-
ZeTA Client Library - ZeTA integration utilities
All components are designed as mock/simulation services for development and testing purposes, not for production use.
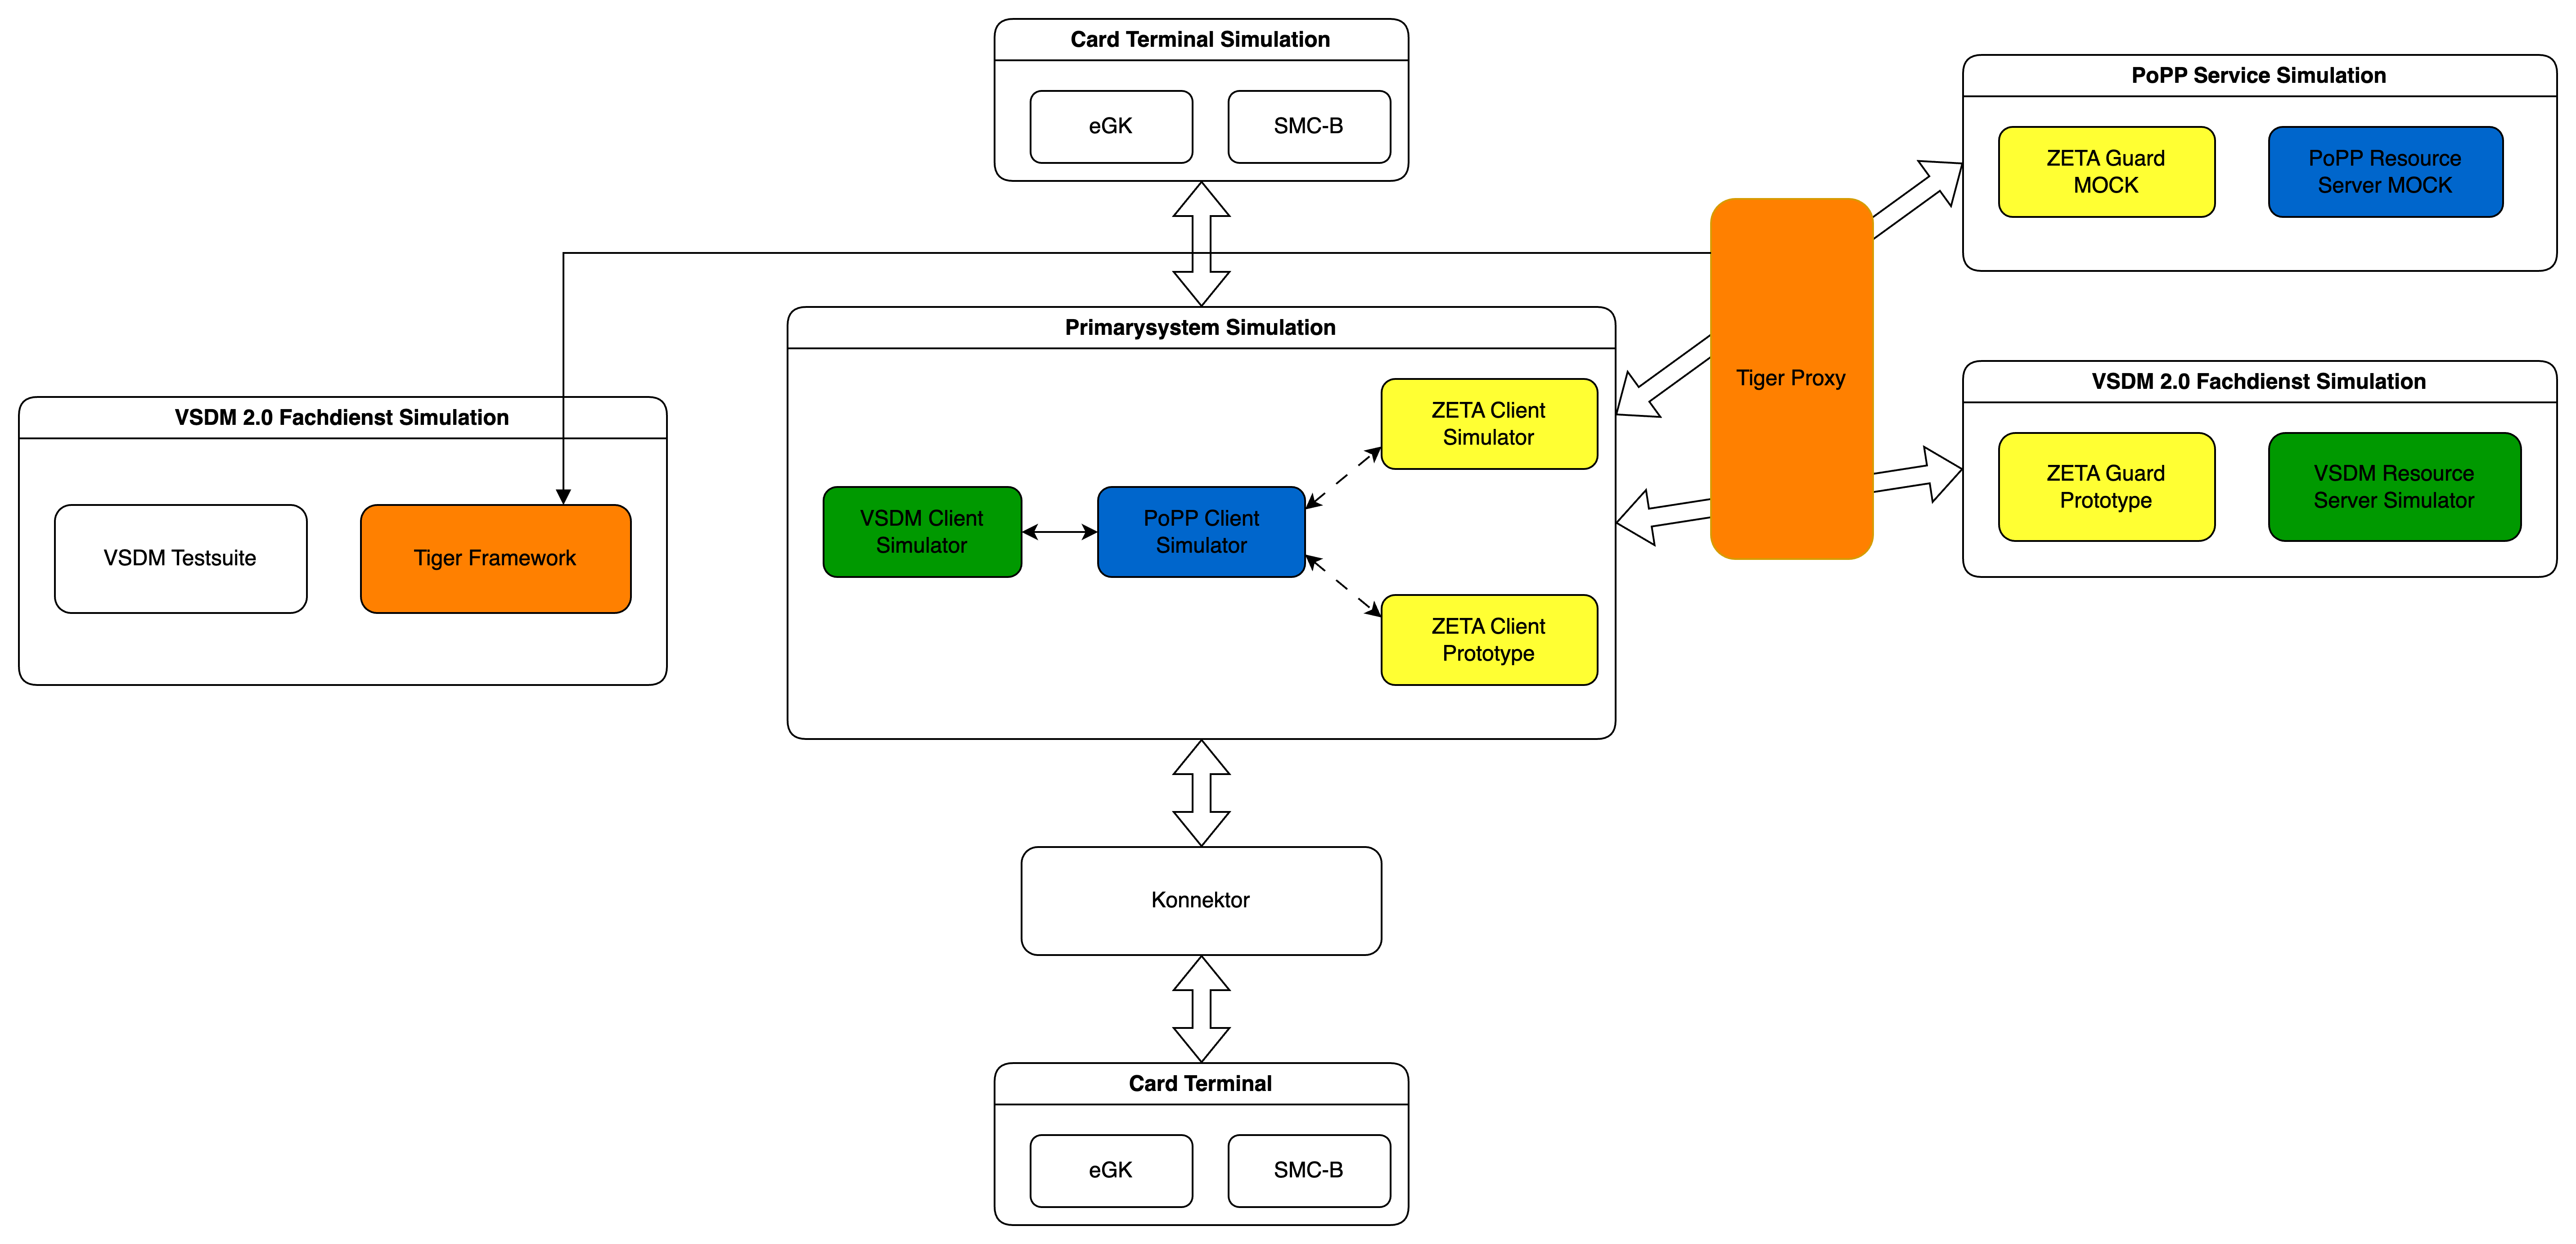
4.3. Service Descriptions
| Service | Purpose |
|---|---|
Card Terminal Client |
Simulates electronic health card (eGK, SMC-B, HBA) terminal operations with PACE protocol support |
VSDM Client |
Simulates VSDM2 client operations including data retrieval and PoPP token validation |
ZeTA PEP PoPP |
Policy Enforcement Point proxy for PoPP validates tokens and forwards requests |
ZeTA PDP PoPP |
Policy Decision Point for PoPP performs OAuth 2.0 token exchange (RFC 8693) |
PoPP Server |
Backend PoPP service generates and validates Proof of Possession tokens |
VSDM Server |
Backend VSDM service provides VSDM2 data from YAML test fixtures |
Tiger Proxy UI |
Local Tiger Proxy between PS-Simulation and PoPP and VSDM-Servers |
The services are exposed on different ports to the local environment.
To access the containers when applicable, use the following script to find the host port mapping:
docker ps --format 'table {{.Names}}\t{{.Ports}}'
5. Tiger Logs
Traffic logs captured during the vsdm-testsuite feature test runs are available in the doc/traffic/
folder.
Two perspectives are recorded for each test run:
-
Frontend:
doc/traffic/frontend.html– traffic as seen by the client (e.g. the VSDM client simulator), i.e.
outgoing requests and the responses received from the backend services. -
Backend:
doc/traffic/backend.html– traffic as seen by the server side, i.e. the requests arriving at the
Zeta components and the responses they return.
The logs are provided in both a human-readable HTML format (.html) and the Tiger traffic format (.tgr), which can be
opened with the Tiger Proxy (cf. https://gematik.github.io/app-Tiger/Tiger-User-Manual.html).
6. Integrate a custom PS (Primärsystem)
Integrating a custom Primärsystem (PS) is a primary design goal of the TI 2.0 Testhub. Currently, however, it requires some manual steps:
-
Start the Testhub with the
backend-onlyprofile to disable the built-in PS-Simulators (VSDM Client and Card Terminal Client):
docker compose -f doc/docker/compose-local.yaml --profile backend-only up -d
-
The custom PS has to be started (e.g. add as a new service in
doc/docker/backend/compose-local.yaml, but could simply be started outside of docker compose as well) -
Optional: To use the PS with the VSDM-Testsuite it has to implement the same API as the existing vsdm-client(which can be seen at http://localhost:{PORT}/v3/api-docs)
You can connect to the resource servers as follows:
- VSDM-Server
-
Use the port that is forwarded to the internal port 443 of
vsdm-zeta-ingress. If the port is 9119 you can connect from the Docker host using https://localhost:9119/. - PoPP-Server
-
Use the port that is forwarded to the internal port 80 of
popp-ingress.
The usage of the Zeta-SDK can be seen in the existing vsdm-client-simservice-java implementation. The class ZetaSdkClientAdapter.java uses the client while VsdmZetaSdkClientConfig.java configures it.
7. POPP Implementation Overview
We ship two main implementations of PoPP (Proof of Patient Presence) with Testhub:
- Mock PoPP Token Generator
-
A fast implementation that ignores the specified interfaces and generates tokens quickly. Useful for load tests and rapid prototyping.
- Gematik Sampl Implementation
-
Aligns to the specified POPP interfaces. Suitable for production-like scenarios and interface compliance testing.
PoPP Tokens have to be generated and validated. Validation is commonly done by the PEP component. The token is signed using a private key and validated using the public key complement. The PEP must be configured to read the public key from the service that generated the token.
The VSDM client can be configured to use the Mock PoPP Token Generator or an arbitrary endpoint that implements the PoPP specification.
7.1. How To Enable The Mock PoPP Token Generator
Start the application using docker compose with the mock-popp Profile. This will automatically set the required environment variable and start the mock PoPP Token Generator service only.
Rebuild and restart services to ensure all configuration values are applied correctly.
7.2. How to enable the Gematik Sample POPP Implementation
This is the default scenario where the Testhub uses the Gematik sample implementation of PoPP Client and PoPP Server.
-
Set
POPP_HTTP_URLto thehttp://popp-client:{PORT}/token. Find the value of{PORT}by looking at the port configuration of the popp-client container.# doc/docker/compose-local.yml vsdm-client-base: # ... environment: # verify the port is correct - POPP_HTTP_URL=http://popp-client:8081/token -
Start the application using docker compose with the full Profile. This will automatically set the required environment variable and start the PoPP Client and Server components of the Gematik sample implementation.
Rebuild and restart services to ensure all configuration values are applied correctly.
7.3. How To Replace the PoPP Server with External Implementation
If you want to operate the entire PoPP infrastructure (PoPP Client and Server) externally using the Gematik sample implementation or another external PoPP implementation, follow these steps.
-
Ensure the external infrastructure is up, running and reachable.
-
Disable using the PoPP mock implementation in VSDM client by setting
VSDM_USE_MOCK_POPP_TOKEN=false:# doc/docker/compose-local.yml vsdm-client: # ... environment: - VSDM_USE_MOCK_POPP_TOKEN=false -
Set
SPRING_PROFILES_ACTIVEto an empty string:# doc/docker/backend/compose-popp-services.yml popp-client: # ... environment: - SPRING_PROFILES_ACTIVE= -
Set
POPP_SERVER_URLto the external server endpoint to request a new PoPP token:# doc/docker/backend/compose-popp-services.yml popp-client: # ... environment: - SPRING_PROFILES_ACTIVE= - POPP_SERVER_URL=wss://example.com/popp/token -
Ensure the PEP components use the external PoPP server to resolve the public keys for PoPP token validation:
# doc/docker/backend/zeta/vsdm-zeta-pep.conf
pep_popp_issuer https://example.com/
Rebuild and restart services to ensure all configuration values are applied correctly.
7.3.1. Common Issues When Using An External Implementation
Ensure that the kid in your PoPP token can be found in the JWKS endpoint offered by the PoPP issuer.
Make sure that the external implementation returns the expected responses from the respective endpoints. To learn refer to the PEP source code dealing with the JWKS data.
7.4. Notes / Troubleshooting
-
After changes to compose files always restart the affected containers (e.g.
docker compose down && docker compose up -dfor the changed services). -
Test reachability of the external service from the Testhub instance (e.g.
curlfrom the host/container). -
Verify that the external PoPP infrastructure is healthy and accessible before starting the vsdm-client and other dependent services.
-
Pay attention to WebSocket connections if using external PoPP servers (ensure
wss://is properly configured for secure connections). -
Check logs for authentication errors or token generation issues if the vsdm-client reports connectivity problems:
docker logs vsdm-client
docker logs popp-client-
Ensure the PoPP control REST endpoint is accessible and returns valid responses in the expected format.
7.5. Summary
This document shows the minimal changes required to either use the mock PoPP token generator for fast testing, replace only the Token Server, or replace the entire PoPP Client and Server externally.
The main configuration points are:
-
Mock PoPP Token Generator: Set
vsdm.use-mock-popp-token: trueto bypass PoPP services entirely for quick testing and load tests -
External PoPP Implementation: Set
vsdm.use-mock-popp-token: false, configurepopp.http.urlto the external PoPP Client control REST endpoint or setPOPP_HTTP_URLto the same endpoint -
Compose Configuration: Comment out/remove the internal PoPP simulations in the compose files when using external services
-
TLS and Connectivity: Ensure proper TLS (https://…;) and certificate configuration for external services
-
Testing: Always verify reachability and proper responses from external PoPP infrastructure before starting dependent services
8. How to integrate VSDM services
8.1. Scenario 1: Replace the Resource Server behind ZetaGuard
If you only want to replace the Resource Server (keeping ZetaGuard as PEP/proxy), follow these steps.
8.1.1. Prerequisites
-
The external resource server must be started and reachable from the Testhub instance.
8.1.2. Steps
-
Make sure the vsdm server simulation is not started in the compose setup.
# File: compose-vsdm-services.yaml (or the compose file that contains the vsdm server)
# Example: comment out the block for the vsdm-server
# vsdm-server:
#   image: ...
#   ports:
# - "80:8080"-
In the Testhub compose settings: under the block that describes the PEP (e.g.
vsdm-zeta-pep), remove or comment out the dependency on the internalvsdm-server(depends_on).
# Example: in compose-vsdm-services.yaml or compose-local.yaml
# under vsdm-zeta-pep:
#   depends_on:
#     - vsdm-server
# => comment out or remove-
Configure the PEP so that it forwards to the external (real) Resource Server.
Edit the vsdm-zeta-pep.conf file and replace the proxy_pass line:
# Before (local vsdm-server in compose):
proxy_pass http://vsdm-server:80/;

# After (real resource server):
proxy_pass http://URL_TO_REAL_SERVER/;
Tip: Pay attention to the trailing / and to TLS (https://…;) when required.
8.2. Scenario 2: Replace the complete domain service (ZetaGuard + Resource Server)
If the complete domain service (ZetaGuard and the Resource Server) is operated externally, follow these steps.
8.2.1. Prerequisites
-
The external domain service (ZetaGuard + Resource Server) must be started and reachable from the Testhub instance.
8.2.2. Steps
-
Do not start the internal simulations: both the vsdm server simulation and the internal ZetaGuard must not be started in the compose configuration.
# In compose-local.yaml: comment out the include of compose-vsdm-services.yaml
# - include: compose-vsdm-services-
Replace the
vsdm-zeta-ingressentry intiger.yaml(or the file that defines the ingress / routing for vsdm) with the URL of the domain service.
# File: tiger.yaml
# Before:
vsdm-zeta-ingress: http://vsdm-zeta-ingress
# After:
vsdm-zeta-ingress: http://URL_TO_DOMAIN_SERVICE-
Adjust the client configuration: in
vsdm-client/application-local.yamlconfigure theresourceServerUrlto the URL of the external vsdm-zeta-pep service or directly to the domain service, depending on your architecture.
# File: vsdm-client/application-local.yaml
resourceServerUrl: "http://URL_TO_VSDM_ZETA_PEP/"
Note: If the external domain service uses TLS, use https://…; and make sure certificates / CA trust are configured accordingly.
8.3. Examples and useful commands
-
Search the compose files for
vsdm-server,vsdm-zeta-peporvsdm-zeta-ingressto quickly find the relevant blocks:
grep -R "vsdm-server\|vsdm-zeta-pep\|vsdm-zeta-ingress" -n .-
Example: simple change with sed (local; check with git diff first):
# Replace proxy_pass line in vsdm-zeta-pep.conf (create backup first!)
cp vsdm-zeta-pep.conf vsdm-zeta-pep.conf.bak
sed -i.bak "s|proxy_pass http://vsdm-server:80/;|proxy_pass http://URL_TO_REAL_SERVER/;|g" vsdm-zeta-pep.conf
8.4. Notes / Troubleshooting
-
After changes to compose files always restart the affected containers (e.g.
docker compose down && docker compose up -dfor the changed services). -
Test reachability of the external service from the Testhub instance (e.g.
curlfrom the host/container). -
Pay attention to CORS, authentication and TLS settings if clients report errors when accessing the external service.
8.5. Summary
This document shows the minimal changes required to either replace only the Resource Server behind ZetaGuard or to operate the complete domain service (ZetaGuard + Resource Server) externally.
The main changes are:
-
Commenting out/removing the internal simulations in the compose files
-
Adjusting
proxy_passinvsdm-zeta-pep.conf -
Replacing ingress/URL references in
tiger.yamlandvsdm-client/application-local.yaml
9. ZETA Guard and ZETA Client
9.1. ASL (additional security layer)
9.1.1. Disabling ASL
The quickest and easiest way to disable ASL is by setting zeta_asl_use to not_supported in the .well-known/oauth-protected-resource file.
Example for doc/docker/backend/zeta/well-known/oauth-protected-resource:
{
    "resource": "https://vsdm-zeta-ingress/",
    "authorization_servers": [
        "https://vsdm-zeta-ingress/auth/realms/zeta-guard/"
    ],
    "zeta_asl_use": "not_supported"
}
The ZETA Client SDK configuration does not need to be modified.
For additional information about ASL refer to the specifications and relevant repositories.
10. FAQ / Troubleshooting
10.1. Testhub
10.1.1. Why are there so many files in the SMC-B ZIP file?
The ZIP file structure is used for many other processes connected with the Gematik.
It’s currently not possible to change this process for Testhub.
10.1.2. An Ant BuildException has occured…
This is usually caused by a configuration issues when building the Docker images.
Look further up for the relevant error message around the task create-docker-image and check the Docker section below.
10.1.3. E2E tests are not starting with port exception
When running the E2E tests you can run into an error claiming that a port is taken:
***************************
APPLICATION FAILED TO START
***************************

Description:

Web server failed to start. Port 6800 was already in use.

Action:

Identify and stop the process that's listening on port 6800 or configure this application to listen on another port.

TGR Workflow UI is active, please press quit in browser window...
TGR Destroying spring boot context after testrun...
TGR Tiger shut down orderly
[ERROR] Failed to start bean 'webServerStartStop'
This happens when you are using the Tiger Workflow UI and you didn’t press the power off button in the Workflow UI. To fix the issus:
-
Press the red power button in the Workflow UI and try again
-
Kill the process listening on the port mentioned by YOUR error message. Note that port configurations can change and the above error message is for illustration only.
10.1.4. The Tiger Workflow UI runs into timeouts on startup
Due to performance constraints it’s possible that there is not enough time for the Workflow UI and E2E tests to start in a timely manner:
15:29:57.034 [main ] INFO  d.g.t.t.c.w.TigerBrowserUtil - Starting Workflow UI via 'xdg-open http://localhost:6800'
15:29:57.052 [main ] INFO  d.g.t.t.c.w.TigerBrowserUtil - Workflow UI http://localhost:6800
15:29:57.052 [main ] INFO  d.g.t.t.l.TigerDirector - Waiting 10 seconds for workflow Ui to fetch status...
You can try:
-
to increase the setting
lib.workflowUiStartTimeoutInSecondsin the filetiger.yaml. -
to set
lib.activateWorkflowUi: falsein the filetiger.yaml.
For more information on how to configure Tiger check the Tiger User Manual.
10.1.5. PoPP error: pep: alias not found (popp)
An error like this:
{
  "error": "PoPP",
  "error_description": "PoPP error: pep: alias not found (popp)",
  "error_uri": "https://vsdm-zeta-ingress/doc/errors/PoPP.html"
}
usually indicates that the PEP could not fetch the public key for PoPP token validation. Ensure:
-
the PEP is configured to use the correct PoPP server
-
the PoPP server provides a JWKS endpoint that exposes the public key corresponding to the Key ID (KID) specified in the token. While this endpoint typically defaults to
.well-known/signed-jwks, it is fully configurable. The authoritative URI for the JWKS endpoint should be retrieved dynamically via the PoPP server’s OpenID Connect discovery document located at.well-known/openid-federation
If you switch between PoPP example implementation and PoPP token generator double check that the PEP is using the correct endpoint.
10.2. Docker
10.2.1. The name "xyz" is already in use by container …
Occasionally you might encounter an error like:
Error response from daemon: Conflict. The name "vsdm-client" is already in use by container f9e5798a82e0.
-
It’s possible that you are running a container with the same name.
You have to rename or remove it. -
It’s possible that a previous Testhub start wasn’t cleaned properly.
First remove the remaining containers and then restart Testhub:docker compose -f ./doc/docker/compose-local.yaml down -v docker compose -f ./doc/docker/compose-local.yaml --profile full up -d --remove-orphans
10.2.2. Authentication for pulling Docker images
Testhub components are povided as public Docker images.
Authentication with a registry is not neccessary.
Depending on your Docker configuration you may run into authentication issues such as these:
ERROR: (gcloud.auth.docker-helper) There was a problem refreshing your current auth tokens: Reauthentication failed. cannot prompt during non-interactive execution.
Please run:

  $ gcloud auth login
This issue is NOT related to Testhub.
To fix the problem either:
-
Authenticate using your credential helper such as the
gcloudCLI -
Remove the relevant settings from your docker configuration
10.2.3. No feedback from workflow Ui, aborting!
If you see this error, the tiger framework was not able to reach the browser within the expected time.
This usually happens when the Testhub is started on a machine with limited resources or the browser setup is somewhat slow.
You should have a browser window open with the Testhub UI, but it might stay blank for a while.
If this happens try to reload that tab.
If you don’t see this tab at all, check if the Testhub is running and try to open http://localhost:6800/ in your browser.
The timeout is set to 120 seconds, so if you can open the UI within that time frame, you should be able to start the workflow without any issues.
If you are still running into problems, try to increase the timeout in the file tiger.yaml (search for "workflowUiStartTimeoutInSeconds" and increase the value).
10.2.4. permission denied while trying to connect to the Docker daemon socket…
Ensure you are following the post-install steps as outlined by dockerdocs, especially on how to use Docker as a non-root user:
https://docs.docker.com/engine/install/linux-postinstall/#manage-docker-as-a-non-root-user
10.3. Windows PowerShell
10.3.1. Issues with running commands with parameters in PowerShell
If you are running into issues with running commands with parameters in PowerShell, try to use PowerShell’s passthrough mechanism for arguments with the "stop parsing" symbol --% to prevent PowerShell from interpreting the parameters as its own.
For example, instead of running
./mvnw -pl test/vsdm-testsuite/ -Dit.test="Vsdm*IT" -Dskip.inttests=false verify
which may lead to
[ERROR] Unknown lifecycle phase "Vsdm*IT". You must specify a valid lifecycle phase [...]
try to run it with the passthrough --% symbol
./mvnw --% -pl test/vsdm-testsuite/ -Dit.test="Vsdm*IT" -Dskip.inttests=false verify
which should prevent PowerShell from interpreting the -Dit.test parameter as its own and instead pass it correctly to the mvnw command.
11. Known issues
11.1. popp-sample-implementation only supports legacy /jwks.json endpoint
The popp-sample-implementation currently only supports the legacy /jwks.json endpoint. If you haven’t changed the default PoPP stack configuration, then popp-sample-implementation and popp-token-generator use the same key material and popp-token-generator can be used for the pep_popp_issuer setting.