1. Overview
To get a quick introduction to the core concepts and features of the Tiger test framework check out our video
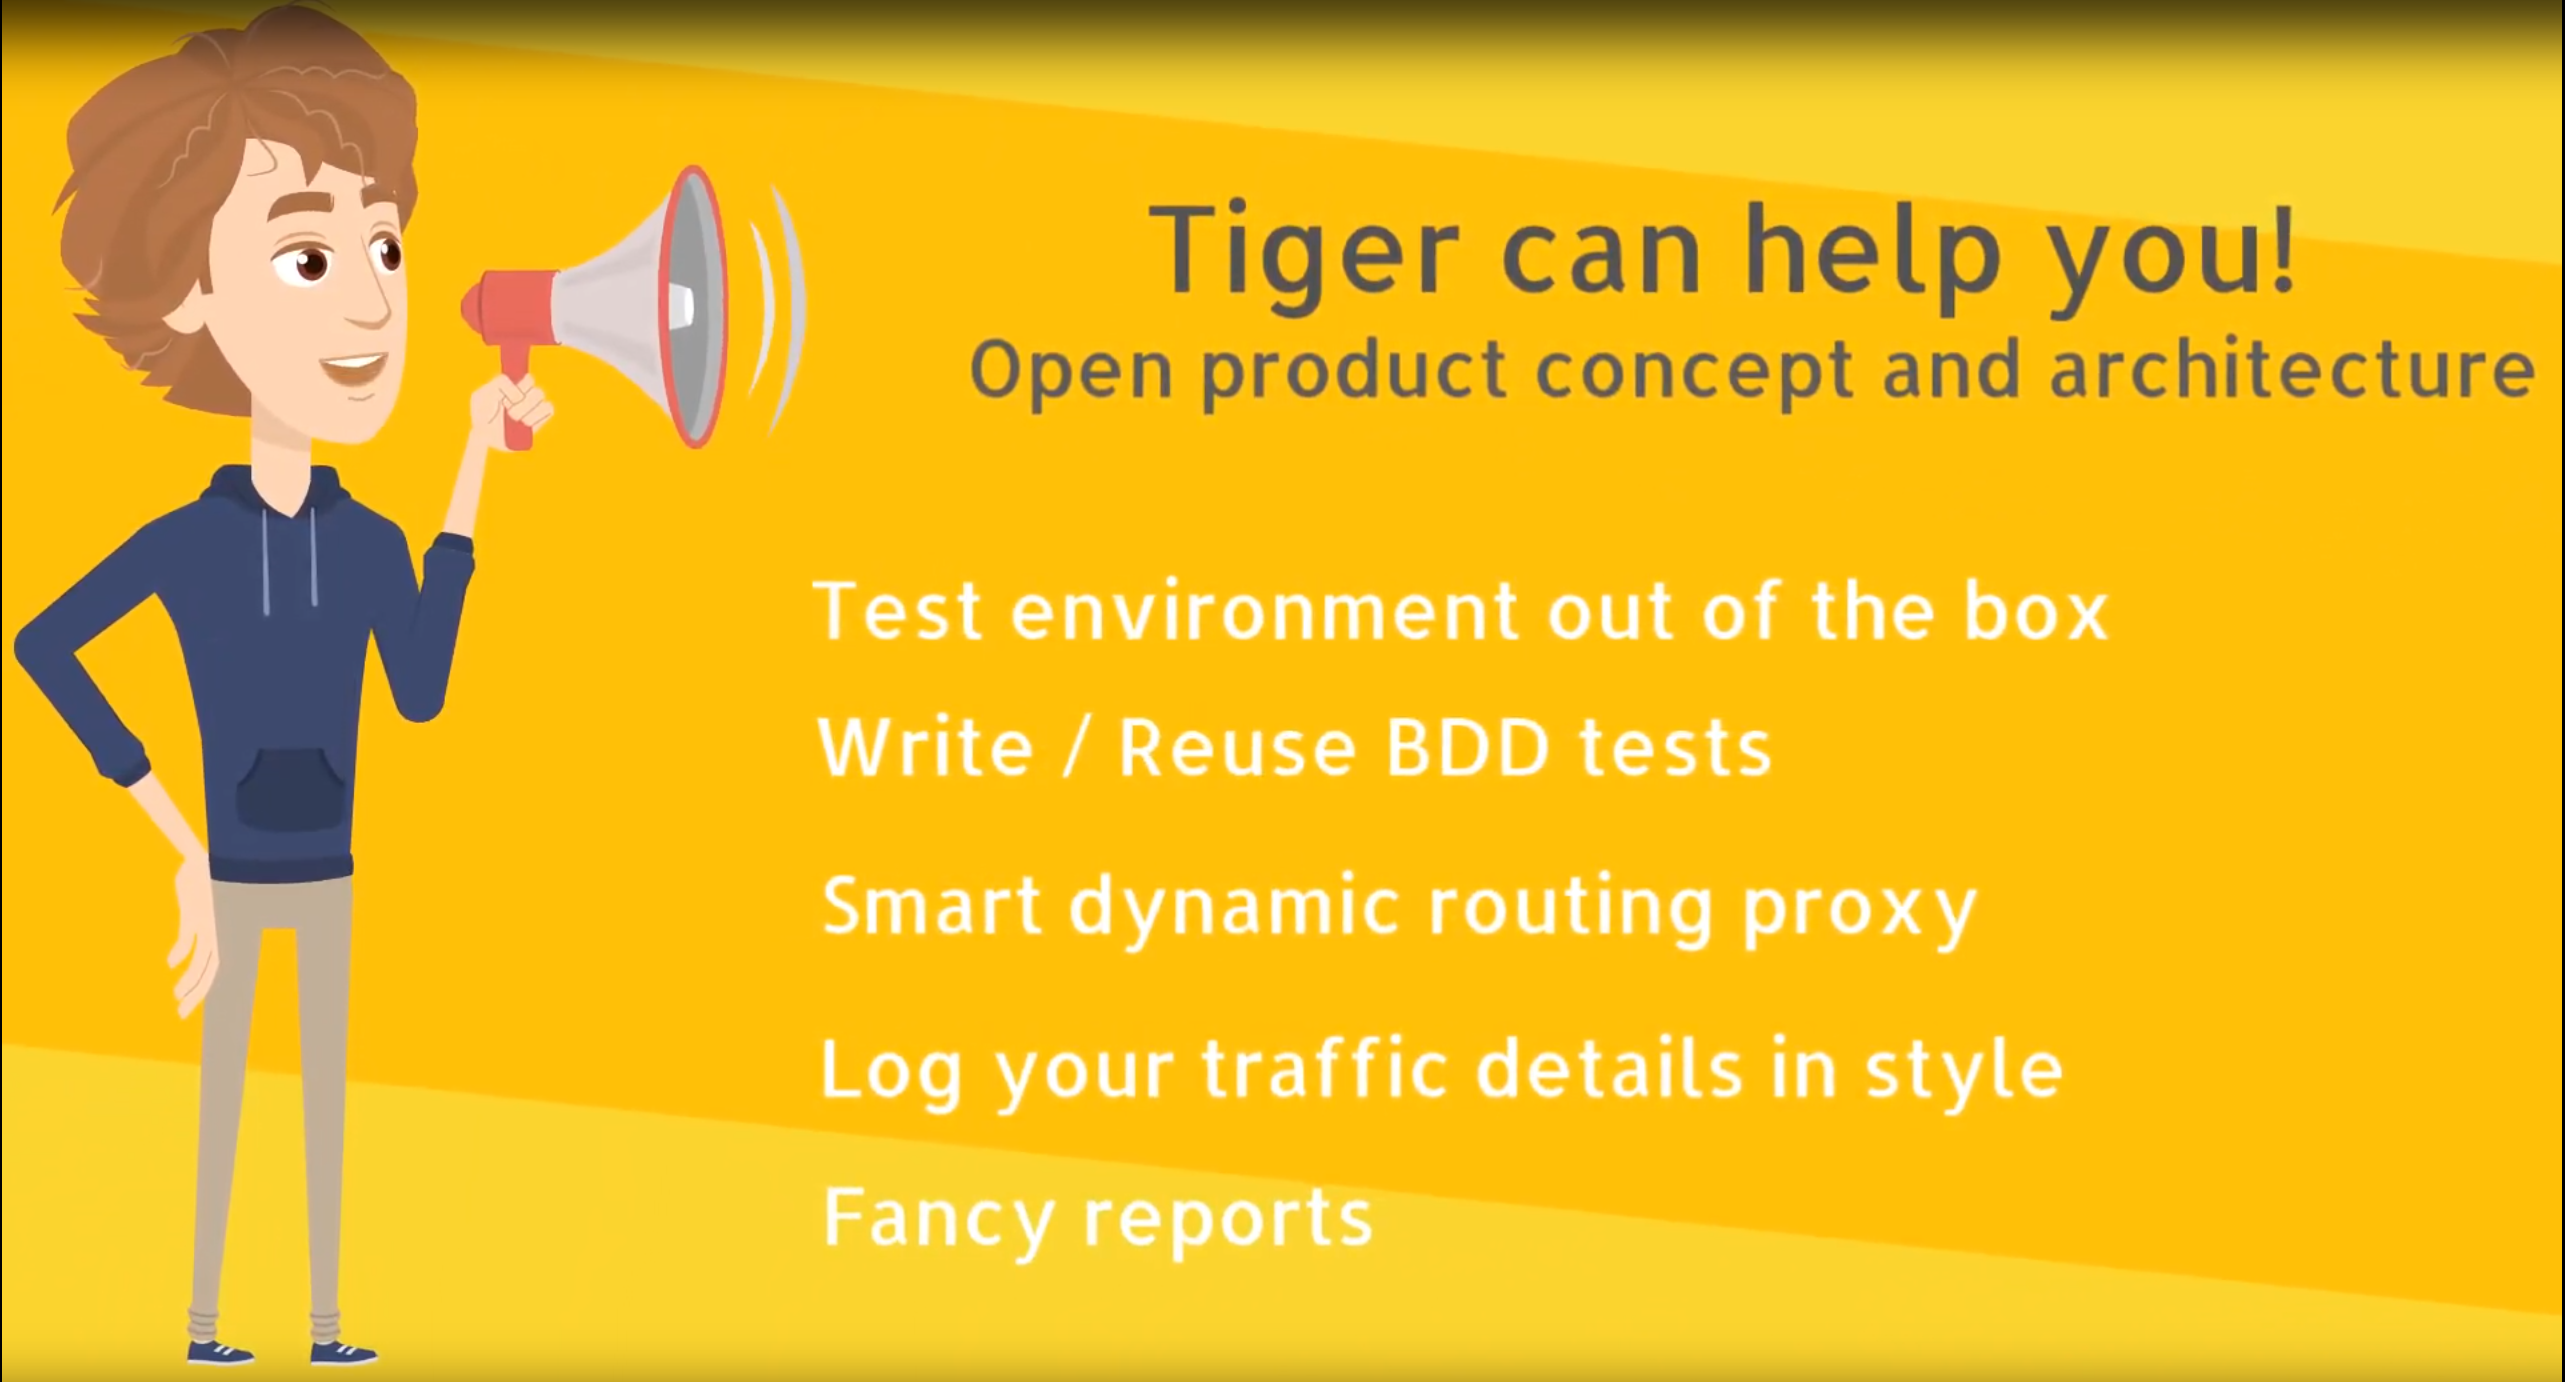
Tiger is a framework for interface-driven BDD black-box-testing.
Tiger is a toolbox that supports and guides you when writing test suites.
It lets you focus on writing the tests and solves typical problems that every team encounters (configuration, setting up the test environment, parametrization, result reporting, test running).
How, you ask?
-
Tiger does not focus on components but on the interactions between them.
The tiger proxy captures the traffic between components. -
The tiger proxy parses the traffic and builds a tree structure which abstracts away the encoding (XML, JSON, JWT, ASN.1, MIME and many more) and lets you focus on the data.
-
The Tiger test environment manager handles Docker containers, Helm charts, JARs and external servers, boots the configured setup and routes the traffic, all with zero lines of Java, all in YAML only.
-
A complete configuration toolkit, which combines multiple sources and supports custom configuration of your test suite as well, again with zero lines of Java.
-
Common tasks (JSON validation, message filtering, scenario configuration, configuration of simulators…) can be performed with the Tiger test library, which can be seamlessly imported into BDD test suites.
This allows you to build powerful test suites with zero lines of Java. -
If you want to write custom steps and glue code, our Java API has got you covered by supporting common tasks (crypto, serialization…) for you. The Tiger Workflow UI is a web-based user interface designed to guide the tester through complex test workflows. It provides an interactive and visual way to execute, monitor, and control BDD test scenarios.
So the little lines you have to write are to be powerful and descriptive?!
1.1. Components
Tiger has a clear separation in three components, each of them having a clear purpose, described in the next subsections:
1.1.1. Tiger Test Environment Manager
-
Instantiating test nodes - external JARs, Docker containers, Docker Compose stacks, Helm charts, Zion and accessing server instances via external URL configurations
-
Automatic shutdown - on teardown of the test run, all instantiated test nodes are stopped
-
Highly configurable - a multitude of parameters and configuration properties
-
Flexible environment management - exporting and importing environment variables and system properties to other test nodes
-
Customizing configuration properties - via command-line system properties or environment variables
See chapter Tiger Test Environment Manager for a detailed description and configuration options.
1.1.2. Tiger Proxy
-
Rerouting - allows rerouting requests based on a configured lookup table
-
Modifications - allows modifying the content of requests / responses on the fly
-
Mesh set up - allows forwarding traffic data from one proxy to another for aggregated validations
-
TLS man in the middle - allows tracing TLS encrypted traffic
-
RBel logging - breaks up and parses each request / response received.
This includes decryption of VAU (https://gemspec.gematik.de/docs/gemILF/gemILF_PS_ePA/gemILF_PS_ePA_V4.0.0/#A_24494), ZETA/ASL and encrypted JWT.
Structured data like JSON, XML, JWT, ASN.1, MIME, X.509, LDAP and many more are displayed in a sophisticated HTML report.
See Supported formats for a full list.
See chapter Tiger Proxy for a detailed description and configuration options.
1.1.3. Tiger Test Library
The Tiger test library provides the following core features:
-
Validation - BDD steps to filter requests and validate responses
-
Workflow UI - BDD steps to support tester guidance in test workflows
-
Content assertion - BDD steps to assert JSON / XML data structures
-
Product Integration - Synchronisation with Polarion, Serenity BDD and screenplay pattern
See chapter Tiger Test Library for a detailed description and usage examples.
1.1.4. Working together
The test environment manager instantiates all test nodes configured in the tiger.yaml config file.
It also instantiates one local tiger proxy for the current test suite.
The local tiger proxy instance (and others created in the test environment if using a mesh setup) traces all requests and responses forwarded via this proxy and provides them to the test suite for further validation.
For each server node instantiated, the local tiger proxy adds a route so that the test suite can reach the instantiated server node via HTTP and the configured server hostname.
Each tiger proxy can be configured in a multitude of ways: as a reverse or forward proxy with special routing features and content modifications, or in a mesh setup forwarding traffic to other Tiger Proxies.
The BDD or JUnit test suite can integrate the Tiger test library to validate messages (requests and responses) sent and received over Tiger Proxies using features such as RBelPath, VAU decryption, JSON checker and XML checker.

1.1.5. Tiger extensions
As Tiger evolves, we have implemented a set of extensions that make your job as a tester easier in areas not directly covered by the Tiger core.
The following extensions are currently available:
-
Zion extension provides a customizable zero line mock server
-
Mail extension enables testing of email flows and querying mails in test cases
-
Cloud extension provides the docker, docker compose and helm chart server types for the Tiger test environment manager
-
FHIR validation extension provides BDD steps to perform FHIR schema-based and FHIRPath-based validations
-
CATS extension (gematik internal only) provides BDD steps for configuring and interacting with the Cats Card Terminal Simulator
-
Konnektormanagement extension (gematik internal only) provides BDD steps for administering Konnektors
-
PSSim extension (gematik internal only) provides BDD steps for simulating a primary system
-
Kartenterminal Robot extension (gematik internal only) provides BDD steps for controlling the card terminal robot
See Tiger Extensions for a detailed description of each extension.
2. Getting started
 ROOOARRR!
Ready to rumble!
Tiger is based on Java, Maven and Serenity BDD - check the system requirements and get started.
|
Currently, there are no plans to support Gradle or other build environments. However, if you are using it in your projects, feel free to contact us and we might find a way to support your specific build environment. |
If you do not have time to read the entire documentation, you can jump directly to the Example project section.
2.1. Requirements
-
Open JDK >= 17
-
Maven >= 3.6
When you are developing a testsuite (further), you should use an IDE (we recommend IntelliJ >= 2021.2.3 because of the IntelliJ Cucumber plugin, see IntelliJ section for more detail).
| On Windows you can use Git Bash or Powershell |
2.2. Maven in a nutshell
2.2.1. Using the Tiger Starter Pom
We provide a start pom which makes it faster to bootstrap a new test suite project.
You need to extend the tiger-starter-parent pom in your project, and you get a project with all the tiger dependencies and plugins configured to run tests with maven.
<?xml version="1.0" encoding="UTF-8"?>
<project xmlns="http://maven.apache.org/POM/4.0.0"
         xmlns:xsi="http://www.w3.org/2001/XMLSchema-instance"
         xsi:schemaLocation="http://maven.apache.org/POM/4.0.0 http://maven.apache.org/xsd/maven-4.0.0.xsd">
    <modelVersion>4.0.0</modelVersion>

    <parent>
        <groupId>de.gematik.test</groupId>
        <artifactId>tiger-starter-parent</artifactId>
        <version>${RELEASE_VERSION}</version>
    </parent>

    <artifactId>tiger-demo</artifactId>
    <version>0.0.1-SNAPSHOT</version>
    <packaging>jar</packaging>

</project>
You can execute the tests in this project by running:
mvn verifyThis will run your cucumber feature files using the Tiger Framework and generate serenity html reports.
For quick configuration we have set the following maven properties, which you can override in your project pom:
<tiger.featuresDir>${basedir}/src/test/resources/features</tiger.featuresDir>
<tiger.glues>${project.groupId}</tiger.glues>
More detailed configuration can still be performed directly on the tiger-maven-plugin and maven-failsafe-plugin.
See the following section for details.
We also provide a maven profile which allows you to execute a test suite without the maven failsafe plugin.
With
mvn exec:java -Ptiger-uiyou can start tiger as a java application without the full maven lifecycle.
This profile is pre-configured to start the Workflow UI with the interactive test selector dialog.
This means the tests will not be run automatically on start up and you can select exactly what you want to execute via the tiger ui.
2.2.2. Without the Tiger Start Pom
To use Tiger with your BDD/Cucumber/Serenity based test suite you need to add a few dependencies to integrate with Tiger
-
Current version of Tiger-bom in your dependencyManagement section
-
Tiger test library in your dependencies section
-
or the current version of Tiger test library as test-jar artefact
And to trigger the test suite’s execution, you will need to add these plugins
-
Tiger maven plugin
-
Maven FailSafe plugin
<?xml version="1.0" encoding="UTF-8"?>
<!--
  ~ Copyright 2024 gematik GmbH
  ~
  ~ Licensed under the Apache License, Version 2.0 (the "License");
  ~ you may not use this file except in compliance with the License.
  ~ You may obtain a copy of the License at
  ~
  ~     http://www.apache.org/licenses/LICENSE-2.0
  ~
  ~ Unless required by applicable law or agreed to in writing, software
  ~ distributed under the License is distributed on an "AS IS" BASIS,
  ~ WITHOUT WARRANTIES OR CONDITIONS OF ANY KIND, either express or implied.
  ~ See the License for the specific language governing permissions and
  ~ limitations under the License.
  ~
  -->
<project xmlns="http://maven.apache.org/POM/4.0.0" xmlns:xsi="http://www.w3.org/2001/XMLSchema-instance" xsi:schemaLocation="http://maven.apache.org/POM/4.0.0 http://maven.apache.org/xsd/maven-4.0.0.xsd">
  <modelVersion>4.0.0</modelVersion>

  <groupId>de.gematik.test.tiger.examples</groupId>
  <artifactId>TigerTestBDD</artifactId>
  <version>1.2.0-SNAPSHOT</version>

  <properties>
    <maven.compiler.source>17</maven.compiler.source>
    <maven.compiler.target>17</maven.compiler.target>

    <version.maven.failsafe>3.3.1</version.maven.failsafe>
    <!-- please adapt Tiger version property to the most current one obtained from -->
    <!-- maven central:
          https://mvnrepository.com/artifact/de.gematik.test/tiger-test-lib
          or from gematik internal Nexus
          https://nexus.prod.ccs.gematik.solutions/#browse/search=keyword%3Dtiger-test-lib
        -->
    <version.tiger>4.3.2</version.tiger>
  </properties>

  <dependencyManagement>
    <dependencies>
      <dependency>
        <groupId>de.gematik.test</groupId>
        <artifactId>tiger-bom</artifactId>
        <version>${version.tiger}</version>
        <type>pom</type>
        <scope>import</scope>
      </dependency>
    </dependencies>
  </dependencyManagement>

  <!-- tag::dependencies[] -->
  <dependencies>
    <dependency>
      <groupId>de.gematik.test</groupId>
      <artifactId>tiger-test-lib</artifactId>
    </dependency>
  </dependencies>
  <!-- end::dependencies[] -->

  <build>
    <plugins>
      <!-- tag::generator-plugin[] -->
      <!-- optional plugin to dynamically create JUnit driver classes on the fly.
            You may omit this plugin if you have written your driver classes manually.
            -->
      <plugin>
        <groupId>com.mycila</groupId>
        <artifactId>license-maven-plugin</artifactId>
        <configuration>
          <skip>true</skip>
        </configuration>
      </plugin>
      <plugin>
        <groupId>de.gematik.test</groupId>
        <artifactId>tiger-maven-plugin</artifactId>
        <version>${version.tiger}</version>
        <executions>
          <execution>
            <id>generate-tiger-drivers</id>
            <goals>
              <!-- mandatory -->
              <goal>generate-drivers</goal>
              <!-- optional. This will attach the Tiger-Agent to the VM running the
                            tests. This, in turn, enables tiger to access and store masterSecrets of TLS
                            connections. This can be used to decipher TLS-traffic in wireshark. -->
              <goal>attach-tiger-agent</goal>
            </goals>
            <phase>generate-test-sources</phase>
            <configuration>
              <!-- optional -->
              <glues>
                <glue>de.gematik.test.tiger.glue</glue>
                <!-- add your packages here -->
              </glues>
              <!-- optional -->
              <featuresDir>${project.basedir}/src/test/resources/features</featuresDir>
              <!-- optional -->
              <includes>
                <include>**/*.feature</include>
              </includes>
              <!-- optional -->
              <driverPackage>de.gematik.test.tiger.examples.bdd.drivers</driverPackage>
              <!-- optional -->
              <!--suppress UnresolvedMavenProperty -->
              <driverClassName>Driver${ctr}IT</driverClassName>
              <!-- optional, defaults to the templated located at
                            /src/main/resources/driver4ClassTemplate.jtmpl
                            in the tiger-maven-plugin module.
                            This template will create a junit4 compliant driver class.
                            Use separate template file if you have spring boot apps to test
                            or need to do some more fancy set up stuff.
                            <templateFile>${project.basedir}/..../XXXX.jtmpl</templateFile>
                            -->
              <!-- optional -->
              <skip>false</skip>
            </configuration>
          </execution>
          <execution>
            <id>generate-tiger-report</id>
            <goals>
              <goal>generate-serenity-reports</goal>
            </goals>
            <configuration>
              <!-- optional - directory where serenity reports are created -->
              <reportDirectory>${project.build.directory}/site/serenity</reportDirectory>
              <!-- optional - directory with the .feature files being executed -->
              <requirementsBaseDir>src/test/resources/features</requirementsBaseDir>
              <!--optional - when set to true, the serenity report is automatically open in the default browser -->
              <openSerenityReportInBrowser>false</openSerenityReportInBrowser>
              <!-- optional - A comma separated list of report types to be generated. -->
              <reports>html,single-page-html,json-summary</reports>
            </configuration>
          </execution>
        </executions>
      </plugin>
      <!-- end::generator-plugin[] -->

      <!-- tag::failsafe-plugin[] -->
      <!-- Runs the tests by calling the JUnit driver classes -->
      <!-- To filter features / scenarios use the system property
                 -Dcucumber.filter.tags -->
      <plugin>
        <groupId>org.apache.maven.plugins</groupId>
        <artifactId>maven-failsafe-plugin</artifactId>
        <version>${version.maven.failsafe}</version>
        <configuration>
          <includes>
            <!-- adapt to the class names of your driver classes -->
            <include>**/Driver*IT.java</include>
          </includes>
        </configuration>
        <executions>
          <execution>
            <goals>
              <goal>integration-test</goal>
              <goal>verify</goal>
            </goals>
          </execution>
        </executions>
      </plugin>
      <!-- end::failsafe-plugin[] -->
    </plugins>
  </build>
</project>
For a successful startup you also need a minimum Tiger test environment configuration YAML file in your project root:
# minimum viable test environment specification
# default local Tiger Proxy
tigerProxy:
# no server nodes
servers: {}
and finally a minimal feature file under src/test/resources/features:
Feature: Test Tiger BDD

  Scenario: Dummy Test
    Given TGR set global variable "key01" to "value01"
    When TGR assert variable "key01" matches "v.*\d\d"
With these three files in place you can run the simple dummy test scenario defined in the feature file by issuing
mvn verifyIf you are interested in the plugins Tiger uses, please refer to the section ( Maven Plugin Deep Dive).
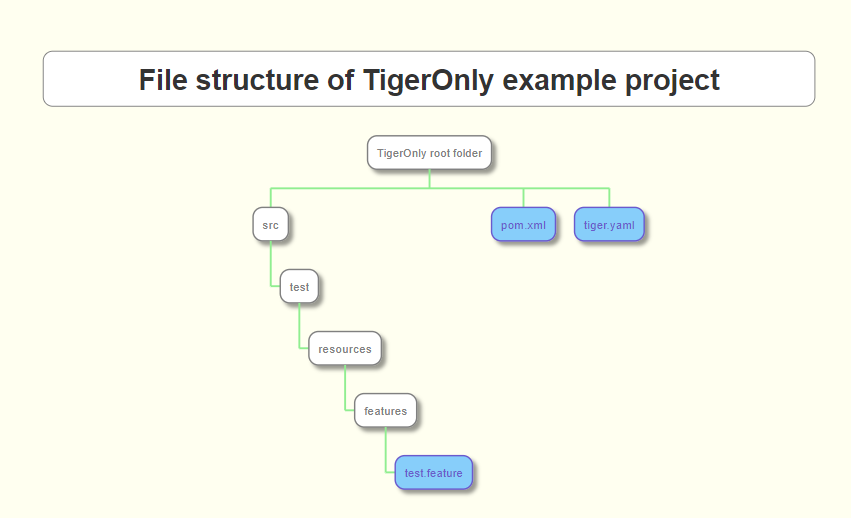
2.3. Example project
In the /doc/examples/tigerOnly folder of this project you will find an example for a minimum configured maven project that
-
embeds Tiger
-
allows to use its Cucumber steps and
-
allows to easily configure your test environment
All you need is to set up three files:
-
a Maven
pom.xmlfile to declare the dependencies and the plugins needed -
a
tiger.yamlto declare your test environment (servers needed, proxy routes,…).
This is currently "empty". -
a
test.featurefile containing a test scenario and dummy test steps to be performed.
3. Tiger Test Environment Manager
As outlined in the overview section, the test environment manager is one of the three core components of the Tiger test framework.
Its main task is to start various test server nodes configured in the tiger.yaml configuration file and initialize the local tiger proxy for the test suite.
3.1. Tiger.yaml files and how they are chosen and loaded
The test environment manager first checks if the environment variable TIGER_TESTENV_CFGFILE is set and tries to load the configuration file from this value.
If the environment variable is not set, it searches for files named tiger.yaml or tiger.yml.
If none of these files exist, it will fail the start-up.
It then loads further YAML files:
-
tiger-${hostname}.yamlandtiger-${hostname}.ymlare read and allow computer-dependent configuration.
The hostname is the name of your own computer in the network (on Windows machines, typically the computer name). -
tiger-${profile}.yamlis read if the system propertyprofileor the environment variablePROFILEis set.
The file must be located in the same folder as thetiger.yamlfile.
Additionally, you can configure a default profile in the Tiger configuration, which will be loaded when none is set via environment variable or system property.
See Tiger test lib configuration for more details.
During the start-up phase it also informs the local tiger proxy about the hostnames each node has configured, so that the local tiger proxy can create appropriate routing entries in its own configuration.
To configure your test environment, you can compose the tiger.yaml file manually.
There is a JSON schema available for your IDE to assist with editing the tiger.yaml: https://json.schemastore.org/gematik-tiger.json.
The nodes configured in the YAML file are started asynchronously unless the dependsUpon property is set.
One optional but powerful server type is canopy, a DNS server that can intercept and dynamically reroute selected hostnames to the Tiger proxy at runtime.
This enables test scenarios to change routing configuration without restarting the environment, making it ideal for multi-scenario testing, chaos injection, and hypothesis testing.
For details on why and how to use Canopy, see the Canopy User Guide.
Before writing your own tiger.yaml configuration files, ensure you are familiar with YAML syntax and structure.
3.2. YAML loading and overriding logic
The Tiger test environment loads configuration from several YAML files, depending on environment variables, hostnames, and profiles.
The order and logic are as follows:
-
If the environment variable
TIGER_TESTENV_CFGFILEis set, this file is loaded first. -
If not,
tiger.yamlortiger.ymlin the working directory is loaded. -
Hostname-specific files (
tiger-${hostname}.yamlor.yml) are loaded next. -
Profile-specific files (
tiger-${profile}.yaml) are loaded if a profile is set via system property or environment variable. -
Additional configuration files can be loaded via the
tiger.additionalConfigurationFileslist in the main config.
For details, see Additional YAML files.
3.3. Server type reference
This section provides a detailed description of all supported server node types with typical configuration examples.
| Type | Description |
|---|---|
|
Starts an executable JAR file via |
|
No server is started. Registers an external URL under a fixed hostname in the local tiger proxy. The test code always uses the fixed hostname, regardless of where the real server is located. |
|
Starts a Docker container from a configured image. Tiger automatically injects the proxy certificate into the container. |
|
Starts multiple services via one or more Docker Compose YAML files. |
|
Starts an additional standalone tiger proxy node to intercept traffic between two components to track, log and validate traffic between any two nodes. |
|
Installs or updates a Helm chart in a local or remote Kubernetes cluster. |
|
Starts a built-in httpbin server with standard HTTP mock endpoints. Useful for quick HTTP step testing without a real backend. |
|
Starts a DNS server that dynamically reroutes selected hostnames to the Tiger proxy. Enables runtime routing changes without environment restart. |
3.3.1. externalJar
Starts any executable JAR archive using java -jar.
The options list is passed directly to the JVM (before -jar), while arguments are passed to the application (after -jar).
java ${options} -jar myApp.jar ${arguments}The working directory is the place where the jar is executed from.
If workingDir is not set or is empty, the jar’s parent directory is used as working directory for local: sources, or the OS temp folder for downloaded JARs.
A non-existent workingDir is created automatically.
Relative paths for both source and workingDir are resolved relative to the project root (the directory from which Maven is executed).
Use the local: prefix to reference a JAR file on the local file system without downloading it.Wildcards (e.g. local:../target/app-*.jar) are supported.
|
Tiger will use the following order to try to find a matching file:
-
The path given in
sourcedirectly (absolute, or resolved from the tiger.yaml location if relative) -
In the working directory, a file whose name matches the filename part of the source (fallback for bare filenames)
-
In the working directory, a file whose name matches a wildcard pattern in the source (eg.
app-*.jar)
By default, Tiger uses the same JVM with which Tiger itself was started.
To use a different JVM set lib.javaHome in tiger.yaml or the environment variable TIGER_LIB_JAVAHOME.
servers:
  myBackend:
    type: externalJar
    hostname: myBackend               # reachable as http://myBackend via tiger proxy
    dependsUpon: myDatabase           # waits until myDatabase is running
    startupTimeoutSec: 60
      # MANDATORY SINGLE ENTRY URL from where to download the Jar archive.
      # If the entry starts with "local:" followed by a file path the jar archive
      # is expected to be available at that location and no download is performed.
      # Only one entry is expected for this node type. Additional entries are silently ignored.
    source:
      - local:target/my-service-1.0.jar
      # alternatively download from a URL:
      # - http://nexus.intern/repo/my-service-1.0.jar

      # MANDATORY URL to check for the successful startup of this node.
      # A successful start is indicated by ANY answer on this URL.
      # Any status is accepted as long as there is an answer.
      # If set to "NONE" no check is performed and
      # the test environment manager will wait for the startup timeout.
    healthcheckUrl: http://127.0.0.1:8080/actuator/health
      # OPTIONAL only declare the server healthy once the specified return code
      # is given
    healthcheckReturnCode: 200
      # OPTIONAL the logs of the externalJar are also written to a file, if no logFile is
      # specified a default name will be used
    logFile: ./target/serverLogs/myBackend.log

    externalJarOptions:
        # OPTIONAL folder from where to start the external jar.
        # If not set, Tiger defaults to the parent directory of the jar file (for local: sources)
        # or the OS temp folder (for downloaded jars).
        # Relative paths are resolved relative to the location of the tiger.yaml file.
        # A non-existent directory is created automatically.
      workingDir: /home/user/test/myspecificjar
      # OPTIONAL Options to pass in to the java executable call.
      options:
        - -Xmx512m
        - -Dhttp.proxyHost=127.0.0.1
        - -Dhttp.proxyPort=${tiger.tigerProxy.proxyPort}
      # OPTIONAL provide additional arguments to the jar archive call.
      arguments:
        - --server.port=8080
        - --spring.profiles.active=test
    environment:
      - DB_URL=jdbc:h2:mem:testdb
      - DB_USER=sa
    exports:
- MY_SERVICE_URL=http://myBackendservers:
simpleService:
type: externalJar
source:
- local:../simple-service/target/simple-service.jar
healthcheckUrl: http://127.0.0.1:9090/health3.3.2. externalUrl
A symbolic node type that does not start any server.
Instead, it instructs the local tiger proxy to route requests for the configured hostname to the given source URL.
This allows the test suite to always address a server by the same fixed hostname (e.g. http://idpServer), while the actual target URL can be changed in the YAML without touching any test code.
The environment,urlMappings and exports properties has no effect on this type.
|
servers:
  idpServer:
    type: externalUrl
    hostname: idpServer               # tests always call http://idpServer
    source:
      - https://idp.prod.example.de   # actual target URL
    healthcheckUrl: https://idp.prod.example.de/.well-known/openid-configuration
    # OPTIONAL only declare the server healthy once the specified return code is given
    healthcheckReturnCode: int
3.3.3. docker
Starts a Docker container from a configured image.
Tiger automatically adds the tiger proxy certificate to the container’s OS trust store.
This can be disabled by setting dockerOptions.proxied: false.
To customize the docker container you may alter the entry point command line.
For containers that should exit after a single command you may enable the oneShot property.
The exposed container port is available as ${PORT:xxxx} (where xxxx is the internal container port) in the exports entries.
You can also copy files to the container by configuring the source and destinations paths of files or folder to be copied.
If there is no health check configured inside the docker image, Tiger will try to guess a healthcheck url by assuming the first exposed port as a get request to localhost to check for a successful startup of the docker container (e.g. http://127.0.0.1:xxxx).
If no port is exposed at all, the startupTimeoutSec property will determine the wait period, after which Tiger assumes the container is up and running.
If you have your local docker environment set up hosting the docker containers on a remote docker hub server, you may set the environment variable TIGER_DOCKER_HOST to allow the health check url determined on runtime to point to the remote host instead of localhost.
| To use this server type the tiger-cloud-extension dependency must be added to the pom. |
servers:
  myDatabase:
    hostname: myDatabase
    type: docker
    startupTimeoutSec: 60
    # MANDATORY URL from where to download the docker image.
    source:
      - dockerhubrepo.somewhere.org/repo/project/postgress.image
    # MANDATORY version of the docker image to download.
    version: "15.3"
    # OPTIONAL - a default name will be used if not specified
    logFile: ./target/serverLogs/myDatabase.log
    dockerOptions:
      # OPTIONAL - adds tiger proxy certificate to the container OS trust store.
      # Default value is true.
      proxied: false                  # no TLS interception needed for DB
      # OPTIONAL - container exits after executing its command.
      # Default value is false.
      oneShot: false
    environment:
      - POSTGRES_USER=testuser
      - POSTGRES_PASSWORD=testpass
      - POSTGRES_DB=testdb
    # ${PORT:xxxx} is replaced with the port exposed by the container on the docker host
    exports:
- DB_PORT=${PORT:5432}servers:
dbMigration:
type: docker
source:
- my-registry.example.de/db-migration:latest
startupTimeoutSec: 120
dockerOptions:
# OPTIONAL - container exits after executing its command.
# Default value is false.
oneShot: true
proxied: false
# OPTIONAL - overrides the entry point configured in the docker image.
# Default value is empty (uses the image's entry point).
entryPoint: /bin/sh -c "/migrate.sh && echo DONE"
# OPTIONAL - list of files or folders to copy into the container before start.
copyFiles:
# path to the file or folder to copy on the local file system
- sourcePath: ./config/migration.conf
# path inside the container where the file should be copied to
destinationPath: /etc/migration/migration.conf
# OPTIONAL - file mode as octal (see https://en.wikipedia.org/wiki/File-system_permissions#Numeric_notation)
fileMode: 06443.3.4. compose
Starts multiple services defined in one or more Docker Compose YAML files.
Files can be referenced by path or loaded from the classpath (e.g. from inside a JAR).
Tiger copies and processes all compose files into target/tiger-testenv-mgr/<serverId>/ before starting them, replacing all Tiger placeholder expressions.
Because of this flattening, compose files must not reference additional external files.
| To use this server type the tiger-cloud-extension dependency must be added to the pom. |
servers:
  myStack:
    type: compose
    startupTimeoutSec: 180
    logFile: ./target/serverLogs/myStack.log
    source:
      - ./docker/my-stack.yml
- ./docker/my-stack-override.ymlservers:
epaStack:
type: compose
startupTimeoutSec: 300
source:
- classpath:/de/gematik/test/tiger/testenvmgr/epa/titus-epa2.yml
- classpath:/de/gematik/test/tiger/testenvmgr/epa/titus-epa2-local.yml3.3.5. tigerProxy
Starts an additional standalone tiger proxy as an embedded Spring Boot application.
This is useful to intercept and log traffic between two components that do not communicate through the local test suite proxy.
The full tiger proxy configuration (routes, modifications, TLS, etc.) can be used inside tigerProxyConfiguration.
See Tiger Proxy basics for the complete reference.
servers:
  sniffer:
    type: tigerProxy
    hostname: sniffer
    dependsUpon: myBackend
    tigerProxyConfiguration:
      adminPort: 9090                 # WebUI at http://localhost:9090/webui
      proxyPort: 3128
      proxiedServer: myBackend        # reverse proxy in front of myBackend
      proxiedServerProtocol: http
      proxyRoutes:
        - from: http://myBackend
to: http://127.0.0.1:8080servers:
forwardProxy:
type: tigerProxy
tigerProxyConfiguration:
proxyPort: 8888
adminPort: 8889
proxyRoutes:
- from: http://legacyHost
to: https://new.backend.example.de
modifications:
- condition: "isRequest"
targetElement: "$.header.Authorization"
replaceWith: "Bearer test-token-fixed"3.3.6. helmChart
Installs or upgrades a Helm chart in a local or remote Kubernetes cluster.
Tiger waits until all configured healthcheckPods are running before declaring the node ready.
Port forwarding is set up via exposedPorts so that the test suite can access the services locally.
| To use this server type the tiger-cloud-extension dependency must be added to the pom. |
servers:
  nginxService:
    type: helmChart
    startupTimeoutSec: 120
    # MANDATORY repository from where to download the docker image
    # if the helm chart is stored on the local file system that the
    # workingDir should be set.
    source:
      - bitnami/nginx
    # OPTIONAL version of the image
    version: "15.0.0"
    helmChartOptions:
      context: my-kube-context        # kubectl context name
      # OPTIONAL if no working directory is set the default . is used.
      # if the helm chart is stored on the local file system the workingDir
      # should be set.
      workingdir:
      # OPTIONAL override the POD_NAMESPACE environment variable if set.
      # if not set, "default" will be used.
      nameSpace: test
      # MANDATORY pod name of the helm chart
      podName: test-nginx
      debug: false
      # OPTIONAL should contain a list of pods for the health check, regex can be used.
      healthcheckPods:
        - test-nginx-.*               # regex of pods that must be running
      # OPTIONAL contains a list that will be used for the port forwarding,
      # if empty no port forwarding is done. The syntax is:
      # <POD_NAME_OR_REGEX>,<LOCAL_PORT>:<FORWARDING_PORT>[,<LOCAL_PORT>:<FORWARDING_PORT>]*
      exposedPorts:
        - test-nginx.*,8080:80        # local:8080 → pod:80
      # OPTIONAL contains a list of regex to identify the pods whose logs
      # should be forwarded to the console and Tiger Workflow UI.
      logPods:
        - test-nginx.*
      # OPTIONAL key-value pairs that will be used for starting the helm chart
      values:
        replicaCount: 1
service.type: ClusterIPservers:
myChart:
type: helmChart
startupTimeoutSec: 180
source:
- ./helm/my-chart
helmChartOptions:
workingDir: ./helm
podName: my-chart-pod
nameSpace: default
healthcheckPods:
- my-chart-pod-.*
exposedPorts:
- my-chart-pod-.*,9000:80803.3.7. httpbin
Starts a httpbin server.
It provides a wide range of ready-to-use HTTP mock endpoints such as /get, /post, /status/{code}, /headers, /delay/{n} and many more.
No external dependency or Docker is required.
This type is ideal for quickly testing HTTP glue code steps without a real backend.
servers:
  httpbin:
    type: httpbin
    serverPort: ${free.port.0}
healthcheckUrl: http://localhost:${free.port.0}/status/200servers:
httpbin:
type: httpbin
hostname: httpbin
serverPort: ${free.port.0}
healthcheckUrl: http://localhost:${free.port.0}/status/200
exports:
- HTTPBIN_URL=http://httpbin
The ${free.port.0} placeholder is automatically resolved to a free port on the local machine at startup.Use ${free.port.1}, ${free.port.2} etc. for additional ports.
|
3.3.8. canopy
Starts a CANOPY DNS server that dynamically intercepts and reroutes selected hostnames to the Tiger proxy.
Instead of static Docker network configurations, CANOPY enables runtime routing changes via REST API or Cucumber steps, so test scenarios can swap routing without restarting the environment.
The server is available as a Docker image (gematik1/tiger-canopy-image:latest).
When used standalone (docker-compose only), no tiger-canopy-extension dependency is required.
For Tiger integration with auto-wiring and DNS injection features, ensure tiger-canopy-extension is on the classpath.
When configured with a unique sibling tigerProxy server, CANOPY auto-wires the proxy URL and enables Dynamic-Route mode (automatic route registration with the proxy).
The DNS address is automatically injected into sibling Docker containers for transparent hostname interception.
Published placeholders (available for use in other server configurations):
- ${<serverId>.baseUrl} — REST API URL (e.g., http://canopy:8080)
- ${<serverId>.dnsAddress} — DNS server address (container-network IP or localhost)
- ${<serverId>.dnsPort} — DNS port (default 53)
- ${<serverId>.containerName} — Container ID/name
For comprehensive documentation, configuration reference, troubleshooting, and examples, see the
Canopy User Guide.
servers:
  myProxy:
    type: tigerProxy
    tigerProxyConfiguration:
      adminPort: 9000
      proxyPort: 9090

  myCanopy:
    type: canopy
    canopy:
      # tigerProxyUrl is auto-wired to ${myProxy.adminUrl}
      # controlMode is auto-set to ROUTE_PER_HOST
      proxiedHosts:
        - { host: api.example.com, matchType: EXACT }
        - { host: example.org,     matchType: SUFFIX }

  testApp:
    type: docker
    docker:
      image: my-app:latest
      exposedPorts: [8080]
# DNS is automatically injected; app resolves api.example.com through Canopyservers:
httpProxy:
type: tigerProxy
tigerProxyConfiguration:
adminPort: 9000
proxyPort: 9090
pop3Proxy:
type: tigerProxy
tigerProxyConfiguration:
adminPort: 9100
proxyPort: 9110
myCanopy:
type: canopy
canopy:
tigerProxyUrl: ${httpProxy.adminUrl} # default proxy
proxiedHosts:
- { host: api.example.com } # → httpProxy
- { host: pop3.example.com,
tigerProxyUrl: ${pop3Proxy.adminUrl} } # → pop3Proxyservers:
myProxy:
type: tigerProxy
tigerProxyConfiguration:
adminPort: 9000
proxyPort: 9090
dnsOnlyCanopy:
type: canopy
canopy:
# DNS-Only Mode: DNS rewriting only, proxy configured separately
controlMode: NONE
tigerProxyUrl: http://my-external-proxy:9090/
proxiedHosts:
- { host: example.com }
dynamicRouteCanopy:
type: canopy
canopy:
# Dynamic-Route Mode: Canopy registers routes with proxy automatically
controlMode: ROUTE_PER_HOST
# tigerProxyUrl auto-wired to ${myProxy.adminUrl} if not set
proxiedHosts:
- { host: api.example.com }3.4. Server type example
Here is a little example of how the server names are set and used and how the server is reachable via the tiger proxy.
servers:
# here the server name is "identityServer" and
# the server is reachable under "identityServer" via the tiger proxy
  identityServer:
    type: externalJar
    # important: the source entry must not contain any spaces.
    source:
      - local:../octopus-identity-service/target/octopus-identity-service-1.0-SNAPSHOT.jar
    healthcheckUrl: http://localhost:${tiger.ports.identity}/status
    externalJarOptions:
      options:
        - -Dhttp.proxyHost=127.0.0.1
        - -Dhttp.proxyPort=${tiger.tigerProxy.proxyPort}
      arguments:
        - --server.port=${tiger.ports.identity}
        - --services.shopping=http://myShoppingServer

  # here the server name is "shoppingServer"
  # but the server is reachable under "myShoppingServer" via the tiger proxy because hostname is set
  shoppingServer:
    hostname: myShoppingServer
    type: externalJar
    source:
      - local:../octopus-shopping-service/target/octopus-shopping-service-1.0-SNAPSHOT.jar
    healthcheckUrl: http://localhost:${tiger.ports.shopping}/inventory/status
    externalJarOptions:
      options:
        - -Dhttp.proxyHost=127.0.0.1
        - -Dhttp.proxyPort=${tiger.tigerProxy.proxyPort}
      arguments:
        - --server.port = ${tiger.ports.shopping}
        - --services.identity=http://identityServer

  testClient:
    type: externalJar
    source:
      - local:../octopus-example-client/target/octopus-example-client-1.0-SNAPSHOT.jar
    healthcheckUrl: http://localhost:${tiger.ports.client}/testdriver/status
    externalJarOptions:
      options:
        - -Dhttp.proxyHost=127.0.0.1
        - -Dhttp.proxyPort=${tiger.tigerProxy.proxyPort}
      arguments:
        - --server.port=${tiger.ports.client}
        # here are the examples how the servers are reachable
        - --services.shopping=http://myShoppingServer
        - --services.identity=http://identityServer
The general properties are followed by the type specific substructures, which configure specific aspects of each node type.
Their meaning and format are explained in the related section.
  # type specific sub structure for external jar, Tiger Proxy, docker and helm chart nodes
  externalJarOptions:
    # used by external jar and Tiger Proxy nodes
    workingDir: string
    # only used by external jar nodes
    options: []
    # used by external jar and Tiger Proxy nodes
    arguments: []
    # flag whether to forward log output from external jar processes to the workflow UI
    activateWorkflowLogs : true
    # flag whether to forward log output from external jar processes to workflow UI and console
    activateLogs: true

  # type specific sub structure for Tiger Proxy nodes
  tigerProxyConfiguration:
    # Here a normal Tiger Proxy configuration can be used.
    # This is explained in more depth down below
    adminPort: int
    proxiedServer: string
    proxiedServerProtocol: [HTTP|HTTPS]
    proxyRoutes:
        # defines a forward-proxy-route from this server
      - from: http://foobar
        # to this server
        to: https://cryptic.backend/server/with/path

  # type specific sub structure for docker container and compose nodes
  dockerOptions:
    # all properties below only used by docker container nodes
    proxied: boolean
    oneShot: boolean
    entryPoint: string
  # type specific sub structure for helm charts
  helmChartOptions:
    # context to install the helm chart to
    context:
    # name for the helm chart
    podName:
    # working directory for local helm and kubectl calls
    workingDir:
    # name space to install the helm chart to
    nameSpace:
    # flag whether to show more detailed infos about
    # the helm chart installation in the console
    debug:
    # list of regex names for pods to be running to signal
    # successful startup of helm chart **/
    healthcheckPods:
    # list of key value pairs to be used by the helm chart
    values:
    # comma separated list of port forwardings
    # Entries can be either "podNameRegex:xxxx", which is shorthand for
    # "podNameRegex:xxxx:xxxx or
    # "podNameRegex:xxxx:yyyy" where xxxx is the local port
    # and yyyy is the port in the pod
    exposedPorts:
    # list of regex for pod names logs should be shown
    logPods:
The configuration of the Tiger Proxy is explained in detail in the section Configuring the local test suite Tiger Proxy
3.4.1. Configuring PKI identities in Tiger Proxy’s tls section
PKI identities can be supplied in a number of ways (JKS, BKS, PKCS1, PKCS8).
In every place a string can be given.
It could be one of
-
"my/file/name.p12;p12password"
-
"p12password;my/file/name.p12"
-
"cert.pem;key.pkcs8"
-
"rsaCert.pem;rsaKey.pkcs1"
-
"key/store.jks;key"
-
"key/store.jks;key1;key2"
-
"key/store.jks;jks;key"
Not supported pathname strings:
-
"D:\\myproject\\key\\store.jks;key"
Supported pathname string on all platforms:
-
"myproject/key/store.jks;key"
Please notice, that double backslashes ("\\") are not supported as file separators, since they are not accepted on all platforms.
Invalid pathname strings will also produce an exception.
Each part can be one of:
-
filename
-
password
-
store-type (accepted are P12, PKCS12, JKS, BKS, PKCS1 and PKCS8)
If you want, you can also describe the components in a map:
tls.forwardMutualTlsIdentity:
  filename: myIdentity.p12
  password: "changeit"
  storeType: P12
In this case both the storeType and the password are not mandatory and would be guessed (the store-type via the file extension and the password via a default-list).
3.4.2. Docker Container node
The docker container node allows to instantiate a local docker container from the configured image.
The exposed port of the docker container is available as a special token in the substitution process of the exports entries (${PORT:xxxx} where xxxx is the port being exposed inside the container).
To customize the docker container you may alter the entry point command line.
Additionally, Tiger will automatically add the Tiger Proxy certificate to the container’s operating system list of trusted certificates.
This modification can be disabled by setting the property dockerOptions.proxied to false.
E.g.:
servers:
  exampleDockerServer:
    type: docker
    dockerOptions:
        proxied: false # default is true
For containers that should exit after a single command you may enable the oneShot property.
You can also copy files to the container by configuring the source and destinations paths of files or folder to be copied.
If there is no health check configured inside the docker image, Tiger will try to guess a healthcheck url by assuming the first exposed port as a get request to localhost to check for a successful startup of the docker container (e.g. http://127.0.0.1:xxxx).
If no port is exposed at all, the startupTimeoutSec property will determine the wait period, after which Tiger assumes the container is up and running.
If you have your local docker environment set up hosting the docker containers on a remote docker hub server, you may set the environment variable TIGER_DOCKER_HOST to allow the health check url determined on runtime to point to the remote host instead of localhost.
| To use this server type you must include the tiger-cloud-extension dependency! |
servers:
    dockerContainer_001:
      hostname: myDockerContainer
      type: docker
      dependsUpon: csv string
      startupTimeoutSec: int

      # MANDATORY URL from where to download the docker image.
      source:
        - dockerhubrepo.somewhere.org/repo/project/docker.image
      # MANDATORY version of the docker image to download.
      version: 0.1.2
      # OPTIONAL the logs of the docker container are also written to a file, if no logFile is
      # specified a default name will be used
      logFile: ./target/serverLogs/dockerContainer_001.log

      dockerOptions:
        # OPTIONAL Flag whether the container shall be modified by
        # o adding the Tiger Proxy certificate to the container operating system.
        # o adding docker.host.internal to the container's /etc/hosts file.
        # Default value is true.
        proxied: true
        # OPTIONAL Flag whether the container is a one shot container or not.
        # One shot meaning it will execute a command and then stop.
        # Default value is false.
        oneShot: false
        # OPTIONAL The entry point command line to be used to start up this container
        # overwriting any configured entry point in the docker image.
        # Default value is empty meaning to use the configured entry point command line.
        entryPoint: chmod a+x /startup.sh && /startup.sh
        # OPTIONAL list of files to be copied to the container
        copyFiles:
          # path to the file or the folder to copy inside the container
          - sourcePath: ./example/path/file_to_copy.txt
          # path inside the container where the file should be copied to
            destinationPath: /path/in/container/file_to_copy.txt
          # OPTIONAL the file mode of the copied file as octal representation (see https://en.wikipedia.org/wiki/File-system_permissions#numericNotation
            fileMode: 0633
          # a complete folder can also be copied instead of a single file
          - sourcePath: ./example/copy_folder
            destinationPath: /path/in/container/copy_folder


      # The following properties are explained in the General properties section above
      environment: []
      urlMappings: []
      exports: []
3.4.3. Docker Compose node
The docker compose node is a very tricky type of node because we use testcontainer library, which is not exactly up to date in terms of docker compose support.
So many of the yaml compose files will need to be modified to work with the testcontainer library.
For now, we support the ePA2 FD module and the DEMIS Meldeportal.
If you want to use your own compose files, please note that Tiger copies and processes your yml files to the target/tiger-testenv-mgr/${serverId} folder, replacing all variable/property expressions (for details check this chapter).
The processing/copying flattens the file hierarchy, thus you must not depend on any additional file resources in your docker compose files.
Each copied compose file will have a random UUID appended to its filename.
| To use this server type you must include the tiger-cloud-extension dependency! |
servers:
  type: compose
  dependsUpon: csv string
  startupTimeoutSec: int
  # OPTIONAL the logs of the docker compose are also written to a file, if no logFile is
  # specified a default name will be used
  logFile: ./target/serverLogs/dockerCompose.log

  # MANDATORY list of yaml files to use to start up the services.
  # The entries can either be file paths or if starts with
  # classpath:....  a reference to a yaml file contained in the class path
  # (it could also be located inside a jar that is in the class path)
  source:
    - classpath:/de/gematik/test/tiger/testenvmgr/epa/titus-epa2.yml
- classpath:/de/gematik/test/tiger/testenvmgr/epa/titus-epa2-local.ymlservers:
demis_001:
type: compose
source:
- classpath:/de/gematik/test/tiger/testenvmgr/demis/demis_localhost.yml
startupTimeoutSec: 1803.4.4. External Jar node
The External Jar node is along with the Docker container node the most important/used node for test environments.
Any Jar archive executable which can be started with the java -jar command can be configured as an external Jar node.
The options list are arguments added immediately after the java executable, while the arguments list is appended after the -jar argument.
The working directory is the place where the jar is executed from.
So if your jar archive expects some configuration files make sure to choose the folder appropriately.
If workingDir is not set, Tiger defaults to the parent directory of the jar file for local: sources, or the OS temp folder for downloaded jars.
Relative paths for both source and workingDir are resolved relative to the location of the main tiger.yaml file.
If using the local: prefix you can also use wildcards to find any matching jar-files.
Tiger will use the following order to try to find a matching file:
-
The path given in
sourcedirectly (absolute, or resolved from the tiger.yaml location if relative) -
In the working directory, a file whose name matches the filename part of the source (fallback for bare filenames)
-
In the working directory, a file whose name matches a wildcard pattern in the source (eg.
app-*.jar)
java ${options} -jar externalJar.jar ${arguments}servers:
externalJar_001:
hostname: mySpecialJar
type: externalJar
dependsUpon: csv string
startupTimeoutSec: int
# MANDATORY SINGLE ENTRY URL from where to download the Jar archive.
# If the entry starts with "local:" followed by a file path the jar archive
# is expected to be available at that location and no download is performed.
# Only one entry is expected for this node type. Additional entries are silently ignored.
source:
- http://myjars.download.org/myproject/myjar.jar
# MANDATORY URL to check for the successful startup of this node.
# A successful start is indicated by ANY answer on this URL.
# Any status is accepted as long as there is an answer.
# If set to "NONE" no check is performed and
# the test environment manager will wait for the startup timeout.
healthcheckUrl: http://127.0.0.1:8080
# OPTIONAL only declare the server healthy once the specified return code
# is given
healthcheckReturnCode: int
# OPTIONAL the logs of the externalJar are also written to a file, if no logFile is
# specified a default name will be used
logFile: ./target/serverLogs/externalJar_001.log
externalJarOptions:
# OPTIONAL folder from where to start the external jar.
# If not set, Tiger defaults to the parent directory of the jar file (for local: sources)
# or the OS temp folder (for downloaded jars).
# Relative paths are resolved relative to the location of the tiger.yaml file.
# A non-existent directory is created automatically.
workingDir: /home/user/test/myspecificjar
# OPTIONAL Options to pass in to the java executable call.
options: []
# OPTIONAL provide additional arguments to the jar archive call.
# Default value is empty.
arguments:
- --testarg1
- -singledasharg2
- --paramarg3=testvalue1
# The following properties are explained in the General properties section above
environment: []
urlMappings: []
exports: []By default, the JVM used to start the JAR-File is the taken from the java.home system property, thus using the same JVM with which Tiger was started.
To change the JVM used you can set the property tiger.lib.javaHome (e.g. by setting -Dtiger.lib.javaHome, by setting TIGER_LIB_JAVAHOME in the environment or by setting lib.javaHome in the tiger.yaml).
3.4.5. External URL node
The symbolic node type that will not start a server instance, but simply allows external services to be used via the configured hostname.
This is achieved by the test environment manager instructing the local Tiger Proxy to provide a route for the symbolic hostname to the external URL of the service.
So, in the following example, the test suite can send HTTP(S) requests to the server "http://myExternalServer" via the local Tiger Proxy, which will be rerouted to the external URL "https://www.medizin.de".
If it is ever necessary to change the external URL, the test suite does not have to be modified, only the routing configuration for the node has to be changed.
Given the nature of this type, the environment section has no effect and is not to be used.
servers:
  externalUrl_001:
      hostname: myExternalServer
      type: externalUrl
      dependsUpon: csv string
      startupTimeoutSec: int

      # MANDATORY URL of the external server
      source:
        - https://www.medizin.de

      # OPTIONAL URL to check for successful startup of this node.
      # A successful start is indicated by ANY answer on this URL.
      # Any status is accepted as long as there is an answer.
      # If the value is not set, then no health check is carried out
      # in the startup phase, instead the startupTimeout is waited for.
      # After this timeout it is assumed that the server is up.
      healthcheckUrl: https://www.medizin.de/healthyState.jsp
      # OPTIONAL only declare the server healthy once the specified return code
      # is given
      healthcheckReturnCode: int
      # OPTIONAL the logs of the externalUrl are also written to a file, if no logFile is
      # specified a default name will be used
      logFile: ./target/serverLogs/externalUrl_001.log

      # The following properties are explained in the General properties section above
      # IGNORE for this type as it has no effect
      environment: []
      urlMappings: []
      exports: []
3.4.6. Helm Chart node
The helm chart node allows to start a helm chart from the configured source (local helm chart file / folder or remote helm chart).
The helm chart is started and the server is ready when all pods are up and running, if port-forward is used (if exposedPorts are set), then port-forwarding is also done and the startup is finished and the service can be used for testing.
| To use this server type you must include the tiger-cloud-extension dependency! |
servers:
  testHelmChart_Nginx:
    type: helmChart
    startupTimeoutSec: 50
    # MANDATORY repository from where to download the docker image
    # if the helm chart is stored on the local file system that the
    # workingDir should be set.
    source:
      - bitnami/nginx
    # OPTIONAL version of the image
    version: 1.1.0
    helmChartOptions:
      # The kubernetes context
      context:
      # OPTIONAL if no working directory is set the default . is used.
      # if the helm chart is stored on the local file system the workingDir
      # should be set.
      workingdir:
      # OPTIONAL prints out debug messages if set to true, default is false.
      debug: true
      # OPTIONAL override the POD_NAMESPACE environment variable if set.
      # if not set, "default" will be used.
      nameSpace: buildslaves
      # MANDATORY pod name of the helm chart
      podName: test-tiger-nginx
      # OPTIONAL key-value pairs that will be used for starting the helm chart
      values:
      # OPTIONAL should contain a list of pods for the health check, regex can be used.
      healthcheckPods:
        - test-tiger-nginx-.*
      # OPTIONAL contains a list of regex to identify the pods whose logs
      # should be forwarded to the console and Tiger Workflow UI.
      logPods:
        - test-tiger-nginx.*
      # OPTIONAL contains a list that will be used for the port forwarding,
      # if empty no port forwarding is done. The syntax is:
      # <POD_NAME_OR_REGEX>,<LOCAL_PORT>:<FORWARDING_PORT>[,<LOCAL_PORT>:<FORWARDING_PORT>]*
      exposedPorts:
        - test-tiger-nginx.*,8080:80
3.4.7. Tiger Proxy node
The most complex and versatile node type.
The Tiger Proxy will be started as an embedded spring boot application.
This way the start-up time can be minimized, and it is always guaranteed to start the current version.
servers:
    tigerProxy_001:
      hostname: myTigerProxy
      type: tigerProxy
      dependsUpon: csv string
      startupTimeoutSec: int

      tigerProxyConfiguration:
        # OPTIONAL port of the web user interface and the proxy management
        # (e.g. rbel-message forwarding)
        # Default value is empty, which means a random port will be used.
        # The chosen port is stored with the key tiger.internal.localproxy.admin.port in
        # the TigerGlobalConfiguration
        adminPort: 8080
        # OPTIONAL server name of the node this proxy shall be used as reverse proxy for.
        # If set the routes will be configured appropriately.
        # Default value is empty.
        proxiedServer: externalJar_001
        # OPTIONAL port of the proxy, where the proxy expects to receive proxy requests
        # Default value is empty, which means a random port will be used.
        proxyPort: 3128
        # OPTIONAL protocol the proxy is expecting requests in. One of [http|https]
        # Default value is http
        proxiedServerProtocol: http
        # configures the proxy itself. For more details
        # please check the chapter about the local test suite Tiger Proxy below
        ...
        proxyRoutes:
          - from: http://foobar
            # defines a forward-proxy-route from this server...
            to: https://cryptic.backend/server/with/path
            # to this server
        ...

      # The following properties are explained in the General properties section above
      environment: []
      urlMappings: []
      exports: []
The configuration of the Tiger Proxy is explained in detail in the section Configuring the local test suite Tiger Proxy
3.4.8. httpbin node
The httpbin simply starts a httpbin server.
This provides several endpoints against which you can perform all kinds of http requests.
The server port on which the server starts can be configured.
httpbin:
    type: httpbin
    serverPort: ${free.port.0}
    healthcheckUrl: http://localhost:${free.port.0}/status/200
3.5. Provided node templates
Besides these basic nodes we also support tailored templates for nodes like IDP, ePA, ERp and DEMIS.
This should allow you to bring up project specific test environments very fast.
All currently supported templates can be found in the tiger-testenv-mgr modul in the yaml file at /src/main/resources/de/gematik/test/tiger/testenvmgr/templates.yaml
To use such a template, just use the template attribute:
myPersonalTestIDPInTheRU:
  template: idp-rise-ru
or if you want to have an environment with a local reference implementation of the ERezept Fachdienst
myLocalTestIDP:
  template: idp-ref
  hostname: idp

myLocalTestERp:
  template: erzpt-fd-ref
  dependsUpon: myLocalTestIDP
3.5.1. Local IDP reference nodes
This template provides the reference implementation of the IDP server as a local docker container.
The docker image is loaded from a gematik internal docker registry server.
The system property IDP_SERVER is set to the URL of the Discovery Document end point and is available for all subsequently initiated test environment nodes.
3.5.2. External IDP RISE instance nodes
The idp-rise-ru template provides the RU instance of RISE’s IDP server as an "external URL".
The system properties IDP_SERVER and GEMATIK_TESTCONFIG are set to the URL of the Discovery Document end point and a config-file for the IDP test suite respectively.
They are available for all subsequently initiated test environment nodes.
The idp-rise-tu template provides the TU instance accordingly.
3.5.3. Local ERp reference nodes
This template provides the reference implementation of the eRezept server as a local docker container.
The docker image is loaded from a gematik internal docker registry server.
Make sure that an IDP server node is instantiated before the ERp FD is started and that it is available under http://idp or adapt the environment variable configuration.
A large list of environment variables is set.
But don’t worry, it is just the server that uses them.
3.5.4. Local ePA2 reference nodes
This template provides the gematik reference Aktensystem simulation as docker compose.
3.5.5. Local PSSim node
This template provides a Primärsystem simulation (as a jar), usable for ePA.
See https://wiki.gematik.de/display/PTP/epa-ps for more information.
3.5.6. Local KonSim node
This template provides a Konnektor simulation (as external jar).
See https://wiki.gematik.de/display/PTP/KonSim for more information.
3.6. Configuring the local test suite Tiger Proxy
The local Tiger Proxy for the test suite can be configured by using the following section(s) in the tiger.yaml file.
For more information about what the Tiger Proxy is and how it works see the chapter Tiger Proxy basics
# Flag whether to activate the local Tiger Proxy. The local tiger proxy field will be null if this property is set to false
# Default value is true
localProxyActive: true

# Specifiy additional yaml-files to read in during startup
additionalConfigurationFiles:
  -
    # the path to the file to read
    filename: specialEnvironment.yaml
    # the key to which to map the given file. "tiger" is the base-key for the tiger.yaml-file
    baseKey: tiger

# the block where all the Tiger Proxy configuration properties are located
tigerProxy:
  # the port which will be used for administration (webUI, mesh-Setup,...)
  adminPort: 7777
  # port which will be used to proxy requests
  proxyPort: 6666
  additionalProxyPorts:
    - 5555 # additional port which will be used for proxying
  # logLevel of the proxy-server. DEBUG and TRACE will print traffic, so use with care!
  proxyLogLevel: TRACE
  # section to configure whether and where the proxy should dump a tiger traffic file on shutdown
  fileSaveInfo:
    # should the traffic be logged to a file?
    writeToFile: true
    # configure the file name
    filename: "foobar.tgr"
    # default false, removes any potentially existing saved tgr traffic file on startup.
    clearFileOnBoot: true
    # read traffic from a file at startup
    sourceFile: "sourceFile.tgr"
    # filter messages read from file (JEXL expression).
    # Only message for which this expression is true will be loaded.
    readFilter: "message.statusCode == '200'"

  # a list of routing entries the proxy should apply to traffic
  proxyRoutes:
      # defines a forward-proxy-route from this server...
    - from: http://foobar
      # to this server
      to: https://cryptic.backend/server/with/path
      # reverse proxy-route. http://<tiger-proxy>/blub will be forwarded
    - from: "/blub"
      to: "https://another.de/server"
      # the traffic for this route will NOT be logged (default is false)
      disableRbelLogging: true
      hosts:
        - "www.google.com"
        - "www.bing.com"
      # For reverse proxy-routes this allows to differentiate requests based on the host-header. This is useful when the DNS-resolvement of the client can be influenced, but not the ports used.

  # a list of modifications that will be applied to every proxied request and response
  modifications:
    # a condition that needs to be fulfilled for the modification to be applied
    # (uses JEXL grammar)
  - condition: "isRequest"
    # which element should be targeted?
    targetElement: "$.header.user-agent"
    # the replacement string to be filled in.
    # This modification will replace the entire "user-agent" in all requests
    replaceWith: "modified user-agent"

  - condition: "isResponse && $.responseCode == 200"
    targetElement: "$.body"
    # The name of this modification.
    # This can be used to identify, alter or remove this modification.
    # The name is optional, but if it is used, it has to be unique.
    name: "body replacement modification"
    # This will replace the body of every 200 response completely with the given json-string
    # (This ignores the existing body. For example this could be an XML-body.
    # Content-Type-headers will NOT be set accordingly).
    replaceWith: "{\"another\":{\"node\":{\"path\":\"correctValue\"}}}"
  - targetElement: "$.body"
    # The given regex will be used to target only parts of targeted element.
    regexFilter: "ErrorSeverityType:((Error)|(Warning))"
    # This modification has no condition,
    # so it will be applied to every request and every response
    replaceWith: "ErrorSeverityType:Error"

  # can be used if the target-server (to) is behind another proxy
  forwardToProxy:
    hostname: 192.168.110.10
    port: 3128
    type: HTTP
    noProxyHosts:
      - "localhost"
  # The Tiger Proxy will route google.com to google.com even if no route is set.
  # The traffic routed via this "forwardAll"-routing will be logged by default
  # (meaning it will show up in the Rbel-Logs and be forwarded to tracing-clients)
  # This can be deactivated by setting this flag to false
  activateForwardAllLogging: true
  # Limits the rbel-Buffer to approximately this size.
  # Note: When Rbel debugging is activated the size WILL vastly exceed this limit!
  rbelBufferSizeInMb: 1024
  # If set to false disables traffic-analysis by Rbel.
  # Deactivating will not impede proxy-forwarding nor
  # the traffic-endpoints.
  activateRbelParsing: true
  # While parsing the Tiger Proxy can block the communication from completing.
  # The end answer from the Tiger Proxy is only transmitted when parsing is completed
  # (and the message pair can be seen in the log). When 'false' the parsing is done
  # asynchronous.
  # Default is true ONLY for the local Tiger Proxy, otherwise default is false!!
  parsingShouldBlockCommunication: false
  # This will share the WebUI-Resources (various CSS-files) from the Tiger Proxy
  # locally, thus enabling usage when no internet connection exists
  localResources: true
  # When active the host-headers are rewritten even for a reverse-proxy-route
  rewriteHostHeader: true
  # This option can be used to deactivate TLS-Termination. Only deactivate this in
  # conjunction with a directReverseProxy
  activateTlsTermination: true

  tls:
    # Can be used to define a CA-Identity to be used with TLS. The Tiger Proxy will
    # generate an identity when queried by a client that matches the configured route.
    # If the client then in turn trusts the CA this solution will provide you with a seamless
    # TLS experience. It however requires access to the private-key of a trusted CA.
    serverRootCa: "certificate.pem;privateKey.pem;PKCS8"
    # Alternative solution: now all incoming TLS-traffic will be handled using this identity.
    # This might be easier but requires a certificate
    # which is valid for the configured routes
    serverIdentity: "certificateAndKeyAndChain.p12;Password"
    # Defines which SSL-Suites are allowed. This will delete all default-suites and only add the one
    # defined here. This configures the server-side of the proxy. Available values can be found here:
    # https://docs.oracle.com/javase/7/docs/technotes/guides/security/SunProviders.html
    serverSslSuites:
      - "TLS_ECDHE_RSA_WITH_AES_256_CBC_SHA"
    # This configures the SSL-Suites for the client-side. Available values can be found here:
    # https://docs.oracle.com/javase/7/docs/technotes/guides/security/SunProviders.html
    clientSslSuites:
      - "TLS_ECDHE_RSA_WITH_AES_256_CBC_SHA"
    # Define which TLS protocols the server will allow/use. Available values can be found here:
    # https://docs.oracle.com/javase/7/docs/technotes/guides/security/SunProviders.html
    clientSupportedGroups:
      - "brainpoolP256r1"
      - "brainpoolP384r1"
      - "prime256v1"
      - "secp384r1"
    # Define the groups to be offered in the "client hello" message. More information can be found here:
    # https://datatracker.ietf.org/doc/html/rfc8446#section-4.2.7
    serverTlsProtocols:
      - "TLSv1.2"

    # This identity will be used as a client-identity for mutual-TLS when forwarding to
    # other servers. The information string can be
    # "my/file/name.p12;p12password" or
    # "p12password;my/file/name.p12" or
    # "cert.pem;key.pkcs8" or
    # "rsaCert.pem;rsaKey.pkcs1" or
    # "key/store.jks;key" or
    # "key/store.jks;key1;key2" or
    # "key/store.jks;jks;key"
    #
    # Each part can be one of:
    # * filename
    # * password
    # * store-type (accepted are P12, PKCS12, JKS, BKS, PKCS1 and PKCS8)
    forwardMutualTlsIdentity: "directory/where/another/identityResides.jks;changeit;JKS"
    # domain which will be used as the server address in the TLS-certificate
    domainName: deep.url.of.server.de
    # Alternate names to be added to the TLS-certificate
    # (localhost and 127.0.0.1 are added by default)
    alternativeNames:
      - localhost
      - 63.54.54.43
      - foo.bar.server.com
    # the file into which the master-secrets are written. For this to work
    # the tiger-java-agent has to be attached to the JVM
    # (eg. -javaagent:tiger-java-agent-3.1.4.jar). This can be done by
    # executing the goal 'attach-tiger-agent' to the tiger-maven-plugin.
    masterSecretsFile: "masterSecretsFile.txt"

  # the given folders are loaded into RBel for analysis. This is only necessary to decrypt
  # traffic when analyzing it. It has no effect on the proxy-functions themselves.
  keyFolders:
  - .

  # Filter out any messages larger from parsing (saving performance)
  skipParsingWhenMessageLargerThanKb: 8000
  # Filter out any messages (or message parts) from displaying
  skipDisplayWhenMessageLargerThanKb: 512

  # A list of upstream Tiger Proxies. This proxy will try to connect to all given sources to
  # gather traffic via the STOMP-protocol. If any of the given endpoints are not accessible
  # the server will not boot. (fail fast, fail early)
  trafficEndpoints:
    - http://another.tiger.proxy:<proxyPort>
  trafficEndpointConfiguration:
    # the name for the traffic Endpoint. can be any string, which will be
    # displayed at /tracingpoints
    name: "tigerProxy Tracing Point"
3.7. Standalone mode vs. implicit startup with test suite
If your test environment is very "expensive" to start or if you are developing your test suite scenarios, thus starting many test runs in a short time, you might want to keep your test environment running and not shut it down after each run.
To do so, you can simply use the tiger maven plugin to start your test environment in standalone mode.
First prepare a standalone test environment configuration file (call it for example tiger-standalone.yaml) containing all the server nodes needed and with a deactivated the local tiger proxy section.
Now set the env var TIGER_TESTENV_CFGFILE or the Java system property tiger.testenv.cfgfile to point to this file.
If you start the test environment manager standalone, it will keep the nodes running until you enter quit into the console or kill the process with Ctrl + C or the operating equivalent commando to the UNIX command kill ${PROCESS_ID}.
In the latter case it is not guaranteed that all processes are cleanly shut down.
Please check your process list with operating system-specific tools.
export TIGER_TESTENV_CFGFILE=....../tiger-standalone.yaml
mvn tiger:setup-testenv
In case you also need cloud extension server types (docker, helmchart) make sure to add the Tiger cloud extensions as dependency to the plugin block.
Now before starting your test suite scenarios you need to
-
disable / remove the test nodes in your default
tiger.yaml(either by setting the property active to false or remove the server node entry completely).
If you forget to do this, two nodes will be instantiated (one from the standalone test environment manager and the second during test run from the test environment manager started via the test suite hooks). -
and add routes for each node to the local tiger proxy.
If you forget to do this, your test suite will not be able to access the test nodes under their configured hostname as this configuration is only known to the standalone test environment manager and NOT to the local tiger proxy started by the test suite hooks.
The best practice is to have three test environment configuration files:
-
tiger-standalone.yaml to enable a persistent test environment during the development of test suite scenarios
-
tiger-nonodes.yaml for the test suite that will instantiate no nodes but only configure the routes to the nodes from the standalone test environment manager
-
tiger.yamla complete configuration that can be used in CI or after the test suite development is completed.
The first and the latter most of the time are identical besides the root level flag localProxyActive.
So you may skip the first and just use it with two different values being set.
3.8. Using Environment variables and system properties
In many configuration values (e.g. exports, environment, source, etc.), placeholders like ${PORT:xxxx} or ${NAME} can be used.
These are replaced at runtime with the actual values (e.g. the exposed port of a Docker container or the hostname of a node).
4. Tiger Proxy
4.1. Introduction: What are proxies, reverse and forward proxies?
There are many different types of proxies.
Here, we only discuss HTTP and HTTPS proxies.
4.1.1. Forward proxies
Forward proxies work like a relay station: you send a packet to your destination via the proxy.
The proxy receives the packet, reads the address, and can forward it to wherever it sees fit.
To use a forward proxy, the sender must be aware of it and send the packet accordingly.
This allows the creation of virtual domains, which is used extensively in Tiger.
Lastly a forward proxy acts as a man-in-the-middle, enabling the penetration of TLS-traffic.
We also use this, but we will explain it in more depth later.
4.1.2. Reverse proxies
Reverse proxies also receive traffic and may reroute it at their own discretion.
Unlike a forward proxy, a reverse proxy is invisible to the sender.
Reverse proxies act like normal servers and are addressed as such.
They then forward the received packet to its actual destination and return the answer to the original caller.
The reverse proxy can also read the complete traffic.
The eventual destination is opaque to the original caller.
This also enables path rewriting (for example, a GET to http://reverse.proxy.de/my/deep/url might be mapped to http://gematik.de/deep/url, eliminating the /my prefix).
A reverse proxy also terminates HTTPS, always.
This is less of a problem with a reverse proxy since it is technically not a man-in-the-middle attack, as the traffic is addressed directly to the reverse proxy.
4.2. Tiger Proxy basics
The Tiger Proxy is a proxy server that can be deployed in three distinct modes:
-
Local Tiger Proxy — automatically started by the Test Environment Manager (TestenvMgr) as part of every Tiger test suite.
It is the central traffic recording point for the test suite. -
Remote Tiger Proxy (
type: tigerProxyin theserversblock) — an additional proxy instance started and managed by the TestenvMgr alongside other servers.
It is useful to intercept traffic between two components that do not communicate through the local test suite proxy. -
Standalone Tiger Proxy — a self-contained Spring Boot JAR or Docker image that runs independently of any test suite.
It is the recommended choice for permanently running traffic recorders, sidecar containers, or mesh-setup nodes.
See Tiger Standalone Proxy for details.
4.2.1. Configuration structure by deployment mode
The configuration structure differs depending on the deployment mode.
Local Tiger Proxy and Standalone Tiger Proxy share the same flat structure — all properties are placed directly under the tigerProxy key:
tigerProxy:
  adminPort: 9090
  proxyPort: 3128
  # and so on
Remote Tiger Proxy (declared as a server of type: tigerProxy) places its proxy-specific properties under tigerProxyConfiguration inside the server entry:
servers:
  myProxy:
    type: tigerProxy
    tigerProxyConfiguration:
      adminPort: 9090
      proxyPort: 3128
      # and so on
All three deployment modes expose the same two ports: a proxy port for HTTP/HTTPS traffic, and an admin port providing the Tiger Proxy Web UI (described in detail here), a REST interface to manage routes and modifications at runtime, and a WebSocket/STOMP interface to stream RBel messages to other Tiger Proxy instances.
The following example shows a complete Tiger Proxy configuration with all available properties.
When used as a local or standalone proxy the properties are placed directly under tigerProxy (without an additional tigerProxyConfiguration nesting).
When used as a remote proxy server they are placed under servers.<name>.tigerProxyConfiguration.
The individual attributes are described in detail in the subsections below.
servers:
  myTigerProxy:
    # ----General-------------------------------------------------
    name: "my-tiger-proxy"              # OPTIONAL display name for this proxy instance
    tigerProxyConfiguration:
      adminPort: 9090                   # port for the admin UI and REST interface
      proxyPort: 3128                   # port for proxying HTTP/HTTPS traffic
      additionalProxyPorts:             # OPTIONAL additional proxy ports
        - 3129
      proxyLogLevel: WARN               # log level: TRACE, DEBUG, INFO, WARN, ERROR
      localResources: true              # serve UI resources locally (no internet needed)

      # ----Routes--------------------------------------------------
      proxyRoutes:
        - from: http://my.domain/       # forward-proxy route (absolute URL)
          to: http://backend.example.de/
          hosts:                        # OPTIONAL: match specific Host headers
            - "www.google.com"
          criterions:                   # OPTIONAL: JEXL conditions for route matching
            - "$.header.foo == 'bar'"
          disableRbelLogging: false     # set to true to skip RBel parsing for this route
          authentication:               # OPTIONAL: add authentication to forwarded requests
            username: "user"
            password: "pass"
            # bearerToken: "mytoken"    # alternatively use Bearer Token
          matchForProxyType: true       # match only the proxy-mode suggested by "from"
          preserveHostHeader: false     # set to true to keep the original Host header

      # ----TLS-----------------------------------------------------
      tls:
        domainName: "my.backend.example.de"
        serverRootCa: "certificate.pem;privateKey.pem;PKCS8"     # custom CA for cert generation
        serverIdentity: "myIdentity.p12;changeit"                # fixed server identity
        allowGenericFallbackIdentity: false
        serverIdentities:                                        # multiple server identities
          - "identity1.p12;00"
          - "identity2.p12;changeit"
        ocspSignerIdentity: "myOcspSigner.p12;Password"
        masterSecretsFile: "masterSecrets.txt"
        forwardMutualTlsIdentity: "clientIdentity.jks;changeit;JKS"  # mTLS client identity
        alternativeNames:
          - "localhost"
          - "127.0.0.1"
        serverSslSuites:                                       # restrict allowed TLS cipher suites on the server side (replaces defaults)
          - "TLS_ECDHE_RSA_WITH_AES_256_CBC_SHA"
        clientSslSuites:                                       # restrict allowed TLS cipher suites on the client side (when proxy connects to upstream)
          - "TLS_ECDHE_RSA_WITH_AES_256_CBC_SHA"
        serverTlsProtocols:                                    # allowed TLS protocol versions for the server side
          - "TLSv1.2"
        clientSupportedGroups:                                 # ECDH groups to offer in the TLS ClientHello (e.g. brainpool curves)
          - "brainpoolP256r1"

      # ----Modifications-------------------------------------------
      modifications:
        - condition: "isRequest"
          targetElement: "$.header.user-agent"
          replaceWith: "Tiger-Proxy"
        - condition: "isResponse && $.responseCode == 200"
          targetElement: "$.body"
          name: "body-replacement"
          replaceWith: "{\"status\":\"ok\"}"

      # ----Traffic file save/load----------------------------------
      enableLegacyTraffic: false          # enables support for legacy traffic formats, this is useful when integrating with older tiger proxy instances, default is false
        writeToFile: false                # true = dump all traffic to a .tgr file on shutdown
        filename: "tiger-proxy.tgr"       # name of the file to write traffic to
        name: "tigerProxy Tracing Point"  # display name shown
        sourceFile: ""                    # OPTIONAL path to a .tgr file to load traffic from at startup
        readFilter: ""                    # JEXL filter; only messages matching this expression are loaded from source file

      # ----Mesh setup (traffic endpoints)--------------------------
      trafficEndpoints:
        - http://another.tiger.proxy:9090
      skipTrafficEndpointsSubscription: false
      failOnOfflineTrafficEndpoints: false
      requireHealthyTrafficEndpoints: false
      downloadInitialTrafficFromEndpoints: false
      enableLegacyTraffic: false          # enables support for legacy traffic formats, this is useful when integrating with older tiger proxy instances, default is false
      trafficEndpointFilterString: ""
      trafficEndpointConfiguration:
        name: "TigerProxy Tracing Point"  # display name shown
        wsEndpoint: "/tracing"            # WebSocket endpoint path used for STOMP connections
        stompTopic: "/traces"             # STOMP topic to subscribe to for receiving traffic

      # ----Forward proxy (if the target is behind another proxy)---
      forwardToProxy:
        hostname: 192.168.1.10            # hostname/IP of the upstream forward proxy
        port: 3128                        # port of the upstream forward proxy
        type: HTTP                        # HTTP or HTTPS, default is HTTP
        username: "proxyuser"             # OPTIONAL credentials for the upstream proxy
        password: "proxypass"
        noProxyHosts:                     # list of hosts that should bypass the upstream proxy
          - "localhost"
          - "127.0.0.1"

      # ----Direct reverse proxy for non-HTTP traffic---------------
      directReverseProxy:
        hostname: 127.0.0.1               # target hostname to forward TCP traffic to
        port: 3858                        # target port
        ignoreConnectionErrors: false     # true = suppress connection error logs
        tcpIdleTimeoutInSeconds: 5.0        # OPTIONAL TCP keep-alive timeout in seconds (default: 5), null = disabled
        modifierPlugins: []               # OPTIONAL plugin classes to modify traffic on the TCP layer before forwarding

      # ----Notes on messages---------------------------------------
      notes:
        - message: "This is a note"
          jexlCriterion: "isRequest && path == '$.method'"

      logConnectMessages: false   # if set to true, the tiger proxy will log HTTP CONNECT messages (used for tunneling HTTPS through a forward proxy), default is false
      # Folders containing keys (e.g. PEM, P12) loaded into RBel for decrypting traffic during analysis
      keyFolders:
        - "."

      # ----RBel parsing--------------------------------------------
      activateRbelParsing: true
      activateRbelParsingFor:
        - epa-vau
        - X509
      activateForwardAllLogging: true
      activateTlsTermination: true
      parsingShouldBlockCommunication: false
      activateTrafficLogging: true
      logConnectMessages: false   # if set to true, the tiger proxy will log HTTP CONNECT messages (used for tunneling HTTPS through a forward proxy), default is false

      # ----Buffer sizes--------------------------------------------
      rbelBufferSizeInMb: 1024
      stompClientBufferSizeInMb: 1
      perMessageBufferSizeInMb: 100
      skipParsingWhenMessageLargerThanKb: 8000
      skipDisplayWhenMessageLargerThanKb: 512

      # ----Timeouts------------------------------------------------
      connectionTimeoutInSeconds: 10            # Timeout for establishing connections (default: 10)
      maximumPartialMessageAgeInSeconds: 300    # Maximum age of incomplete/partial messages before they are discarded (default: 300)
      waitForPreviousMessageBeforeParsingInSeconds: 5.0
      previousMessageTimeoutDetectionGracePeriodInSeconds: 10.0
      previousMessageTimeoutDetectionTimeGapThresholdInSeconds: 30.0
      previousMessageTimeoutDetectionRecentConnectionThresholdInMinutes: 5.0

      # ----Display-------------------------------------------------
      maximumDefaultExpandedMessageDepth: 3

      # ----Header rewriting----------------------------------------
      rewriteHostHeader: false
      rewriteLocationHeader: true
      honorHostHeaderRouting: false
      # ----Traffic download pagination-----------------------------
      maximumTrafficDownloadPageSize: 100000    # Maximum number of messages per download (default: 100000)
4.3. Understanding routes
Routes are the fundamental mechanic of how the Tiger Proxy handles traffic.
They can be for a forward- or reverse-proxy.
A route has the following properties:
4.3.1. from
From where should the traffic be collected?
This can either be an absolute URL (e.g. http://foobar), which defines a forward-proxy route, or relative (e.g. /foo), defining a reverse-proxy-route.
Please note: You can freely add parts (e.g. http://foobar/extra/part) to further specify the mapping.
You can add multiple routes that match the same URL.
If multiple matches are found, the most specific route is selected.
For example, if you have two routes / and /foo then for a request to /foo/bar the route /foo will be selected.
A route will only match when the proxy-mode is met.
A reverse-proxy-route will thus not match when a forward-proxy request is received.
To disable this proxy-mode matching, you can set the flag matchForProxyType to false (default is true).
4.3.2. to
The target of the mapping.
This has to be an absolute URL.
The tiger proxy will, upon receiving a request to this mapping, execute a matching request to the defined host.
An example.
Consider the following route:
tigerProxy:
  tigerProxyConfiguration:
    proxyRoutes:
      - from: http://my.domain/
        to: http://orf.at/
The http:// in the from property indicates that we have a forward-proxy route defined.
So when we execute: (assuming the tiger proxy is started locally under the port 1234)
curl -x http://localhost:1234 http://my.domain/newsThe result will match the following curl
curl http://orf.at/newsAdditional headers are kept and just patched through.
The same goes for the body and the HTTP-Method.
Added parts of the from-URL are stripped when forwarding.
Meaning: If you have a mapping
tigerProxy:
  tigerProxyConfiguration:
    proxyRoutes:
      - from: http://my.domain/deep/
        to: http://orf.at/blub/
and you execute GET http://my.domain/deep/deeper, you will get the result of GET http://orf.at/blub/deeper (the /deep in between has been eliminated along with my.domain).
4.3.3. Trailing Slashes
Trailing slashes in routes may be significant for the server.
Thus, the handling of the tiger proxy is important.
To achieve a consistent behavior while maintaining ease of use, the following rules apply:
-
If the request is longer than the from-path of the route (eg. if
fromis/fooand the request is/foo/bar, then/baris the deep-path), the trailing slash behavior from the request is taken.
This only is the case for more path-fragments (/foo/bar), and not simply a longer string (/foobar), as this would not be matched to the route. -
If the to-URL has a trailing slash, the request is forwarded with a trailing slash.
-
Finally, if the request ends with a slash and the from-URL does NOT end with one, a trailing slash is added.
(The logic being the slash in the from-URL expresses an anticipated slash.
Thus, a slash being present in the request is simply "expected".)
This leads to the following examples:
| from | to | request | forwarded to |
|---|---|---|---|
"/webapp/" |
"/api/" |
"/webapp" |
"/api/" |
"/webapp/" |
"/api" |
"/webapp" |
"/api" |
"/webapp/" |
"/api/" |
"/webapp/" |
"/api/" |
"/webapp/" |
"/api" |
"/webapp/" |
"/api" |
"/webapp" |
"/api/" |
"/webapp" |
"/api/" |
"/webapp" |
"/api" |
"/webapp" |
"/api" |
"/webapp" |
"/api/" |
"/webapp/" |
"/api/" |
"/webapp" |
"/api" |
"/webapp/" |
"/api/" |
"/webapp<irrelevant>" |
"/api<irrelevant>" |
"/webapp/foo" |
"/api/foo" |
4.3.4. Multiple targets
Sometimes you can only at runtime know which target to use.
This can be achieved by using the to-property as a list of targets:
tigerProxy:
  tigerProxyConfiguration:
    proxyRoutes:
    -
      from: /
      to:
        - http://orf.at/blub/
        - http://ard.de/bla/
When booting the tiger proxy, the proxy tries to reach the target host by sending a HEAD-request to the host (dropping the path).
If the server sends a valid HTTP (or HTTPS) response, the target is considered reachable and the route is used.
If no target can be reached, an exception is thrown.
The return code is ignored.
You can deactivate the rbel-Logging on a per-Route basis.
Rbel is a versatile and powerful tool, but the analysis of individual messages consumes a lot of both CPU and memory.
Deactivating it for routes in which it is unnecessary is therefore a good idea.
4.3.5. hosts
In some instances you might be pressed to "hosts" multiple servers on one tiger proxy.
This can happen when you can influence DNS-Resolvement, but neither the path nor the port used.
In this case you can use the hosts-property to define which hosts should be routed to which target.
tigerProxy:
  tigerProxyConfiguration:
    proxyRoutes:
      hosts:
        - "www.google.com"
        - ".*.bing.com"
The entries are matched first as a total match, failing that as regular expressions.
If you want to add ports, you are free to do so: "myHost:80".
This, however, will require that the ports on all entries in this specific list are given (this does not apply to other routes).
4.3.6. criterions
As an additional measure for a more fine-grained matching, you can use criteria.
These are JEXL expressions that have to be fulfilled for the route to be used.
This can be leveraged to make the routing decision dependent on the content of the message.
tigerProxy:
  tigerProxyConfiguration:
    proxyRoutes:
      - from: /
        to: http://orf.at/blub/
        criterions:
          - $.header.foo == 'bar'
This will only forward messages where the header contains a key "foo" with the value "bar".
4.3.7. disableRbelLogging
You can deactivate the rbel-Logging on a per-Route basis.
Rbel is a versatile and powerful tool, but the analysis of individual messages consumes a lot of both CPU and memory.
Deactivating it for routes in which it is unnecessary is therefore a good idea.
4.3.8. authentication
You can add optional authentication configuration which will be added to the forwarded message.
Here either Basic access authentication or Bearer Token can be used:
tigerProxy:
   tigerProxyConfiguration:
      proxyRoutes:
        - from: http://my.domain/basicAuth/
          to: http://orf.at/blub/
          authentication:
            username: "test1"
            password: "pwd2"
        - from: http://my.domain/bearerToken/
          to: http://orf.at/blub/
          authentication:
            bearerToken: "blubblab"
Please note that the phrase "Bearer " will be added automatically.
Please do not add it yourself!
4.3.9. matchForProxyType
By default, a proxy route will only match when the proxy-mode defined by the from attribute is met.
For example, a route with from: /foo will not match with a forward-proxy request like so:
curl -x localhost:59163 http://backend.domain/To enable matching for both proxy-modes, you can use the matchForProxyType-flag:
tigerProxy:
   tigerProxyConfiguration:
      proxyRoutes:
        - from: /foobar
          to: http://orf.at/blub/
          matchForProxyType: false
This will match with both of the following requests:
curl -x localhost:59163 http://backend.domain/foobar
curl http://localhost:59163/foobar
4.3.10. preserveHostHeader
This option will disable the rewrite of the Host-header in the forwarded request.
This will lead to inconsistent Host-headers in the proxied requests, which might lead to unexpected behavior on the target server. (e.g. when forwarding from http://my.domain/ to http://orf.at/ the Host-header will still contain "my.domain" instead of "orf.at").
Default is false.
4.3.11. alpnProtocols
The Tiger Proxy automatically probes each HTTPS backend at route-add time to discover its ALPN (Application-Layer Protocol Negotiation) capabilities.
Based on the result, the proxy restricts the protocols it advertises to clients during the TLS handshake — ensuring transparent behavior (the client sees the same protocol it would with a direct connection).
In most cases this works automatically and requires no configuration.
However, for ambiguous setups — such as two routes on the same hostname pointing to different backends with different protocol support — you can explicitly declare the ALPN protocols per route using the alpnProtocols property:
tigerProxy:
    proxyRoutes:
      - from: /api
        to: https://h2-server:443
        alpnProtocols:
          - "h2"
          - "http/1.1"
      - from: /legacy
        to: https://h1-server:443
        alpnProtocols:
          - "http/1.1"
When alpnProtocols is set, the declaration overrides the automatic probe for that route — no probe is performed.
If multiple routes with explicit alpnProtocols declarations match the same client connection (same SNI hostname), the proxy computes the intersection of the declared lists (conservative approach).
Valid protocol identifiers are h2 (HTTP/2) and http/1.1.
Automatic behavior (no alpnProtocols set)
| Backend probe result | Proxy advertises to client | Rationale |
|---|---|---|
Backend prefers |
|
Backend supports h2; also offer h1 for h1-only clients |
Backend only speaks |
|
Backend can’t do h2 — don’t offer it to the client |
Probe failed (unreachable) |
|
Fail-open — keep default, fall back to protocol translation |
HTTP backend (no TLS) |
|
No TLS → no probe possible → keep default |
Mixed backends (h2 + h1) |
|
Conservative — only offer what ALL backends support |
When to use explicit alpnProtocols
-
Path-ambiguous routes: Two routes with different paths on the same hostname but different backends.
The automatic probe can’t know which path the client will request at TLS time, so it falls back to the conservative approach (only h1 if any backend is h1-only).
UsealpnProtocolsto resolve this explicitly. -
Backend unreachable at startup: If the backend is not reachable when the route is added, the probe fails and the proxy defaults to
[h2, http/1.1].
UsealpnProtocolsto declare the correct protocols. -
Force a specific protocol: For testing purposes you may want to force h2 or h1, regardless of what the backend actually supports.
4.4. TLS, keys, certificates a quick tour on proxies
A fundamental part of a proxy setup is TLS.
Since a proxy is a constant man-in-the-middle attack, TLS is designed to make this exact scenario (eavesdropping while forwarding) impossible.
Since a lot of the traffic in the gematik context is security-relevant and thus TLS-secured, this point is very relevant.
Fundamentally breaking into TLS requires two things:
-
A certificate which the server can present which is valid for the given domain
-
The certifying CA (or a CA reachable via a certification path) has to be part of the client truststore
There are different ways to reach these two requirements.
Which one should be taken is dependent on the setting and the client used (most importantly, of course: can you alter the truststore for the test-setup?)
Here are a few things to know and ways in which to enable TLS:
4.4.1. TLS and HTTPS-Proxy
TLS can be done via an http- or a https-proxy.
The proxy-protocol does NOT equate to the client-server-protocol.
To minimize the headache in configuration, it is therefore strongly recommended to simply always use the http-proxy (sidenote: using an http-proxy does NOT reduce the security of the overall protocol.
The security still relies on server-certificate-verification.)
If, however, you cannot avoid using the https-proxy, you have to make sure that you add the given certificate to your truststore.
In class TigerProxy.java in Tiger there are methods such as SSLContext getConfiguredTigerProxySslContext(), X509TrustManager buildTrustManagerForTigerProxy,() and KeyStore buildTruststore() that can help you configure the SSLContext in your case, if you use HTTP third party libraries (Unirest, okHttp, RestAssured, etc.) as well as vanilla Java.
If you encounter any problems, please contact us.
4.4.2. Configuring PKI identities in tiger proxy’s tls section
PKI identities can be supplied in a number of ways (JKS, BKS, PKCS1, PKCS8).
In every place a string can be given.
It could be one of
-
"my/file/name.p12;p12password"
-
"p12password;my/file/name.p12"
-
"cert.pem;key.pkcs8"
-
"rsaCert.pem;rsaKey.pkcs1"
-
"key/store.jks;key"
-
"key/store.jks;key1;key2"
-
"key/store.jks;jks;key"
Not supported pathname strings:
-
"D:\\myproject\\key\\store.jks;key"
Supported pathname string on all platforms:
-
"myproject/key/store.jks;key"
Please notice, that double backslashes ("\\") are not supported as file separators, since they are not accepted on all platforms.
Invalid pathname strings will also produce an exception.
The following attributes serverRootCa, forwardMutualTlsIdentity, serverIdentity, and ocspSignerIdentity can be configured via a one-line string or via sub properties.
tigerProxy:
  tigerProxyConfiguration:
    tls:
      serverRootCa: "certificate.pem;privateKey.pem;PKCS8"     # custom CA for cert generation
      serverIdentity: "myIdentity.p12;changeit"                # fixed server identity
      serverIdentities:                                        # multiple server identities
        - "identity1.p12;00"
        - "identity2.p12;changeit"
      ocspSignerIdentity: "myOcspSigner.p12;Password"
      forwardMutualTlsIdentity: "clientIdentity.jks;changeit;JKS"  # mTLS client identity
Example for a one-line string:
tigerProxy:
   tigerProxyConfiguration:
      tls:
        serverIdentity: "myIdentity.p12;changeit;P12;myAlias"
Example for sub properties:
tigerProxy:
   tigerProxyConfiguration:
      tls:
        serverIdentity:
          filename: "myIdentity.p12"
          password: "changeit"
          storeType: "P12"     # (accepted are P12, PKCS12, JKS, BKS, PKCS1 and PKCS8)
          alias: "myAlias"
In this case both the storeType and the password are not mandatory and would be guessed (the store-type via the file extension and the password via a default-list, see next section).
4.4.3. Dynamic server identity
To successfully break into TLS traffic, the tiger proxy needs to present a certificate which features the domain-name of the server.
Since the domain-names are known only at runtime, we generate the necessary certificate on-the-fly during the first connection.
For a forward-proxy this is straightforward: The client sends not only the path, but the complete URL to the proxy, letting him handle DNS-resolution.
So when the tiger proxy receives a new request, the necessary domain-name is given by the client.
A new, matching, certificate is generated (these are cached) and presented.
To complete the setup, the client-truststore needs to be patched.
The CA used by the tiger proxy is dynamically generated on each startup.
For a reverse-proxy the domain name, which should be used, is unknown to the tiger proxy (DNS-resolution is done on the client-side).
Thus, a domain-name needs to be provided, which should be used for certificate-generation:
tigerProxy:
   tigerProxyConfiguration:
      tls:
        domainName: deep.url.of.server.de
4.4.4. Client-sided truststore modification
When using a non-default certificate (which will almost always be the case for the tiger proxy), the modification of the client-truststore is necessary.
For cases where the client is running in the same JVM as the target tiger proxy (which is the typical case for a tiger-based testsuite) there exists a helper method to make this task easier.
Depending on your HTTP- or REST- or SOAP-API, you will need to choose the exact way yourself.
The following two examples might give you some idea of what to do.
Unirest.config().sslContext(tigerProxy.buildSslContext()); OkHttpClient client = new OkHttpClient.Builder()
.proxy(new Proxy(
Proxy.Type.HTTP,
new InetSocketAddress(
"localhost",
tigerProxy.getPort())))
.sslSocketFactory(
tigerProxy.getConfiguredTigerProxySslContext().getSocketFactory(),
tigerProxy.buildTrustManagerForTigerProxy())
.build();4.4.5. Custom CA
If you cannot or don’t want to alter the client-truststore, you have two choices: You can either provide a custom CA to be used (and trusted by the client) or you can give the certificate to be used by the tiger proxy.
To set a custom CA to be used for certificate generation, specify it:
tigerProxy:
   tigerProxyConfiguration:
      tls:
        serverRootCa: "certificate.pem;privateKey.pem;PKCS8"
# for more information on specifying PKI identities in tiger see "Configuring PKI identities"
4.4.6. Fixed server identity
The final, easiest, and most unflexible way to solve TLS-issues is to simply give a fixed server-identity.
This identity will be used for all routes, but only if it matches the domain-name given by the client during the handshake.
As a fallback (if the domain-name does not match) the dynamic server-identity will be used.
tigerProxy:
   tigerProxyConfiguration:
      tls:
        serverIdentity: "certificateAndKeyAndChain.p12;Password"
If you want to use the fixed-server identity only for requests to matching hosts and you have NOT supplied a serverRootCa, you can use the allowGenericFallbackIdentity-property:
tigerProxy:
   tigerProxyConfiguration:
      tls:
        serverIdentity: "certificateForFoobar.p12;Password"
        allowGenericFallbackIdentity: true
If certificateForFoobar.p12 contains a certificate for the FQDN foobar.com, then a request to foobar.com will use this certificate.
If the request is to barfoo.com the generic server-identity will be used.
If you have supplied a serverRootCa this CA will always be used for any request for which an exact match is not found.
4.4.7. Multiple server identities
Sometimes you might want to use different server-identities for different hosts that are proxied.
This can be achieved by using the serverIdentities-property.
Simply list the properties, the proxy will automatically try to choose the correct one.
tigerProxy:
   tigerProxyConfiguration:
      tls:
        serverIdentities:
          - "someIdentity.p12;00"
          - "anotherIdentity.p12;changeit"
4.4.8. OCSP stapling
If you want the tiger proxy to use OCSP stapling, you can directly specify the OCSP-Signer to use in the configuration.
tigerProxy:
   tigerProxyConfiguration:
      tls:
        ocspSignerIdentity: "myOcspSigner.p12;Password"
The server will then use this OCSP-Signer to create a fake OCSP-Response during the TLS-handshake.
4.4.9. forwardMutualTlsIdentity
The forwardMutualTlsIdentity property specifies the client certificate (identity) that the tiger proxy should use when establishing a mutual TLS (mTLS) connection to an upstream server.
This is required if the target server expects the proxy to authenticate itself using a client certificate.
You can provide the identity as a string (e.g., myIdentity.p12;changeit;JKS) or as a map with filename, password, and storeType.
This ensures secure, authenticated communication between the proxy and the upstream server.
tls:
  tigerProxyConfiguration:
    forwardMutualTlsIdentity:
      filename: myIdentity.p12
      password: "changeit"
      storeType: P12
4.4.10. TLS Decryption in wireshark
Sometimes you might want to look at decrypted TLS-traffic in wireshark.
To achieve this, we need to extract the masterSecrets of every connection from the tiger proxy and provide them to wireshark.
This is actually pretty straight forward, with one big issue: It is very insecure to access the masterSecrets of a TLS-connection, so we need to attach a Java-Agent to the VM.
When you are using the tiger proxy in a normal tiger-testsuite, you can add the <goal>attach-tiger-agent</goal> goal to the tiger-maven-plugin:
            <plugin>
                <groupId>de.gematik.test</groupId>
                <artifactId>tiger-maven-plugin</artifactId>
                <version>${project.version}</version>
                <executions>
                    <execution>
                        <phase>generate-test-sources</phase>
                        <goals>
                            <goal>generate-drivers</goal>
                            <goal>attach-tiger-agent</goal>
                        </goals>
                    </execution>
                </executions>
            </plugin>
This will modify the argLine property used by failsafe to start the testsuite and attach the TigerAgent to the VM.
Next we need to set the filename where to write the masterSecrets to:
tigerProxy:
   tigerProxyConfiguration:
      tls:
        masterSecretsFile: "myMasterSecrets.txt"
The tiger proxy will write the secrets to the given file.
The final step is to import the masterSecrets into wireshark:
Go to Edit → Preferences.
Open the Protocols tree and select TLS.
Alternatively, select a TLS packet in the packet list, right-click on the TLS layer in the packet details view, and open the Protocol preferences menu.
Set the (Pre)-Master-Secret log filename to the file containing the master secrets.
Now wireshark should decrypt TLS traffic routed through the tiger proxy on-the-fly.
4.5. Modifications
Modifications are a powerful tool to alter messages before forwarding them.
They can be applied to requests and responses, to routes in forward- and reverse-proxy-mode.
You can choose to modify only specific parts of the message and only alter messages if certain conditions are met.
Response messages support so-called "reason phrases" which are small text explanations to the response code, e.g. "200 OK", ("OK" is a reason phrase).
You can add, modify, and remove reason phrases.
Below is a sample configuration giving insight into how modifications are organized:
tigerProxy:
  tigerProxyConfiguration:
    modifications:
    # a list of modifications that will be applied to every proxied request and response

        # The following modification will replace the entire "user-agent" in all requests
      -
        condition: "isRequest"
        # a condition that needs to be fullfilled for the modification to be applied (JEXL grammar)
        targetElement: "$.header.user-agent"
        # which element should be targeted?
        replaceWith: "modified user-agent"
        # the replacement string to be filled in.

        # The following modification will replace the body of every 200 response completely with the given JSON string
        # (This ignores the existing body. For example this could be an XML-body. Content-Type-headers will NOT be set accordingly)
      -
        condition: "isResponse && $.responseCode == 200"
        targetElement: "$.body"
        name: "body replacement modification"
        # The name of this modification. This can be used to identify, alter or remove this modification. A name is optional
        replaceWith: "{\"another\":{\"node\":{\"path\":\"correctValue\"}}}"

        # The following modification has no condition, so it will be applied to every request and every response
      -
        targetElement: "$.body"
        regexFilter: "ErrorSeverityType:((Error)|(Warning))"
        # The given regex will be used to target only parts of targeted element.
        replaceWith: "ErrorSeverityType:Error"

        # Here we take the value of one header and copy it into another header
      -
        # Check if the header 'foo' is actually present in the request
        condition: "isRequest && $.header.[~'foo'] != null"
        targetElement: "$.header.copy-of-foo"
        replaceWith: "?{$.header.[~'foo']}-modified"
When targeting http headers, if the header is not present, it will be added to the request.
4.6. Mesh set up
One of the fundamental features of the tiger proxy is mesh set up AKA rbel-message forwarding.
This transmits the information about the messages, which the proxy has logged, to other Tiger Proxies (where they will be logged as well).
This enables the creation of "proxy-meshes", staggered Tiger Proxies.
In a mesh set up the "remote tiger proxy" is the one that intercepts the traffic and sends the information.
Conversely, the "receiving tiger proxy" receives the information about the message from the remote tiger proxy.
The "local tiger proxy" is the main tiger proxy booted by the testsuite.
If you configured it to receive traffic from another tiger proxy, (which should always be the case when you are doing a mesh set up) then it is also a receiving tiger proxy.
A common scenario for this approach might be the use of multiple reverse-proxies on the root level (e.g. when the client only allows the configuration of the server IP or domain, but no path-prefix) or the aggregation of traffic across machine-boundaries (e.g. one constantly running tiger proxy which is used by a testsuite on another machine).

In the above picture testObject2 would not be accessible directly by the test suite, thus using the reverse proxy allows circumventing network restrictions.
The reverse proxy could either be started by the test environment manager or as a standalone process.
tigerProxy:
  tigerProxyConfiguration:
    proxyId: IBM
    # A list of upstream Tiger Proxies. This proxy will try to connect to all given sources to
    # gather traffic via the STOMP-protocol.
    trafficEndpoints:
      - http://another.tiger.proxy:<adminPort>
    # If false, then the subscription is tested at the beginning, and if any of the given endpoints are not accessible, the
    # server will not boot. (fail fast, fail early)
    skipTrafficEndpointsSubscription: false   # default
    # Should the tiger proxy fail on startup, when a traffic endpoint is offline?
    # Ignoring this error might lead to an unexpected testing environment!
    failOnOfflineTrafficEndpoints: false   # default is true
    # If set to true, the tiger proxy will only consider traffic endpoints as healthy
    # if they are reachable and functioning correctly.
    requireHealthyTrafficEndpoints: true   # default is true
    # Should the traffic currently available (cached) in the remote be download upon initial connection?
    downloadInitialTrafficFromEndpoints: true  # default
    trafficEndpointConfiguration:
        name: "TigerProxy Tracing Point"   # Display name for this tracing endpoint (default: "tigerProxy Tracing Point")
        wsEndpoint: "/tracing"             # WebSocket endpoint path (default: "/tracing")
        stompTopic: "/traces"              # STOMP topic to subscribe to (default: "/traces")
Please be advised to use the server-port (server.port) here, not the proxy-port (tigerProxy.proxyPort).
The traffic from routes with disableRbelLogging: true will not show up here.
|
If you are setting up a tiger proxy to run constantly and simply forward traffic to a testsuite that is booted adhoc, you might run into performance problems. This is due to the Rbel-Logger being a very hungry beast. To stop Rbel from parsing all messages simply add tigerProxy.activateRbelParsing: false.This will vastly reduce memory and CPU consumption of the application, while still forwarding logged traffic. |
4.6.1. Clock-Skew Compensation
In a mesh setup the participating Tiger Proxies may run on different machines whose system clocks are not perfectly synchronised.
Because Tiger uses timestamps to order messages, even small clock differences can cause messages from different sources to appear in the wrong order.
To compensate for this, the receiving Tiger Proxy automatically determines the clock offset to each remote proxy at connection time in an NTP-style fashion.
The resulting offset is applied to all timestamps of messages received from that remote proxy.
tigerProxy:
    clockSyncSamples: 3
    # Number of round-trips used to estimate the clock offset to a remote proxy.
    # Default is 3. Set to 0 to disable clock-skew compensation entirely.
4.6.2. Mesh API
The tiger proxies use STOMP a simple/streaming text oriented messaging protocol via web socket to forward received traffic.
For an external client to receive these traffic data, it must subscribe to the trace topic reachable at the subscription path /topic/traces.
To do so, the client must connect to the traffic endpoint URL of the tiger proxy.
This is answered with HTTP status 100 and then redirected to web socket protocol via the same port.
For each received traffic data pair (request/response) the tiger proxy will push a web socket message to all subscribed clients.
This JSON encoded message consists of:
-
UUID string
-
http request as base64 encoded data
-
http response as base64 encoded data
-
hostname and port of sender (if retrievable, worst case only IP address or empty)
-
hostname and port of receiver (if retrievable, worst case only IP address or empty)
{
    "uuid": "UUID string",
    "request": "base64 encoded http request",
    "response": "base64 encoded http response",
    "sender": {
      "hostname": "hostname/ip address of sender",
      "port": portAsInt
    },
    "reveiver": {
      "hostname": "hostname/ip address of receiver",
      "port": portAsInt
    }
}
4.6.3. forwardToProxy
If the target server is behind another proxy, you can configure a forward proxy to be used:
tigerProxy:
    tigerProxyConfiguration:
        forwardToProxy:
            hostname: 192.168.110.10
            port: 3128
            type: HTTP              # HTTP or HTTPS, default is HTTP
            username: "proxyuser"   # OPTIONAL: username for proxy authentication
            password: "proxypass"   # OPTIONAL: password for proxy authentication
            noProxyHosts:
              - "localhost"
              - "127.0.0.1"
4.6.4. directReverseProxy
To enable the use of the tiger proxy for non-HTTP scenarios, you can use the option directReverseProxy:
tigerProxy:
    tigerProxyConfiguration:
        directReverseProxy:
            hostname: 127.0.0.1
            port: 3858
            ignoreConnectionErrors: false
This will directly forward any request to the given host.
This is a form of reverseProxy, only also applicable for non-http-traffic.
HTTP traffic will still be forwarded through the use of a global reverse proxy.
Other traffic will be directly forwarded, rerouted directly on the TCP layer.
Messages transmitted can still be parsed via RBel.
If the optional flag ignoreConnectionErrors is true, no connection errors will be logged; the default is false.
4.6.5. directReverseProxy modifierPlugins
The directReverseProxy configuration supports an optional list of modifier plugins that can be used to modify traffic at the TCP layer before it is forwarded:
tigerProxy:
    tigerProxyConfiguration:
        directReverseProxy:
            hostname: 127.0.0.1
            port: 3858
            ignoreConnectionErrors: false
            modifierPlugins:
              - pluginClass: "de.gematik.test.tiger.proxy.modifier.MyCustomModifier"
4.6.6. directReverseProxy TCP Idle Timeout (Keep-Alive)
The directReverseProxy configuration supports an optional tcpIdleTimeoutInSeconds parameter to enable the configuration of the TCP keep-alive behavior for connections to the backend server.
This is useful for long-lived connections (like SMTP) that may have long periods of inactivity to prevent the proxy or server from closing the connection:
tigerProxy:
    tigerProxyConfiguration:
        directReverseProxy:
            hostname: 127.0.0.1
            port: 3858
            ignoreConnectionErrors: false
            tcpIdleTimeoutInSeconds: 5.0
When configured, the proxy sends periodic keep-alive pings to the backend server at the specified interval (in seconds).
This helps maintain connection stability in scenarios with long periods of inactivity, such as SMTP communication where the client may wait a long time before sending the next command.
Important: The keep-alive interval should be shorter than the socket read timeout (typically 20 seconds).
For example, if you set tcpIdleTimeoutInSeconds to 5 seconds, the keep-alive pings every 5 seconds will reset the socket timeout counter before it expires, keeping the connection alive indefinitely.
How it works:
1. Keep-alive pings are sent at the configured interval on idle connections 2. Each ping resets the socket read timeout counter 3. As long as pings arrive before the timeout expires, the connection stays open 4. When the client sends actual data, the ping cycle resumes after the next idle period
4.7. Adding notes to messages
To add notes to certain messages, you can add a list of criteria with messages that shall be added to any message in the rbel log matching the specific criterion.
tigerProxy:
    tigerProxyConfiguration:
      proxyId: meshProxy2
      notes:
        - message: "This is a note on the HTTP method"
          jexlCriterion: "isRequest && path == '$.method'"
        - message: "Hackers were here..."
          jexlCriterion: "element.decryptedUsingKeyWithId == 'mySuperSecretKey'"
4.8. Rbel Parsing
For a detailed description of RBelPath, please refer to the Understanding RBelPath.
4.8.1. activateRbelParsing
Deactivating this flag turns off all Rbel-Analysis of the incoming traffic.
This is a huge deal in terms of memory- and CPU-consumption, but you will lose all benefits of performing Rbel-Analysis.
4.8.2. activateRbelParsingFor
Tiger RBel parses and decodes a wide range of formats and protocols out of the box.
The following formats are supported by default (always active):
| Format | Description |
|---|---|
JSON |
Full JSON structure parsing and tree navigation |
XML |
Full XML structure parsing and tree navigation |
JWT |
JSON Web Token – header, body, and signature are parsed separately |
HTTP/HTTPS |
HTTP request and response parsing including headers, body, and status codes |
URL |
URL parsing including path, query parameters, and fragments |
Base64 |
Automatic Base64 decoding of encoded content |
The following formats are optional and must be explicitly activated:
| Key | Converter(s) | Description |
|---|---|---|
|
RbelPop3CommandConverter, RbelPop3ResponseConverter |
POP3 mail protocol commands and responses |
|
RbelSmtpCommandConverter, RbelSmtpResponseConverter |
SMTP mail protocol commands and responses |
|
RbelMimeConverter, RbelEncryptedMailConverter |
MIME-encoded messages and encrypted mails |
|
RbelAsn1Converter |
ASN.1 binary structures (e.g., in certificates or smart card communication) |
|
RbelVauEpaConverter, RbelVauEpaKeyDeriver |
ePA VAU encrypted traffic decryption |
|
RbelErpVauDecryptionConverter |
eRP VAU encrypted traffic decryption |
|
RbelVauEpa3Converter |
ePA 3.0 VAU encrypted traffic decryption |
|
RbelAslConverter |
ASL encrypted traffic decryption |
|
RbelSicctCommandConverter, RbelSicctEnvelopeConverter |
SICCT smart card terminal protocol |
|
RbelX500Converter |
X.500 directory service structures |
|
RbelX509Converter, RbelX500Converter |
X.509 certificate parsing |
|
RbelLdapConverter |
LDAP protocol messages |
|
RbelBase64GzipConverter |
Base64-encoded and GZip-compressed content |
|
RbelOcspResponseConverter |
OCSP (Online Certificate Status Protocol) responses |
|
Various converters |
WebSocket, SockJS and STOMP messages |
tigerProxy:
    tigerProxyConfiguration:
      activateRbelParsingFor:
        - epa-vau
        - X509
        - mime
- websocket|
Optional converters can also be activated and deactivated at runtime via BDD glue code steps. See Complete set of steps in validation glue code. |
4.8.3. parsingShouldBlockCommunication
If blocking is enabled, the tiger proxy will only return the response when message parsing is completed.
This is inadvisable in high-speed scenarios.
It, however, greatly simplifies the test suite (after the communication is concluded the parsed message appears in the log).
Therefore, the blocking is deactivated by default.
The only exception is the local tiger proxy, which WILL block communication until parsing is completed.
For all Tiger Proxies this default behavior can be changed.
4.8.4. activateTrafficLogging
This flag controls whether the tiger proxy will log all traffic.
If activated, every request and response is noted in the log.
This can lead to a verbose and bloated log.
If you are not interested in the traffic log, but only in the Rbel-Analysis, you can deactivate this flag.
Default is true.
4.9. Buffer sizes
Several buffer-size properties allow fine-tuning of memory usage:
tigerProxy:
  tigerProxyConfiguration:
    rbelBufferSizeInMb: 1024          # Limits the RBel buffer to approximately this size (default: 1024)
    stompClientBufferSizeInMb: 1      # Buffer size for STOMP client connections (default: 1)
    perMessageBufferSizeInMb: 100     # Maximum buffer size per single message (default: 100)
    skipParsingWhenMessageLargerThanKb: 8000   # Skip RBel parsing for messages larger than this (default: 8000)
    skipDisplayWhenMessageLargerThanKb: 512    # Skip display for messages larger than this (default: 512)
4.10. Timeouts and waiting times
4.10.1. waitForPreviousMessageBeforeParsingInSeconds
Defines the timeout in seconds (supports decimal values) to wait for a previous message before parsing the current message when messages reference each other in mesh setups.
If the referenced previous message doesn’t arrive within this timeframe, the current message will be parsed anyway.
Default is 5.0 seconds.
4.10.2. previousMessageTimeoutDetectionGracePeriodInSeconds
Grace period in seconds (supports decimal values) for clock skew between mesh nodes when detecting messages that will never arrive.
This compensates for small time differences between different proxy instances.
Default is 10.0 seconds.
4.10.3. previousMessageTimeoutDetectionTimeGapThresholdInSeconds
Minimum age in seconds (supports decimal values) for previous messages to trigger timeout detection.
If a referenced previous message has a timestamp older than this threshold, it may be considered as "will never arrive" and the current message will be processed immediately.
Default is 30.0 seconds.
4.10.4. previousMessageTimeoutDetectionRecentConnectionThresholdInMinutes
Time threshold in minutes (supports decimal values) for considering a mesh connection as "recent".
Timeout detection only applies to connections that are newer than this threshold to avoid false positives in long-running connections.
Default is 5.0 minutes.
tigerProxy:
  tigerProxyConfiguration:
    waitForPreviousMessageBeforeParsingInSeconds: 5.0
    previousMessageTimeoutDetectionGracePeriodInSeconds: 10.0
    previousMessageTimeoutDetectionTimeGapThresholdInSeconds: 30.0
    previousMessageTimeoutDetectionRecentConnectionThresholdInMinutes: 5.0
4.11. Displaying Nested Messages
Some messages are deeply nested and thus inconvenient to handle in the UI.
With the property tigerProxy.maximumDefaultExpandedMessageDepth you can control how many levels of the message are displayed by default.
Message-parts that are deeper than the given depth are displayed as collapsed but can be expanded.
tigerProxy:
  tigerProxyConfiguration:
    maximumDefaultExpandedMessageDepth: 3 # default is 3, use 0 to display all messages collapsed
4.12. Header rewriting and routing behavior
4.12.1. rewriteHostHeader
This flag activates the rewriting of the host-header.
If activated, the host-header will be rewritten to the target host (only applicably for reverse proxy routes).
Default is false.
4.12.2. rewriteLocationHeader
This flag activates the rewriting of the location-header for 3xx responses.
If activated, the location-header will be modified, so the client will still use the proxy to reach the new location.
Default is true.
4.12.3. honorHostHeaderRouting
When enabled, reverse proxy requests that do not match any configured route will be forwarded to the host specified in the incoming Host header.
This is useful when the TigerProxy acts as a transparent reverse proxy in front of a dynamic set of backends, or when clients already set the Host header correctly to the actual backend.
The fallback has the lowest priority: if a configured route matches the request, that route is always used.
Only when no route matches does the Host header fallback kick in.
If the Host header points back to the TigerProxy itself (e.g. localhost on the proxy port), the connection will be closed to prevent infinite loops.
When this option is enabled, the TigerProxy can potentially forward requests to arbitrary hosts specified by a client in the Host header.For test environments (the primary use case of TigerProxy) this is generally not a concern. |
tigerProxy:
  tigerProxyConfiguration:
    honorHostHeaderRouting: true
Default is false.
4.12.4. maxLoopCounter
By default, the tiger proxy will keep count of the number of requests it executes on itself (e.g., when a request is forwarded to the tiger proxy itself).
If this counter exceeds the value of maxLoopCounter the request will be aborted.
The default value is 10 (Meaning after 10 loops, the request will end in an error).
Note: This behavior can only be customized for all Tiger Proxies.
4.13. Understanding filtering
The filtering of messages in the tiger proxy consists of three main stages.
These are:
-
Traffic filter (trafficEndpointFilterString / readFilter, Determines which messages are accepted into the tiger proxy)
-
Tiger proxy Log filter (Which messages are displayed in the tiger proxy Log?)
-
Pagination (Look around in smaller pages of messages)
Lets dive a bit deeper!
4.13.1. Traffic filter
At the core of the tiger proxy sits a RbelLogger instance.
Here the messages are parsed and stored.
Three sources feed into the RbelLogger:
-
Messages intercepted in the tiger proxy
-
Messages relayed using a mesh setup
-
Messages imported from a file
Messages that are intercepted are automatically stored (the exception being the tigerProxy.activateForwardAllLogging-property, which can deactivate the logging of traffic not specifically forwarded via a route).
For messages in a mesh setup and from a source file filter expressions can be defined to limit the messages that are actually stored.
These can be defined using the tigerProxy.trafficEndpointFilterString (for mesh setups) and tigerProxy.fileSaveInfo.readFilter (for tgr-files) respectively.
When messages pass the filter, partner messages (request/response pairs) are kept intact.
So when you filter for messages that have a return code of 200 the corresponding requests do not match the filter expression.
They are however kept in memory since the partner, the response in that case, do match.
Filter expressions are JEXL expressions.
4.13.2. Tiger Proxy Log filter
When you display the messages on the tiger proxy Log you have the ability to filter out certain messages to be displayed exclusively.
The messages, which are filtered out, do still remain stored in the tiger proxy.
Consequently, this has no effect if you store a TGR file (be it via the tiger proxy Log or the YAML).
The menu on the right side will only show the messages being filtered out to avoid confusion.
However, the messages numbers do reference the order in the main tiger proxy store.
This way they are consistent across different tiger proxy Log filters (message #10 will always refer to the same message, regardless of the tiger proxy Log filter being applied).
Filter expressions are JEXL expressions.
4.14. Understanding RBelPath
RBelPath is a powerful expression language specifically designed for navigating and analyzing messages within the Tiger Proxy.
Inspired by well-known concepts like XPath and JSONPath, RBelPath is tailored to the unique requirements of HTTP traffic and complex testing scenarios.
With RBelPath, testers and developers can precisely access any part of a message, extract values, filter, or compare data—regardless of whether the content is JSON, XML, JWT, HTTP headers, or other supported formats.
This flexibility greatly simplifies the validation and evaluation of test data, making message analysis more efficient and adaptable.
RBeL-Path is a XPath or JSON-Path inspired expression-language enabling the quick traversal of captured RBeL-Traffic (navigation of the RbelElement-tree).
A simple example:
assertThat(convertedMessage.findRbelPathMembers("$.header"))
    .containsExactly(convertedMessage.getFacetOrFail(RbelHttpMessageFacet.class).getHeader());
or
assertThat(convertedMessage.findElement("$.header"))
    .get()
    .isSameAs(convertedMessage.getFacetOrFail(RbelHttpMessageFacet.class).getHeader());
(The first example executes the RbelPath and returns a list of all matching elements; the second one returns an Optional containing a single result.
If there are multiple matches, an exception is given.)
RBeL-Path provides seamless retrieval of nested members.
Here is an example of HTTP-Message containing a JSON-Body:
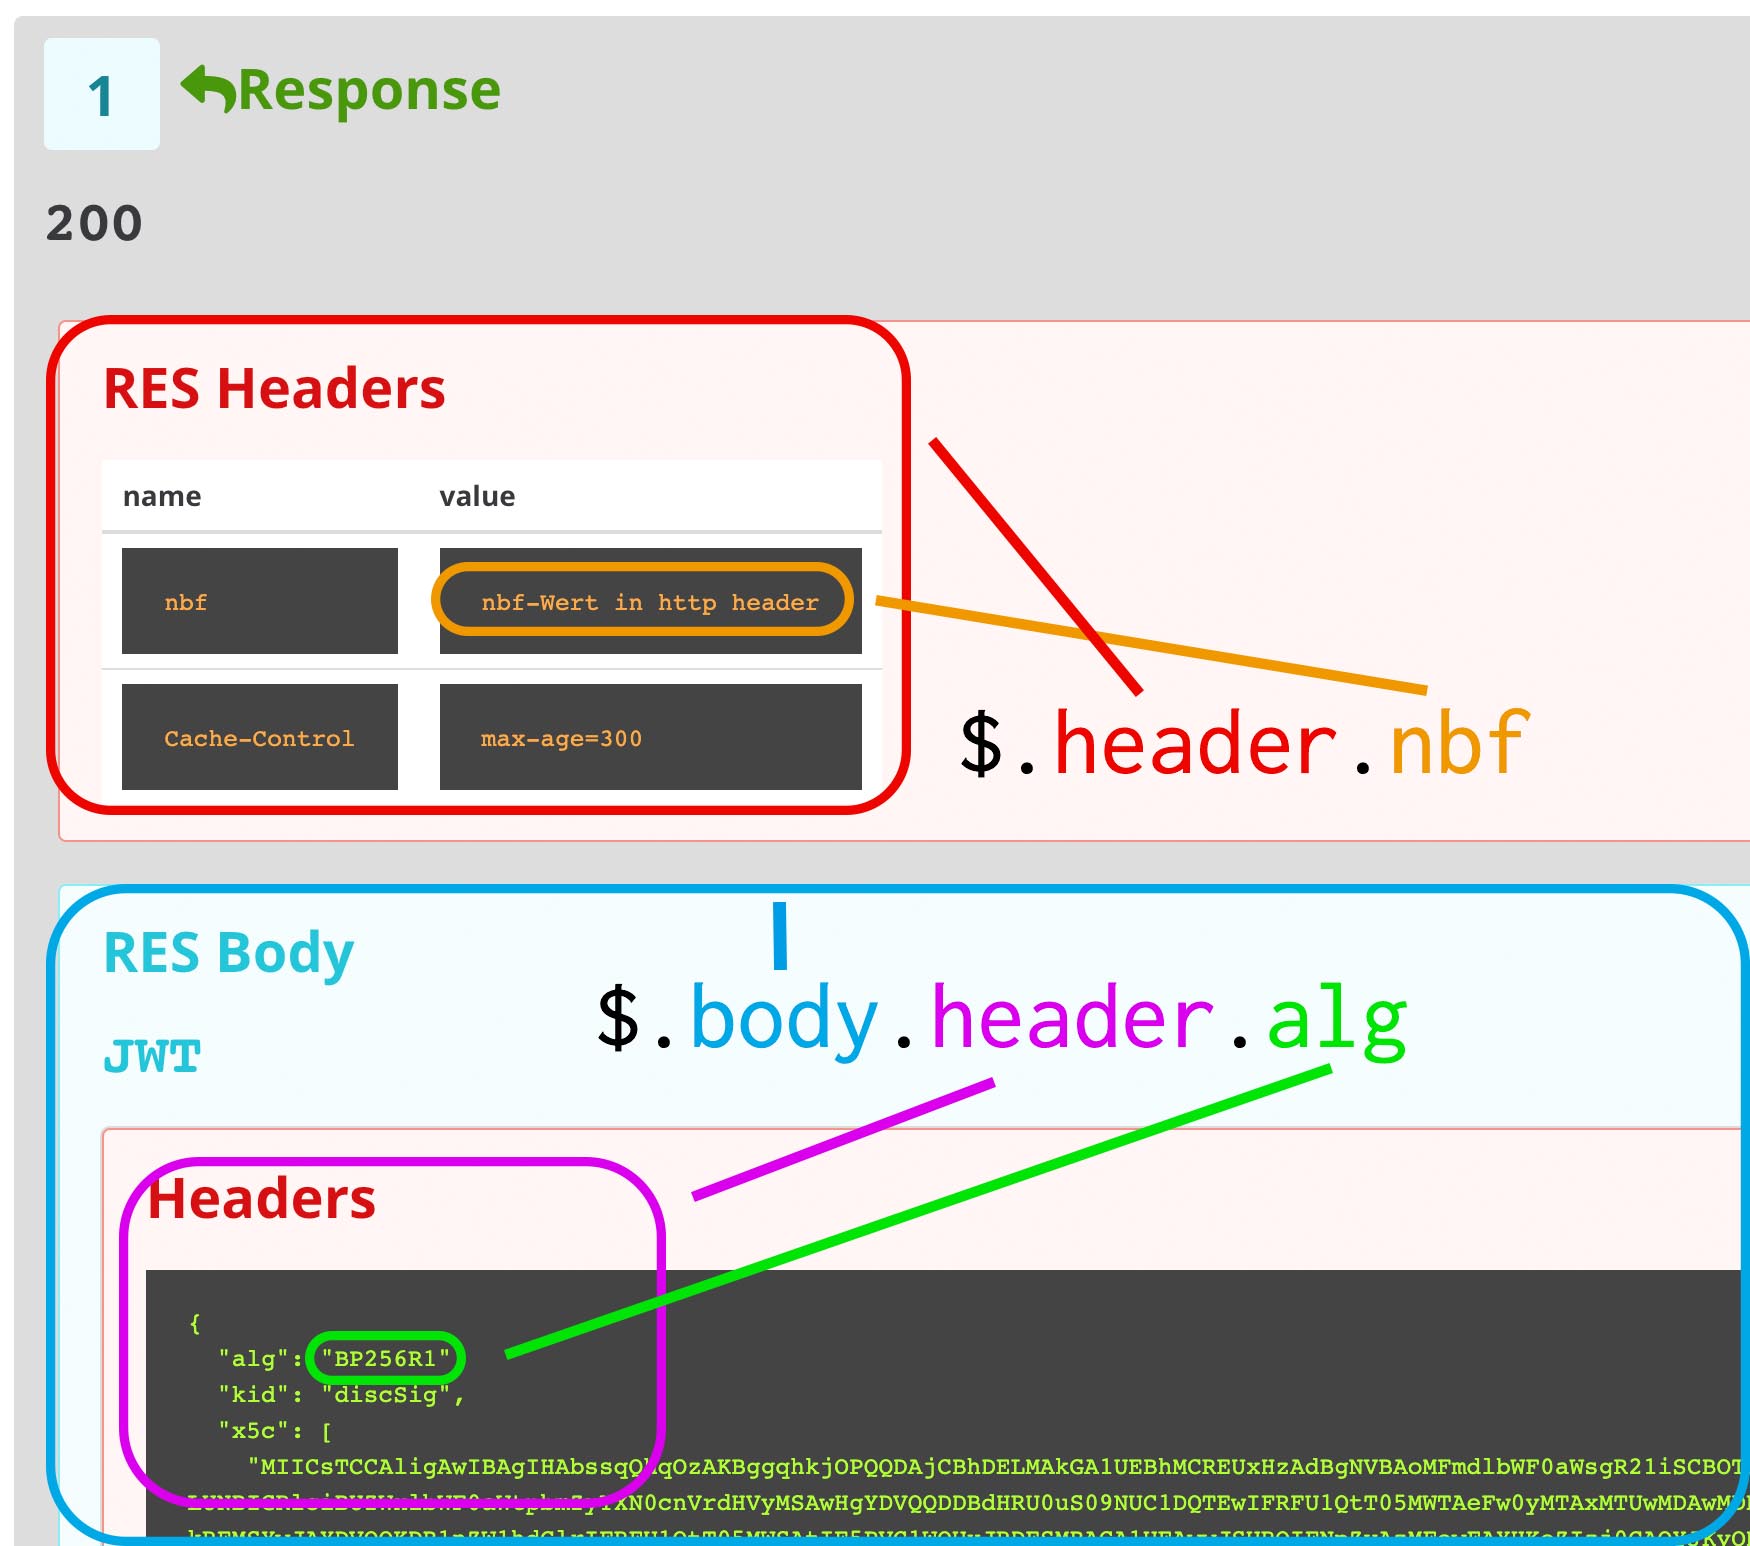
The following message contains a JWT (Json Web Token, a structure which contains of a header, a body, and a signature).
In the body there is a claim (essentially a Key/Value pair represented in a JSON structure) named nbf which we want to inspect.
Please note that the RBeL-Path expression contains no information about the types in the structure.
This expression would also work if the HTTP message contained a JSON object, an XML document, a JWT, a URL, a MIME message, an ASN.1 structure, an X.509 certificate, or any other format supported by Tiger RBel (see Supported formats).
assertThat(convertedMessage.findRbelPathMembers("$.body.body.nbf"))
    .containsExactly(convertedMessage.getFirst("body").get()
    .getFirst("body").get()
    .getFirst("nbf").get()
    .getFirst("content").get());
(The closing .getFirst("content") in the assertion is due to a fix to make RbelPath in JSON-Context easier: If the RbelPath ends on a JSON-Value-Node the corresponding content is returned.)
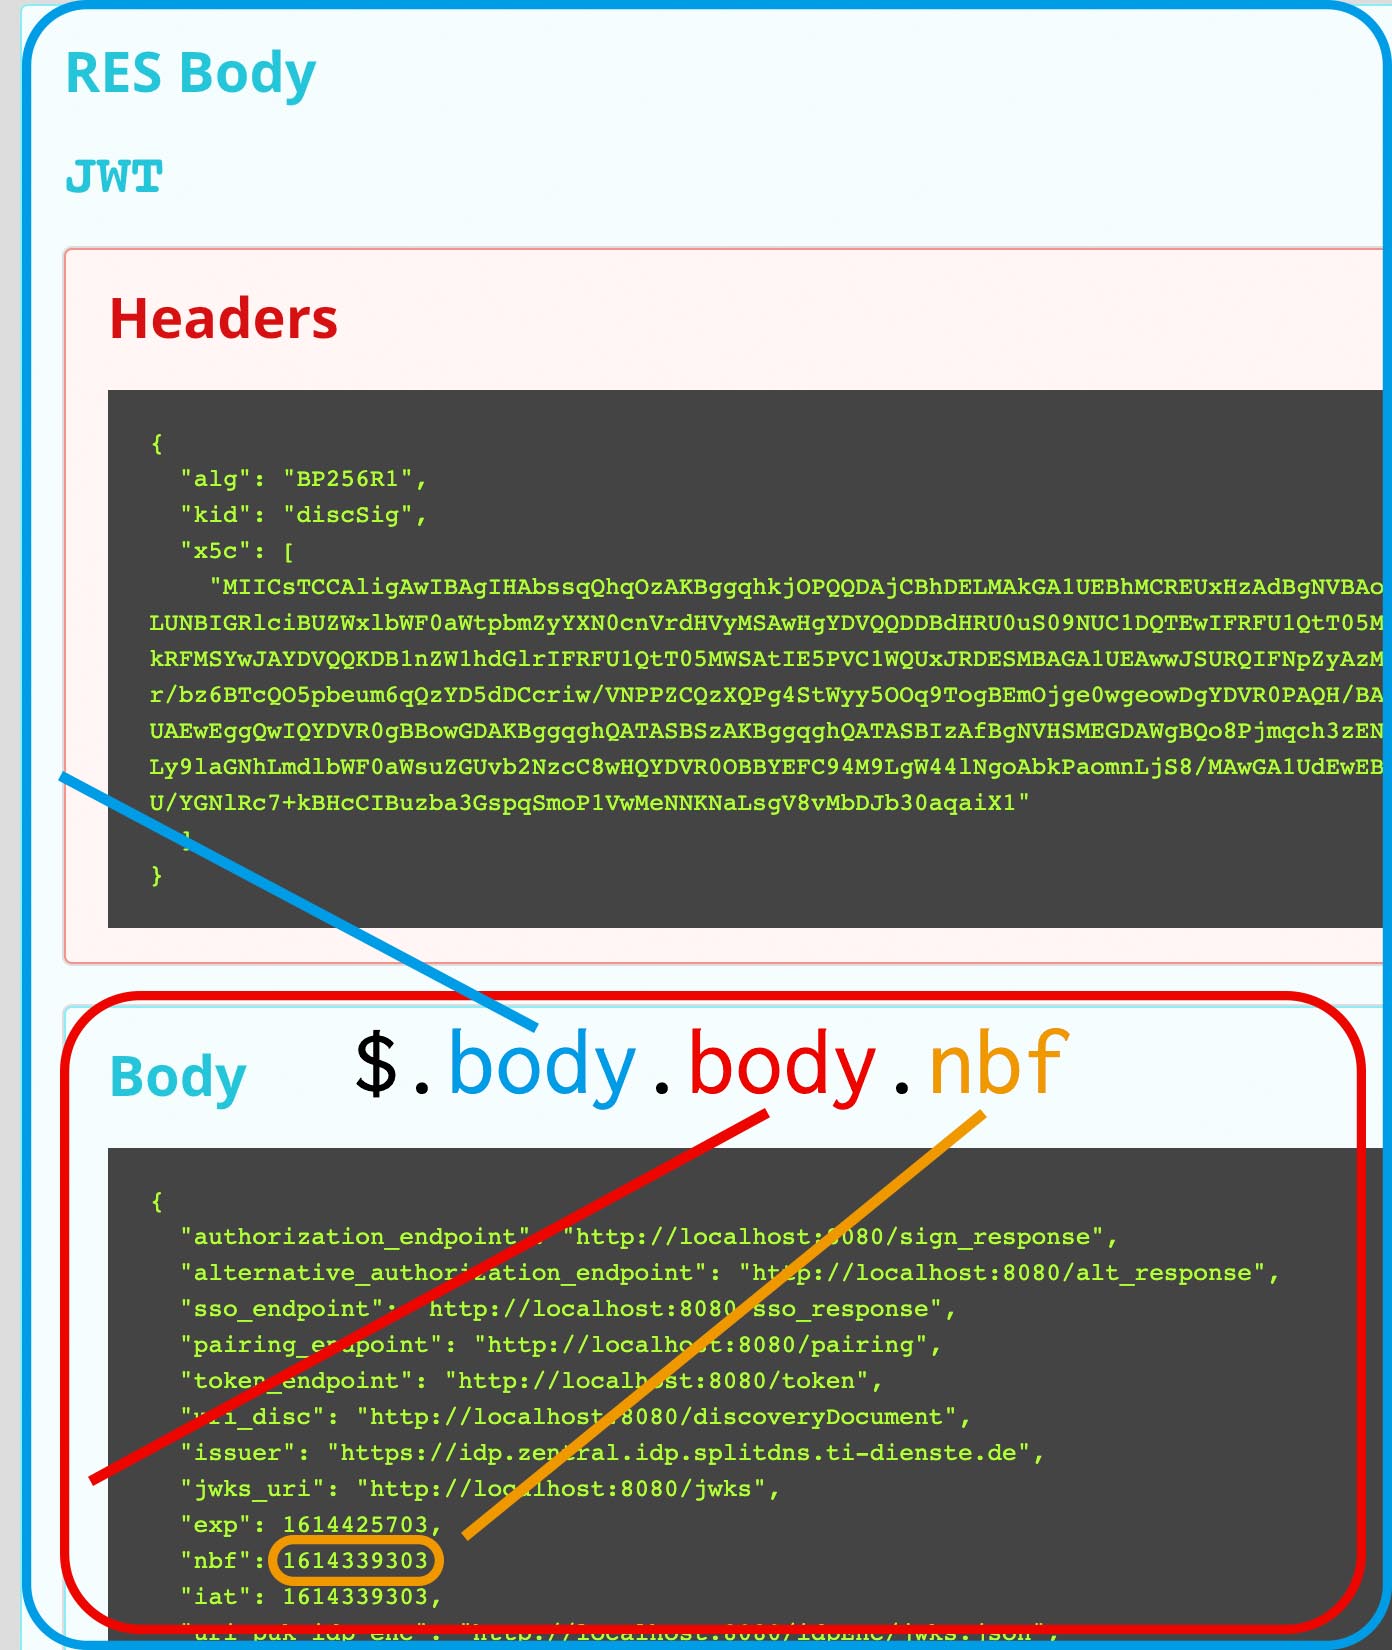
You can also use wildcards to retrieve all members of a certain level:
$.body.[*].nbf
or
$.body.*.nbf
Alternatively, you can recursively descend and retrieve all members:
$..nbf
and
$.body..nbf
will both return the same elements (maybe amongst other elements).
To use keys containing spaces, escape them via ['foo bar'], like so:
$.body.['foo bar'].key
Please note that the keys in the bracket are URL unescaped.
So to use special characters, please URL encode them (space is a special case since + and ' ' are allowed, depending on the exact position).
4.14.1. Arrays
To make things easy and consistent, the entries of an array are simply stored as a map with the index as key.
So the following expression will return the first element of the array:
$.body.array.0
4.14.2. Differentiating between multiple elements
When a key is present multiple times, all elements are returned.
To differentiate between them, you can use the index:
$.body.entry[0]
would give the first element in the following XML:
<body>
    <entry>first</entry>
    <entry>second</entry>
</body>
4.14.3. Alternate keys
To find alternating values, concatenate them using the pipe symbols, like so:
$.body.['foo'|'bar'].key
This expression will explore both subtrees to try to find the following nodes
$.body.foo.key and $.body.bar.key.
Please note that only elements that are present are returned.
So if only always one of the two elements is present, only a single element will be returned.
4.14.4. Case-insensitive matching
Sometimes it can be helpful to match keys in a case-insensitive manner.
To achieve this you can use the ~-operator:
$.body.[~'fOO'].key
This will match $.body.foo.key and $.body.FOO.key (and any other case-insensitive match).
To find multiple case-insensitive matches, concatenate them using the pipe symbols, like so:
$.body.['fOO'|'bAR'].key.
With this expression, the following nodes will be found: $.body.foo.key, $.body.FOO.key, $.body.bar.key and $.body.BAR.key (and any other potential matches).
4.14.5. JEXL expressions
RBeL-Path can be integrated with JEXL expression, giving a much more powerful and flexible tool to extract a certain element.
This can be done using the syntax from the following example:
$..[?(key=='nbf')]
The expression in the round-brackets is interpreted as JEXL.
The available syntax is described in more detail here or https://commons.apache.org/proper/commons-jexl/reference/syntax.html
Please note that these JEXL expressions cannot be nested inside each other deeper than one level (You can write a RbelPath that contains a Jexl-Expression.
And this Jexl-Expression can even contain a RbelPath.
But the inner RbelPath cannot contain another Jexl-Expression).
The variables that can be used are listed below:
-
elementcontains the current RBeL-Element -
parentgives direct access to the parent element of the current element.
Isnullif not present -
messagecontains the HTTP-Message under which this element was found.
It contains:-
methodis the HTTP-Method (or null if it is a response) -
urlis the request URL (or null if it is a response) -
statusCodeis the status response code (or null if it is a request) -
requestis a boolean denoting whether this message is a request -
responseis a boolean denoting whether this message is a response -
headeris a map containing all headers (asMap<String, List<String>>) -
bodyAsStringis the body of the message as a raw string, or null if none is given -
bodyis the RbelElement of the message-body, or null if none is given
-
-
requestis the corresponding HTTP-Request.
Ifmessageis a response, then the corresponding Request will be returned.
Ifmessageis a request, then themessageitself will be returned. -
responseis the corresponding HTTP-Response.
Ifmessageis a request, then the corresponding Response will be returned.
Ifmessageis a response, then themessageitself will be returned. -
keyis a string containing the key that the current element can be found under in the parent-element. -
pathcontains the complete sequence of keys frommessagetoelement. -
typeis a string containing the class-name ofelement(egRbelJsonElement). -
contentis a string describing the content ofelement.
The actual representation depends heavily on the type ofelement.
Additionally, you can always reference the current element (via @.) or the root element (via $.) in any JEXL-expression.
Let’s explain this using an example.
For more detailed information on JEXL expressions, please refer to Detailed JEXL expressions.
4.14.6. Nested RbelPath expressions
Consider the following rbel tree:
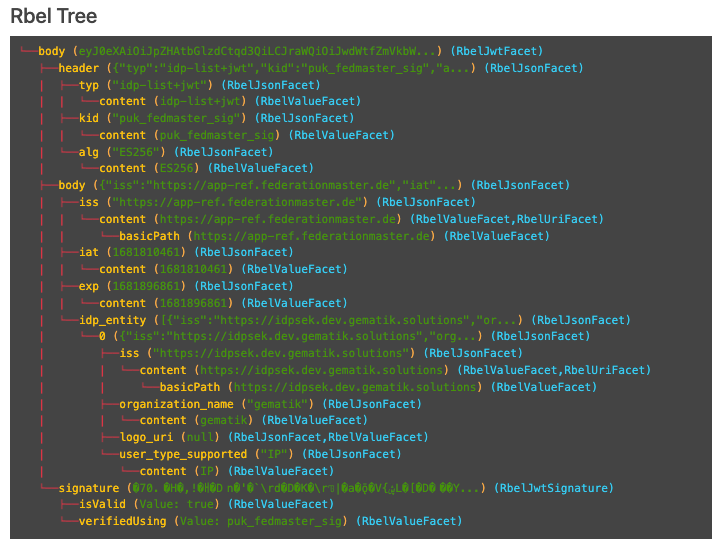
At $.body.body.idp_entity we have an array with potentially multiple entries (here there is only one, entry 0).
We want to select an entry where the iss-claim matches our expectation.
We can achieve this by using a nested Rbel-Path inside the JEXL-Expression:
$.body.body.idp_entity.[?(@.iss.content=='https://idpsek.dev.gematik.solutions')]
Here the @. references the current element: For each array entry the expression is tested, with @. always referring to the current entry.
To access elements starting from the root you can use $. like so:
$.body.body.idp_entity.[?(@.iss.content==$.body.body.idp_entity.0.iss.content)]
You can use recursive descent here as well:
$.body.[?(@..content == 'ES256')] would yield $.body.header.
Let’s unpack this expression:
-
$.bodyselects the http body -
.then selects a child (of the http-body, meaning eitherheader,bodyorsignature) -
The JEXL-selector
[?(@..content == 'ES256')]is then tested on each of the candidates.-
In turn
@..executes a recursive descent, meaning it will select all child nodes individually -
contentselects only the elements which have a key matchincontent.
So we end up with all nodes in the respective subtrees that are namedcontent. -
The JEXL-expression
* == 'ES256''is then selected for every member of the subtree (so the header it will test$.body.header.typ.content,$.body.header.kid.contentand$.body.header.alg.content).
The individual results are then reduced using (so the overall expression matches if there is ANY matching element)
-
-
Since only one of the subtrees does fulfill the expression, only this subtree is returned (and NOT the element itself, i.e.
$.body.header.alg.content)
Please note that since the RbelPath-expressions are executed prior to the JEXL expression the negation might yield unexpected results.
Currently, it is not recommended to use these. (e.g. $.body.[?(not (@.. == 'ES256'))])
4.14.7. Debugging Rbel-Expressions
To help users create RbelPath-Expressions, there is a Debug-Functionality that produces log messages designed to help.
These can be activated by RbelOptions.activateRbelPathDebugging();.
Please note that this is strictly intended for development purposes and will flood the log with quite a lot of messages.
Act accordingly!
When you want to debug RbelPath in BDD test suites, you can add a tiger.yaml file to your project root and add the following property (for more details see this chapter):
lib:
    rbelPathDebugging: true
To get a better feel for a RbelElement (whether it being a complete message or just a part) you can print the tree with the RbelElementTreePrinter.
It brings various options:
RbelElementTreePrinter.builder()
    .rootElement(this) //the target element
    .printKeys(printKeys) // should the keys for every leaf be printed?
    .maximumLevels(100) // only descend this far into the three
    .printContent(true) // should the content of each element be printed?
    .build()
    .execute();
4.15. Tiger Standalone Proxy
The Tiger Standalone Proxy repackages the Tiger Proxy as a self-contained, runnable Spring Boot JAR and as a Docker image.
It is the recommended way to run a Tiger Proxy outside of a Tiger test suite — for example as a permanently running traffic recorder, as part of a mesh setup, or as a sidecar container.
4.15.1. Standalone Proxy vs. Remote Tiger Proxy (type: tigerProxy)
Both the Standalone Proxy and a remote proxy server (type: tigerProxy in the servers block) use the same underlying Tiger Proxy engine with identical capabilities (routes, TLS, modifications, RBel parsing, mesh setup, etc.).
The key difference lies in how and where they are managed:
type: tigerProxy (remote server) |
Tiger Standalone Proxy | |
|---|---|---|
Started by |
TestenvMgr (automatically on test suite start) |
Manually (JAR or Docker) |
Lifecycle |
Tied to the test suite — started and stopped with it |
Independent — runs as a long-lived process or container |
Configuration location |
|
Directly under |
|
Supported — can depend on other servers |
Not applicable |
Typical use case |
Sniffer between two components in the same test environment |
Permanent traffic recorder, mesh node, sidecar container |
Use type: tigerProxy when the additional proxy is part of a test environment that is set up and torn down with each test run.
Use the Standalone Proxy when the proxy should run independently of any particular test suite — for example, as a constantly running traffic forwarder in a mesh setup, or in CI/CD pipelines where the proxy is shared across multiple test runs.
4.15.2. Configuration
All configuration options described in the Tiger Proxy chapter apply equally to the Standalone Proxy.
The properties are placed directly under the tigerProxy key — the same flat structure used by the local Tiger Proxy.
Place the file as application.yaml next to the JAR (Spring Boot picks it up automatically), or supply it explicitly via --spring.config.additional-location.
The following example shows a typical application.yaml for a standalone instance acting as a forward proxy with a mesh connection to a remote Tiger Proxy:
application.yaml for the Tiger Standalone ProxytigerProxy:
# ---- Ports ---------------------------------------------------
adminPort: 9090 # Web UI and REST API reachable at http://localhost:8080
proxyPort: 8080 # HTTP/HTTPS forward- and reverse-proxy port
# ---- Display name --------------------------------------------
name: "my-standalone-proxy"
# ---- Offline mode --------------------------------------------
# Set to true to serve the Web UI from the classpath (no internet required).
localResources: false
# ---- Routes --------------------------------------------------
proxyRoutes:
- from: http://backend.example.de/ # forward-proxy route
to: http://internal.service:8080/
# ---- TLS -----------------------------------------------------
tls:
serverRootCa: "ca-cert.pem;ca-key.pem;PKCS8" # custom CA for on-the-fly cert generation
# ---- Mesh setup ----------------------------------------------
# Connect to another Tiger Proxy and receive its traffic.
trafficEndpoints:
- http://other-tiger-proxy:8080
downloadInitialTrafficFromEndpoints: true
# ---- Traffic file --------------------------------------------
fileSaveInfo:
writeToFile: true
filename: "traffic.tgr"
# ---- RBel parsing --------------------------------------------
activateRbelParsing: true
activateRbelParsingFor:
- epa-vau
- X509
# ---- Buffer sizes --------------------------------------------
rbelBufferSizeInMb: 512
# ---- Spring Boot server port (= the admin port above) ---------
# This must match tigerProxy.adminPort. Required for health checks.
server:
port: 9090
The server.port Spring Boot property must always match tigerProxy.adminPort.The container health check and the mesh STOMP endpoint both use this port. If you change adminPort, update server.port accordingly.
|
There is one property exclusive to the Standalone Proxy (not available for type: tigerProxy servers):
tigerProxy:
  localResources: false   # true = serve Web UI assets from classpath (offline/air-gapped environments)
4.15.3. Running tiger proxy as a standalone JAR
A Spring Boot executable JAR is available via Maven Central.
Download the JAR and start it with:
java -jar tiger-standalone-proxy-<version>.jarTo supply a custom configuration, place an application.yaml next to the JAR — Spring Boot picks it up automatically.
Alternatively, point Spring Boot at any file via --spring.config.additional-location:
java -jar tiger-standalone-proxy-<version>.jar \
     --spring.config.additional-location=file:./my-config.yaml
All properties described in Tiger Proxy basics can be used directly in that file.
4.15.4. Running tiger proxy as a Docker container
You can also run the Tiger Proxy as a Docker container:
docker run -p 8080:8080 -p 9090:9090 --rm gematik1/tiger-proxy-image:latestThis exposes the admin port (8080) and the proxy port (9090) on the host.
|
Always keep the admin port mapped to 8080 inside the container. The container health check connects to port 8080 — if you change this mapping, the health check will fail and the container will be considered unhealthy. |
To supply a custom configuration, mount an application.yaml into the container:
docker run \
  -v ./application.yaml:/app/application.yaml \
  -p 8080:8080 -p 9090:9090 --rm \
  gematik1/tiger-proxy-image:latest
4.15.5. Available endpoints
Once the Standalone Proxy is running, the following endpoints are available on the admin port:
-
Tiger Proxy Web UI — traffic viewer and live filter:
http://localhost:{adminPort}/webui -
Swagger UI — interactive browser-based API explorer:
http://localhost:{adminPort}/swagger-ui/index.html -
OpenAPI JSON spec:
http://localhost:{adminPort}/v3/api-docs -
OpenAPI YAML spec:
http://localhost:{adminPort}/v3/api-docs.yaml
The OpenAPI spec covers all Tiger Proxy REST endpoints, including route management (/route), traffic modifications (/modification), tracing points (/tracingpoints), traffic push (/traffic), and the Web UI endpoints.
5. Tiger Test library
As outlined in the overview section, the Tiger test library is one of the three core components of the Tiger test framework.
Its main goal is to provide extensive support for BDD/Cucumber testing and to integrate the local tiger proxy with the test environment manager and the started test environment.
| Currently, multithreaded or parallel test runs are not supported. |
5.1. Tiger test lib configuration
You can place a tiger.yaml configuration file in the root folder of your test project to customize the Tiger test library integration and activate or deactivate certain features.
lib:
    # Flag to activate tracing at the Rbel Path Executor.
    # If activated the Executor will dump all evaluation steps of all levels to the console
    # when traversing through the document tree
    # Deactivated by default
    rbelPathDebugging: false
    # Flag whether the Executor's dump shall be in ANSI color.
    # If you are working on operating systems (Windows) that do not support
    # Ansi color sequences in their console you may deactivate the coloring with this flag.
    # Activated by default.
    rbelAnsiColors: true
    # Flag whether to start a browser window to display
    # the current steps / banner messages / rbel logs
    # when executing the test suite.
    # This feature can be used to instruct the tester to follow
    # a specific test workflow for manual tests.
    # Deactivated by default
    activateWorkflowUi: false
    # If the startBrowser and activateWorkflowUi options are true,
    # the test system will try to open the Workflow UI in a browser
    # If the startBrowser option is false and activateWorflowUi is true
    # the test system will wait for the Workflow UI to be activated in
    # some other way. The time to be waited for the Workflow UI to be
    # active can be configured via option workflowUiStartTimeoutInSeconds
    startBrowser: true
    # If the activateBrowser option is false and the Workflow UI
    # is supposed to be opened by some other process
    # this option allows to configure how many seconds
    # the test system will wait until the UI has been started
    workflowUiStartTimeoutInSeconds: 120
    # Flag whether to add a curl command details button to
    # SerenityRest RestAssured calls
    # in the Serenity BDD report
    addCurlCommandsForRaCallsToReport: true
    # Flag whether to create the RBEL HTML reports during
    # a testsuite run, activated by default
    createRbelHtmlReports: true
    # Flag whether to generate intermediate Serenity HTML reports
    # after each feature file completes. This allows you to view
    # test progress while the suite is still running.
    # The report is written to target/site/serenity/index.html
    # and a machine-readable progress.json is placed alongside it.
    # Deactivated by default.
    createIntermediateReports: false
    # maximum amount of seconds to wait / pause execution via pop up in the workflow ui, default is 5 hours.
    pauseExecutionTimeoutSeconds: 18000
    # Customize your Rbel-Logs with your own logo. Must be PNG format.
    # Path should be relative to execution-location
    rbelLogoFilePath: "myLogo.png"
    # If you want to use a fixed port for the Workflow UI you can set it here.
    workflowUiPort: 8123
    # Flag whether to clear the initial traffic after the environment startup phase
    # activated by default
    clearEnvironmentStartupTraffic: true
    # name of the tiger-${profile}.yaml to be loaded when none is explcited specified via system property or
    # environment variable, default is an emtpy string, meaning no additional configuration file is loaded
    defaultProfile: "my-default"

# flag whether to start the local tiger proxy (default) or to omit it completely.
# if you have the local tiger proxy deactivated you will NOT be able to
# validate / log any traffic data from test requests / responses.
localProxyActive: true

# section to allow adapting the logging levels of packages/class loggers similar to spring boot
logging:
  level:
    # activate tracing for a specific class
    de.gematik.test.tiger.testenvmgr.TigerTestEnvMgr: TRACE
    # activate tracing for all classes and subpackages of a package
    de.gematik.test.tiger.proxy: TRACE
    # activate tracing for the local tiger proxy. This logger has a special name due to its importance in the tiger test framework
    localTigerProxy: TRACE
5.2. Intermediate Serenity Reports
By default, Serenity HTML reports are only generated at the end of a test suite run.
If you want to monitor test progress while the suite is still running you can enable intermediate report generation.
When activated, the Serenity HTML report is regenerated after each feature file completes and written to target/site/serenity/index.html.
A machine-readable progress.json file containing status information (completed features, pass/fail counts, timing estimates) is placed alongside it.
To enable this feature, add the following to your tiger.yaml:
lib:
  createIntermediateReports: true
5.3. Registering Lifecycle Callbacks
When the tiger test library starts up it goes through the steps of reading the tiger configuration, starting the configured servers and finally starting the local tiger proxy.
By implementing a Java class which implements the interface de.gematik.test.tiger.lifecycle.LifecycleCallbacks you can run custom code before and after each of the mentioned steps.
All classes that implement this interface and are located in the package de.gematik.test.tiger.lifecycle are automatically registered and their methods will be called on the corresponding event.
Here is an example of a class that will log messages on each callback method:
package de.gematik.test.tiger.lifecycle;

import de.gematik.test.tiger.common.data.config.tigerproxy.TigerProxyConfiguration;
import java.util.logging.Logger;

public class ExampleCallback implements LifecycleCallbacks {
  Logger logger = Logger.getLogger(ExampleCallback.class.getName());

  @Override
  public void beforeReadConfiguration() {
    logger.info("beforeReadConfiguration");
  }

  @Override
  public void afterReadConfiguration() {
    logger.info("afterReadConfiguration");
  }

  @Override
  public void beforeServersStart() {
    logger.info("beforeServersStart");
  }

  @Override
  public void afterServersStart() {
    logger.info("afterServersStart");
  }

  @Override
  public void beforeLocalTigerProxyStart(TigerProxyConfiguration localTigerProxyConfiguration) {
    logger.info("beforeLocalTigerProxyStart");
  }

  @Override
  public void afterLocalTigerProxyStart(TigerProxyConfiguration localTigerProxyConfiguration) {
    logger.info("afterLocalTigerProxyStart");
  }
}
5.4. Cucumber and Hooks
As Tiger focuses on BDD and Cucumber based test suites all the setup and tear down as well as steps based actions are performed.
That’s why it is mandatory to use the TigerCucumberRunner, which internally registers the plugin io.cucumber.core.pluginTigerSerenityReporterPlugin to the plugins list.
The LocalProxyRbelMessageListener class initializes a static single RBelMessage listener to collect all messages received by the local tiger proxy and provides those messages via a getter method to the Tiger filter and validation steps.
At startup of the TigerCucumberRunner the TigerDirector gets called once to initiate the Tiger test environment manager, the local tiger proxy (unless it’s configured to be not active) and optionally the workflow UI.
It adds a RbelMessage Listener once to the local tiger proxy and also clears the RbelMessages queue before each scenario / scenario outline variant.
Utilizing the close integration of SerenityBDD and RestAssured at startup also a Restassured request filter, which parses the details and adds a curl Command details button to the Serenity BDD report, is registered.
The curl command shown in that section in the report allows to repeat the performed REST request, for manual test failure analysis.
After each scenario / data variant all collected RbelMessages are saved as HTML file to the target/rbellogs folder, and attached to the SerenityBDD report as test evidence.
The current test run state (success/failed rate) is logged to the console.
5.5. Using the Cucumber Tiger validation steps
The Tiger validation steps are a set of Cucumber steps that enable you to search for requests and associated responses matching certain criteria.
All of that without need to write your own code.
Basic knowledge about RBelPath and regular expressions are sufficient.
In order to use these steps you must ensure that the relevant traffic is routed via the local tiger proxy of the test suite or construct a tiger proxy mesh set up.
5.5.1. Filtering requests
-
Filter for server, method, path, RBelPath node existing / matching given value in request
-
Find first / next / last matching request
-
Find absolute last request (no path input needed)
-
Find first / next / last request containing a RBelPath node
-
Clear all recorded messages
-
Specify timeout for filtering request
With the TGR find next request … steps you can validate a complete workflow of requests to exist in a specific order and validate each of their responses (see next chapter).
5.5.2. Validation iteration order
By default the validator iterates messages in registration order (sequence number).
In proxy-mesh setups where upstream traffic can arrive out of chronological order, switch to transmission-timestamp order via tiger.lib.validation.messageSortOrder:
-
SEQUENCE(default) – sequence number order -
TIMESTAMP– ascending transmission timestamp, sequence number as tiebreaker
TIMESTAMP changes how every validator step pairs requests/responses; existing suites may need review.For a single, standalone Tiger Proxy both modes are equivalent. |
5.5.3. Validating responses
-
Assert that the body of the response matches regex
-
Assert that a given RBelPath node exists
-
Assert that a given RBelPath node matches regex
-
Assert that a given RBelPath node does not match regex
-
Assert that a given RBelPath node matches a JSON struct using the JSONChecker feature set
-
Assert that a given RBelPath node matches an XML struct using the XMLUnit difference evaluator
Feature Tiger validation steps

  Scenario: Example steps

    Given TGR clear recorded messages
    And TGR filter requests based on host "testnode.example.org"
    And TGR filter requests based on method "POST"
    And TGR set request wait timeout to 20 seconds
    When TGR find first request to path "/path/path/blabla" with "$..tag.value.text" matching "abc.*"
    And TGR find first request to path "/path/path/blabla" containing node "$..tag"
    Then TGR current response with attribute "$..answer.result.text" matches "OK.*"
    But TGR current response with attribute "$..answer.reason.text" does not match "REQUEST.*"
    And TGR current response body matches:
    """
         body content
        """
    And TGR current response at "$..tag" matches as JSON:
    """
          {
            "arr1": [
              "asso", "bsso"
            ]
          }
        """
    And TGR current response at "$..tag" matches as XML:
    """
          <arr1>
            <entry index="1">asso</entry>
            <entry index="2">bsso</entry>
          </arr1>
        """

    Given TGR find message with "$.pop3Body.mimeHeader.subject" matching ".*test.*"
    Given TGR find next message with "$.pop3Status" matching "-ERR"
    Given TGR find last message with "$.pop3Command" matching "RETR"
5.5.4. Validating requests
-
Assert that the body of the request matches regex
-
Assert that a given RBelPath contains node
-
Assert that a given RBelPath node matches regex
-
Assert that a given RBelPath matches regex
-
Assert that a given RBelPath node matches as JSON or XML
-
Assert that a given RBelPath node does not match regex
Feature Tiger request validation steps

  Background:
    Given TGR clear recorded messages

  Scenario: Test validation Request
    When TGR send PUT request to "http://httpbin/put" with body "{'foo': 'bar'}"
    Then TGR find last request to path ".*"
    Then TGR current request body matches:
    """
    {'foo': 'bar'}
        """

    Then TGR current request contains node "$.body.foo"
    Then TGR current request with attribute "$.body.foo" matches "bar"
    Then TGR current request at "$.body" matches:
    """
    {'foo': 'bar'}
        """

    Then TGR current request at "$.body" matches as JSON:
    """
    {
      "foo": "${json-unit.ignore}"
    }
        """

    Then TGR current request with attribute "$.body.foo" does not match "foo"
5.5.5. Regex matching
When comparing values (e.g. in the TGR current response body matches:) generally the algorithms check for equality and only check for regex matches if they were not equal.
5.5.6. Complete set of steps in validation glue code
TGR set request wait timeout to {int} seconds
Specify the amount of seconds Tiger should wait when filtering for requests / responses before
reporting them as not found.
TGR clear recorded messages
clear all validatable rbel messages. This does not clear the recorded messages later on
reported via the rbel log HTML page or the messages shown on web ui of tiger proxies.
TGR filter requests based on host {tigerResolvedString}
filter all subsequent findRequest steps for hostname. To reset set host name to empty string
"".
param hostname host name (regex supported) to filter for
TGR filter requests based on port {tigerResolvedString}
filter all subsequent findRequest steps for port. To reset set port to empty string "".
param port to filter for
TGR filter requests based on method {tigerResolvedString}
filter all subsequent findRequest steps for method.
param method method to filter for
TGR warte auf eine Nachricht, in der Knoten {tigerResolvedString} mit {tigerResolvedString}" + " übereinstimmt
TGR wait for message with node {tigerResolvedString} matching {tigerResolvedString}
Wait until a message is found in which the given node, specified by a RbelPath-Expression,
matches the given value. This method will NOT alter currentRequest/currentResponse!!
param rbelPath rbel path to node/attribute
param value value to match at given node/attribute
TGR warte auf eine neue Nachricht, in der Knoten {tigerResolvedString} mit" + " {tigerResolvedString} übereinstimmt
TGR wait for new message with node {tigerResolvedString} matching {tigerResolvedString}
Wait until a NEW message is found in which the given node, specified by a RbelPath-Expression,
matches the given value. NEW in this context means that the step will wait and check only
messages which are received after the step has started. Any previously received messages will
NOT be checked. Please also note that the currentRequest/currentResponse used by the find /
find next steps are not altered by this step.
param rbelPath rbel path to node/attribute
param value value to match at given node/attribute
TGR find first request to path {string}
find the first request where the path equals or matches as regex and memorize it in the {link
#rbelValidator} instance
param path path to match
TGR find request to path {string}
DEPRECATED please use "TGR find first request to path {string}" instead.
TGR find request to path {string} with {string} matching {string}
DEPRECATED please use "TGR find first request to path {string} with {string} matching {string}"
instead. Please use "TGR find first request to path {string} with {string} matching {string}"
instead.
deprecated
TGR finde die erste Anfrage mit Pfad {string} und Knoten {string} der mit {string}" + " übereinstimmt
TGR find first request to path {string} with {string} matching {string}
find the first request where path and node value equal or match as regex and memorize it in the
{link #rbelMessageRetriever} instance.
param path path to match
param rbelPath rbel path to node/attribute
param value value to match at given node/attribute
TGR find next request to path {string}
find the NEXT request where the path equals or matches as regex and memorize it in the {link
#rbelMessageRetriever} instance.
param path path to match
TGR find request with host {tigerResolvedString} and port {tigerResolvedString}
find the first request where host and port equal the given values and memorize it in the {link
#rbelMessageRetriever} instance.
param host host to match
param port port to match
TGR find next request on same connection
find the NEXT request on the same connection as the last found request and memorize it in the
{link #rbelMessageRetriever} instance
TGR finde die nächste Anfrage mit Pfad {string} und Knoten {string} der mit {string}" + " übereinstimmt
TGR find next request to path {string} with {string} matching {string}
find the NEXT request where path and node value equal or match as regex and memorize it in the
{link #rbelMessageRetriever} instance.
param path path to match
param rbelPath rbel path to node/attribute
param value value to match at given node/attribute
TGR find first request to path {string} containing node {string}
find the first request where path matches and request contains node with given rbel path and
memorize it in the {link #rbelMessageRetriever} instance.
param path path to match
param rbelPath rbel path to node/attribute
TGR find request to path {string} containing node {string}
DEPRECATED please use "TGR find first request to path {string} with {string} containing node
{string}" instead.
TGR find next request to path {string} containing node {string}
find the NEXT request where path matches and request contains node with given rbel path and
memorize it in the {link #rbelMessageRetriever} instance.
param path path to match
param rbelPath rbel path to node/attribute
TGR find last request to path {string}
find the LAST request where the path equals or matches as regex and memorize it in the {link
#rbelMessageRetriever} instance.
param path path to match
TGR finde die letzte Anfrage mit Pfad {string} und Knoten {string} der mit {string}" + " übereinstimmt
TGR find last request to path {string} with {string} matching {string}
find the LAST request where path and node value equal or match as regex and memorize it in the
{link #rbelMessageRetriever} instance.
param path path to match
param rbelPath rbel path to node/attribute
param value value to match at given node/attribute
TGR find last request with {string} matching {string}
find the LAST request where the node value equal or match as regex and memorize it in the
{link #rbelMessageRetriever} instance.
param rbelPath rbel path to node/attribute
param value value to match at given node/attribute
TGR finde eine Nachricht mit Knoten {tigerResolvedString} der mit {tigerResolvedString}" + " übereinstimmt
TGR any message with attribute {tigerResolvedString} matches {tigerResolvedString}
assert that there is any message with given rbel path node/attribute matching given value. The
matching will NOT perform regular expression matching but only checks for identical string
content The result (request or response) will not be stored in the {link
#rbelMessageRetriever} instance.
param rbelPath rbel path to node/attribute
param value value to match at given node/attribute
deprecated
TGR find message with {string} matching {string}
find the first message where node value equal or match as regex and memorize it in the {link
#rbelMessageRetriever} instance.
param rbelPath rbel path to node/attribute
param value value to match at given node/attribute
TGR find message with {string}
find the first message containing given node and memorize it in the {link
#rbelMessageRetriever} instance.
param rbelPath rbel path to node/attribute
TGR find next message with {string} matching {string}
find the next message where node value equal or match as regex and memorize it in the {link
#rbelMessageRetriever} instance. If the previous search using the 'find*message' steps found a
response message, then this search starts after that response, otherwise, it starts after the
current request message.
param rbelPath rbel path to node/attribute
param value value to match at given node/attribute
TGR find next message with {string}
find the next message containing given node and memorize it in the {link
#rbelMessageRetriever} instance. If the previous search using any of the 'find*message' steps
found a response message, then this search starts after that response, otherwise, it starts
after the current request message.
param rbelPath rbel path to node/attribute
TGR find last message with {string} matching {string}
find the last message where node value equal or match as regex and memorize it in the {link
#rbelMessageRetriever} instance.
param rbelPath rbel path to node/attribute
param value value to match at given node/attribute
TGR find last message with {string}
find the last message containing given node and memorize it in the {link *
#rbelMessageRetriever} instance.
param rbelPath rbel path to node/attribute
TGR current request body matches:
assert that request body matches.
param docString value / regex that should equal or match
TGR prüfe aktueller Request stimmt im Knoten {tigerResolvedString} überein mit" + " {tigerResolvedString}
TGR prüfe aktuelle Anfrage stimmt im Knoten {tigerResolvedString} überein mit" + " {tigerResolvedString}
TGR current request with attribute {tigerResolvedString} matches {tigerResolvedString}
assert that request matches the value at given rbel path node/attribute. If multiple nodes are
found, each is tested and if any matches, this step succeeds.
param rbelPath path to node/attribute
param value value / regex that should equal or match as string content with MultiLine and
DotAll regex option
TGR current request contains node {tigerResolvedString}
assert that request contains at least 1 (or maybe more) node/attribute at given rbel path.
param rbelPath path to node/attribute
TGR current request does not contain node {tigerResolvedString}
assert that request does not contain node/attribute at given rbel path.
param rbelPath path to node/attribute
TGR current request at {tigerResolvedString} matches:
assert that request matches at given rbel path node/attribute. If multiple nodes are found,
each is tested and if any matches, this step succeeds.
param rbelPath path to node/attribute
param docString value / regex that should equal or match as string content with MultiLine and
DotAll regex option supplied as DocString
TGR current request at {tigerResolvedString} matches as {modeType}:
assert that request matches at given rbel path node/attribute assuming it’s JSON or XML. If
multiple nodes are found, each is tested, and if any matches, this step succeeds.
param rbelPath path to node/attribute
param mode one of JSON|XML
param oracleDocStr value / regex that should equal or match as JSON or XML content
see JsonChecker#compareJsonStrings(String, String, boolean)
TGR prüfe aktueller Request stimmt im Knoten {tigerResolvedString} nicht überein mit" + " {tigerResolvedString}
TGR prüfe aktuelle Anfrage stimmt im Knoten {tigerResolvedString} nicht überein mit" + " {tigerResolvedString}
TGR current request with attribute {tigerResolvedString} does not match" + " {tigerResolvedString}
assert that request does not match at given rbel path node/attribute. If multiple nodes are
found, each is tested, and if any matches, this step fails.
param rbelPath path to node/attribute
param value value / regex that should NOT BE equal or should NOT match as string content with
MultiLine and DotAll regex option
TGR speichere Wert des Knotens {tigerResolvedString} der aktuellen Anfrage in der Variable" + " {tigerResolvedString}
TGR store current request node text value at {tigerResolvedString} in variable" + " {tigerResolvedString}
store given rbel path node/attribute text value of current request.
param rbelPath path to node/attribute
param varName name of variable to store the node text value in
TGR speichere Wert des Knotens {tigerResolvedString} der aktuellen Antwort in der Variable" + " {tigerResolvedString}
TGR store current response node text value at {tigerResolvedString} in variable" + " {tigerResolvedString}
store given rbel path node/attribute text value of current response.
param rbelPath path to node/attribute
param varName name of variable to store the node text value in
TGR ersetze {tigerResolvedString} mit {tigerResolvedString} im Inhalt der Variable" + " {tigerResolvedString}
TGR replace {tigerResolvedString} with {tigerResolvedString} in content of variable" + " {tigerResolvedString}
replace stored content with given regex
param regexPattern regular expression to search for
param replace string to replace all matches with
param varName name of variable to store the node text value in
TGR current response body matches:
assert that response body of filtered request matches.
param docString value / regex that should equal or match
TGR current response contains node {tigerResolvedString}
assert that response of filtered request contains at least one node/attribute at given rbel
path.
param rbelPath path to node/attribute
TGR current response does not contain node {tigerResolvedString}
assert that request does not contain node/attribute at given rbel path.
param rbelPath path to node/attribute
TGR prüfe aktuelle Antwort stimmt im Knoten {tigerResolvedString} überein mit" + " {tigerResolvedString}
TGR current response with attribute {tigerResolvedString} matches {tigerResolvedString}
assert that response of filtered request matches at given rbel path node/attribute. If multiple
nodes are found, each is tested and if any matches, this step succeeds.
param rbelPath path to node/attribute
param value value / regex that should equal or match as string content with MultiLine and
DotAll regex option
TGR prüfe aktuelle Antwort stimmt im Knoten {tigerResolvedString} nicht überein mit" + " {tigerResolvedString}
TGR current response with attribute {tigerResolvedString} does not match" + " {tigerResolvedString}
assert that response of filtered request does not match at given rbel path node/attribute. If
multiple nodes are found, each is tested and if any matches, this step fails.
param rbelPath path to node/attribute
param value value / regex that should NOT BE equal or should NOT match as string content with
MultiLine and DotAll regex option
TGR current response at {tigerResolvedString} matches:
assert that response of filtered request matches at given rbel path node/attribute. If multiple
nodes are found, each is tested and if any matches, this step succeeds.
param rbelPath path to node/attribute
param docString value / regex that should equal or match as string content with MultiLine and
DotAll regex option supplied as DocString
TGR current response at {tigerResolvedString} does not match:
assert that response of filtered request does not match at given rbel path node/attribute. If
multiple nodes are found, each is tested and if any matches, this step fails.
param rbelPath path to node/attribute
param docString value / regex that should equal or match as string content with MultiLine and
DotAll regex option supplied as DocString
TGR current response at {tigerResolvedString} matches as {modeType}:
assert that response of filtered request matches at given rbel path node/attribute assuming
it’s JSON or XML. If multiple nodes match, each is tested, and if any match this step succeeds.
param rbelPath path to node/attribute
param mode one of JSON|XML
param oracleDocStr value / regex that should equal or match as JSON or XML content
see JsonChecker#compareJsonStrings(String, String, boolean)
TGR prüfe aktuelle Antwort im Knoten {tigerResolvedString} stimmt als XML mit folgenden diff" + " Optionen {tigerResolvedString} überein mit:
TGR current response at {tigerResolvedString} matches as XML and diff options" + " {tigerResolvedString}:
assert that response of filtered request matches at given rbel path node/attribute assuming its
XML with the given list of diff options. If multiple nodes match, each is tested and if any
match, this step succeeds
param rbelPath path to node/attribute
param diffOptionsCSV a csv separated list of diff option identifiers to be applied to
comparison of the two XML sources -nocomment … {link DiffBuilder#ignoreComments()}
-txtignoreempty … {link DiffBuilder#ignoreElementContentWhitespace()} -txttrim …
{link DiffBuilder#ignoreWhitespace()} -txtnormalize … {link
DiffBuilder#normalizeWhitespace()}
param xmlDocStr value / regex that should equal or match as JSON content
see <a href="https://github.com/xmlunit/user-guide/wiki/DifferenceEvaluator">More on
DifferenceEvaluator</a>
TGR print all messages as rbel-tree
Prints the rbel-tree of all requests and responses to the System-out
TGR print current response as rbel-tree
Prints the rbel-tree of the current response to the System-out
TGR print current request as rbel-tree
Prints the rbel-tree of the current request to the System-out
TGR reads the following .tgr file {tigerResolvedString}
Reads a Tiger traffic file and sends messages to local Tiger proxy
TGR die Fehlermeldung wird gesetzt auf: {tigerResolvedString}
Sets a custom failure message that will be displayed in the logs if a following step in the
test fails.
param customFailureMessage the custom failure message
TGR die Parser für {string} sind deaktiviert
Deactivate the rbel parsing for the given parsers.
param parsersToDeactivate a comma separated list of parser identifiers to deactivate.
5.6. Writing your own Glue code
You can define your own BDD steps and write the corresponding glue code in your own project. The glue code files should be placed either in the test/java directory or in the main/java directory depending on your project structure and needs.
You must remember to configure the packages where your glue code is defined in the tiger-maven-plugin configuration.
Additionally, you can use some tiger-specific annotations to improve the integration with your glue code with the tiger Workflow Ui and reporting.
5.6.1. Resolving Variables
When defining a glue code method, you can use the variables with the names {tigerResolvedString} and {tigerResolvedUrl}.
These will be automatically resolved by the TigerGlobalConfiguration resolver, and the result is injected directly in the java method.
Here an example:
@Given("an example with a {tigerResolvedString} and a {tigerResolvedUrl}")
public void myExampleMethod(String thisIsTheResolvedStringVariable, URI thisIsTheResolvedUrlVariable){
    //do something with the variables
}
When using this step in a feature file, the passed string and url are resolved before being passed to the java code.
Inside the java code you don’t need to call the resolver again.
The resolved values are also displayed in the Workflow UI and serenity reports.
DataTables and Multiline string arguments
Datatables and multiline strings are special arguments that are passed as the last argument of a method.
They have no placeholder in the cucumber expression.
Here we do not provide an automatic resolving of the arguments before passing them to the java method.
This is because the resolving may not be applicable on every possible use case.
Instead, we provide the marker annotation @ResolvableArgument whose purpose is to ensure that the arguments appear resolved in the Workflow Ui and reports.
Inside the java method the code must do the resolving explicitly.
Here are two examples:
@Given("here is an example of multiline string argument:")
@ResolvableArgument
public void multilineStringExample(String docstring){
 var resolvedExplicitly = TigerGlobalConfiguration.resolvePlaceholders(docString);
}

@Given("here is an example of datatable argument:")
@ResolvableArgument
public void multilineStringExample(DataTable dataTable){
 var resolvedExplicitly = dataTable.asMap().entrySet().stream()
        .collect(
            Collectors.toMap(
                entry -> resolveToString(entry.getKey()),
                entry -> resolveToString(entry.getValue)));
}
5.6.2. Formating Tables
Depending on the concrete useage, a DataTable may be interpreted by the glue code as a row wise argument or as a column wise argument.
To make it clearer to the user, it may be helpful to highlight the first row or the first column of the table when displaying it in the Workflow Ui.
For that you can use the annotations @FirstColumnKeyTable and @FirstRowKeyTable on your own glue code.
When applying the annotations to a glue code method with a DataTable argument, the datatable will apply a bold formatting to the first column or the first row accordingly.
You can apply both annotations to the same method.
For example, this method is annotated with @FirstColumnKeyTable
 @When("TGR send empty {requestType} request to {tigerResolvedUrl} with headers:")
  @FirstColumnKeyTable
  public void sendEmptyRequestWithHeaders(Method method, URI address, DataTable customHeaders){}
and its argument will be displayed like this in the Workflow Ui:

With @FirstRowKeyTable the table will look like this:

5.7. Modifying RbelObjects (RbelBuilder)
5.7.1. Introduction
RBelObjects are internal data structures used by the Tiger test framework to represent and manipulate parsed message content, such as JSON, XML, or token formats. They allow you to access, modify, and assert values at specific paths within a message using RBelPath expressions (see Understanding RBelPath). RBelObjects enable flexible validation, transformation, and serialization of message data during automated tests.
After loading in an object from a string or a file, the RbelObject can be modified in multiple ways:
-
Changing a primitive value at a certain path
-
replacing a primitive node with an object node and vice versa
-
adding new nodes and primitive values as a child path of an existing path
-
adding new nodes to an array/list
After the adjustments, the values of the modified RbelElements can be asserted.
The object can be serialized back to a string.
Jexl Expressions are implemented, as for reading a file or for serializing:
'!{rbelObject:serialize("myRbelObject")}'
5.7.2. List of all possible Steps
TGR creates a new Rbel object {tigerResolvedString} with content {tigerResolvedString}
Creates a new Rbel object with a given key and string content; the string can be a jexl
expression
param name key of Rbel object
param content content of Rbel object, or jexl expression resolving to one
TGR creates a new empty Rbel object {tigerResolvedString} of type {rbelContentType}
Creates a new empty Rbel object
param name key of Rbel object
TGR setzt Rbel-Objekt {tigerResolvedString} an Stelle {tigerResolvedString} auf Wert" + " {tigerResolvedString}
TGR sets Rbel object {tigerResolvedString} at {tigerResolvedString} to new value" + " {tigerResolvedString}
Sets a value of an object at a specified path; newValue is of type String
param objectName name of object in rbelBuilders
param rbelPath path which is to be set
param newValue new value to be set
TGR ergänzt Rbel-Objekt {tigerResolvedString} an Stelle {tigerResolvedString} um" + " {tigerResolvedString}
TGR extends Rbel object {tigerResolvedString} at path {tigerResolvedString} by a new entry" + " {tigerResolvedString}
Adds a new entry to an array or a list of a Rbel object at a specific path
param objectName name of Rbel object
param rbelPath path of array/list
param newEntry new entry
TGR prüft, dass Rbel-Objekt {tigerResolvedString} an Stelle {tigerResolvedString} gleich" + " {tigerResolvedString} ist
TGR asserts Rbel object {tigerResolvedString} at {tigerResolvedString} equals" + " {tigerResolvedString}
Asserts whether a string value at a given path of the rootTreeNode of a RbelBuilder is a
certain value
param objectName name of RbelBuilder in rbelBuilders Map
param rbelPath Path to specific node
param expectedValue value to be asserted
5.7.3. Usage examples
Feature: Tiger - RbelBuilder

  Scenario: Replace/change/add certain values/nodes in a rbel object
    # changing primitive value
    Given TGR creates a new Rbel object 'someObjName' with content '{"address": {"street": "Friedrichstr 136","city": "Berlin","postalCode": "10115"}}'
    Then TGR sets Rbel object 'someObjName' at '$.address.street' to new value 'Hauptstrasse'
    Then TGR asserts '!{rbelObject:serialize("someObjName")}' equals '{"address": {"street": "Hauptstrasse","city": "Berlin","postalCode": "10115"}}' of type JSON

    # adding primitive value
    Given TGR creates a new Rbel object 'someAddress' with content '{"address": {"city": "Berlin","postalCode": "10115"}}'
    Then TGR sets Rbel object 'someAddress' at '$.address.street' to new value 'Friedrichstr'
    Then TGR asserts '!{rbelObject:serialize("someAddress")}' equals '{"address": {"street": "Friedrichstr","city": "Berlin","postalCode": "10115"}}' of type JSON

    # replacing object nodes
    Given TGR creates a new Rbel object 'phoneNumbers' with content '{"phoneNumbers": [{"type": "home",  "number": "030-1234567"},{"type": "mobile", "number": "0176-123456788"}]}'
    When TGR sets Rbel object 'phoneNumbers' at '$.phoneNumbers.1' to new value '{"type" : "work", "number" : "0176-199999"}'
    Then TGR asserts '!{rbelObject:serialize("phoneNumbers")}' equals '{"phoneNumbers": [{"type": "home",  "number": "030-1234567"},{"type": "work", "number": "0176-199999"}]}' of type JSON

    # adding new nodes to an array
    When TGR extends Rbel object 'phoneNumbers' at path '$.phoneNumbers' by a new entry '{"type": "mobile", "number": "0176-123456788"}'
    Then TGR asserts '!{rbelObject:serialize("phoneNumbers")}' equals '{"phoneNumbers": [{"type": "home",  "number": "030-1234567"}, {"type" : "work", "number" : "0176-199999"},{"type": "mobile", "number": "0176-123456788"}]}' of type JSON
5.8. Using the HTTP client steps
The Tiger HTTP client steps are a set of Cucumber steps that enable you to perform simple HTTP requests, with bodies, default and custom headers.
Feature: HTTP/HTTPS GlueCode Test feature

  Background:
    Given TGR clear recorded messages

  Scenario: Simple Get Request
    Given TGR clear recorded messages
    When TGR send empty GET request to "http://httpbin/"
    Then TGR find last request to path ".*"
    And TGR assert "!{rbel:currentRequestAsString('$.method')}" matches "GET"
    And TGR assert "!{rbel:currentRequestAsString('$.path')}" matches "\/?"

  Scenario: Get Request to folder
    When TGR send empty GET request to "http://httpbin/get"
    Then TGR find last request to path ".*"
    And TGR assert "!{rbel:currentRequestAsString('$.method')}" matches "GET"
    And TGR assert "!{rbel:currentRequestAsString('$.path')}" matches "\/get\/?"

  Scenario: PUT Request to folder
    When TGR send empty PUT request to "http://httpbin/put"
    Then TGR find last request to path ".*"
    And TGR assert "!{rbel:currentRequestAsString('$.method')}" matches "PUT"
    And TGR assert "!{rbel:currentRequestAsString('$.path')}" matches "\/put\/?"

  Scenario: PUT Request with body to folder
    When TGR send PUT request to "http://httpbin/put" with body "{'hello': 'world!'}"
    Then TGR find last request to path ".*"
    And TGR assert "!{rbel:currentRequestAsString('$.method')}" matches "PUT"
    And TGR assert "!{rbel:currentRequestAsString('$.path')}" matches "\/put\/?"
    And TGR assert "!{rbel:currentRequestAsString('$.body.hello')}" matches "world!"

  Scenario: PUT Request with body from file to folder
    When TGR send PUT request to "http://httpbin/put" with body "!{file('pom.xml')}"
    Then TGR find last request to path ".*"
    And TGR assert "!{rbel:currentRequestAsString('$.method')}" matches "PUT"
    And TGR assert "!{rbel:currentRequestAsString('$.path')}" matches "\/put\/?"
    And TGR assert "!{rbel:currentRequestAsString('$.body.project.modelVersion.text')}" matches "4.0.0"
   # application/octet-stream is used since no rewriting is done, so unknown/default MIME-type is assumed
    And TGR assert "!{rbel:currentRequestAsString('$.header.Content-Type')}" matches "application/octet-stream.*"

  Scenario: DELETE Request without body
    When TGR send empty DELETE request to "http://httpbin/delete"
    Then TGR find last request to path ".*"
    And TGR assert "!{rbel:currentRequestAsString('$.method')}" matches "DELETE"
    And TGR assert "!{rbel:currentRequestAsString('$.path')}" matches "\/delete\/?"

  Scenario: Request with custom header
    When TGR send empty GET request to "http://httpbin/get" with headers:
      | foo    | bar |
      | schmoo | lar |
    Then TGR find last request to path ".*"
    And TGR assert "!{rbel:currentRequestAsString('$.header.foo')}" matches "bar"
    And TGR assert "!{rbel:currentRequestAsString('$.header.schmoo')}" matches "lar"

  Scenario: Request with default header
    Given TGR set default header "key" to "value"
    When TGR send empty GET request to "http://httpbin/get"
    Then TGR find last request to path ".*"
    And TGR assert "!{rbel:currentRequestAsString('$.header.key')}" matches "value"
    When TGR send POST request to "http://httpbin/post" with body "hello world"
    Then TGR find last request to path ".*"
    And TGR assert "!{rbel:currentRequestAsString('$.header.key')}" matches "value"
    And TGR assert "!{rbel:currentRequestAsString('$.body')}" matches "hello world"

  Scenario: Request with custom and default header, check headers
    Given TGR set default header "key" to "value"
    When TGR send empty GET request to "http://httpbin/get" with headers:
      | foo | bar |
    Then TGR find last request to path ".*"
    And TGR assert "!{rbel:currentRequestAsString('$.header.foo')}" matches "bar"
    And TGR assert "!{rbel:currentRequestAsString('$.header.key')}" matches "value"

  Scenario: Get Request with custom and default header, check body, application type url encoded
    Given TGR set local variable "configured_state_value" to "some weird $value§"
    Given TGR set local variable "configured_param_name" to "my_cool_param"
    When TGR send GET request to "http://httpbin/get" with:
      | ${configured_param_name} | state                     | redirect_uri        |
      | client_id                | ${configured_state_value} | https://my.redirect |
    Then TGR find last request to path ".*"
    And TGR assert "!{rbel:currentRequestAsString('$.path.state.value')}" matches "${configured_state_value}"
    And TGR assert "!{rbel:currentRequestAsString('$.path.state')}" matches "state=!{urlEncoded('some weird $value§')}"
    And TGR assert "!{rbel:currentRequestAsString('$.path.my_cool_param')}" matches "${configured_param_name}=client_id"
    And TGR assert "!{rbel:currentRequestAsString('$.header.Content-Type')}" matches "application/x-www-form-urlencoded.*"

  Scenario: Post Request with custom and default header, check body, application type url encoded
    Given TGR set local variable "configured_state_value" to "some weird $value§"
    Given TGR set local variable "configured_param_name" to "my_cool_param"
    When TGR send POST request to "http://httpbin/post" with:
      | ${configured_param_name} | state                     | redirect_uri        |
      | client_id                | ${configured_state_value} | https://my.redirect |
    Then TGR find last request to path ".*"
    And TGR assert "!{rbel:currentRequestAsString('$.body.state')}" matches "!{urlEncoded('some weird $value§')}"
    And TGR assert "!{rbel:currentRequestAsString('$.body.my_cool_param')}" matches "client_id"
    And TGR assert "!{rbel:currentRequestAsString('$.header.Content-Type')}" matches "application/x-www-form-urlencoded.*"
    And TGR assert "!{rbel:currentRequestAsString('$.body.redirect_uri')}" matches "!{urlEncoded('https://my.redirect')}"

  Scenario: Request with custom and default header, check application type json
    Given TGR set default header "Content-Type" to "application/json"
    When TGR send POST request to "http://httpbin/post" with:
      | ${configured_param_name} |
      | client_id                |
    Then TGR find last request to path ".*"
    And TGR assert "!{rbel:currentRequestAsString('$.header.Content-Type')}" matches "application/json"

  Scenario Outline: JEXL Rbel Namespace Test
    Given TGR send empty GET request to "http://httpbin/html"
    Then TGR find first request to path "/html"
    Then TGR current response with attribute "$.body.html.body.h1.text" matches "!{rbel:currentResponseAsString('$.body.html.body.h1.text')}"

    Examples: We use this data only for testing data variant display in workflow ui, there is no deeper sense in it
      | txt   | txt2 | txt3 | txt4 | txt5 |
      | text2 | 21   | 31   | 41   | 51   |
      | text2 | 22   | 32   | 42   | 52   |

  Scenario: Simple first test
    Given TGR send empty GET request to "http://httpbin/html"
    Then TGR find first request to path "/html"
    Then TGR current response with attribute "$.body.html.body.h1.text" matches "Herman Melville - Moby-Dick"

  Scenario: Test Find Last Request
    Given TGR send empty GET request to "http://httpbin/anything?foobar=1"
    Then TGR send empty GET request to "http://httpbin/anything?foobar=2"
    Then TGR find last request to path "/anything"
    Then TGR current response with attribute "$.responseCode" matches "200"
    Then TGR current response with attribute "$.body.url.content.foobar.value" matches "2"

  Scenario: Test find last request with parameters
    Given TGR send empty GET request to "http://httpbin/anything?foobar=1"
    Then TGR send empty GET request to "http://httpbin/anything?foobar=1&xyz=4"
    Then TGR send empty GET request to "http://httpbin/anything?foobar=2"
    Then TGR find last request to path "/anything" with "$.path.foobar.value" matching "1"
    Then TGR current response with attribute "$.body.url.content.xyz.value" matches "4"

  Scenario: Test find last request
    Given TGR send empty GET request to "http://httpbin/anything?foobar=1"
    Then TGR send empty GET request to "http://httpbin/anything?foobar=2"
    Then TGR send empty GET request to "http://httpbin/anything?foobar=3"
    Then TGR send empty GET request to "http://httpbin/status/404?other=param"
    Then TGR find the last request
    Then TGR current response with attribute "$.responseCode" matches "404"
    Then TGR assert "!{rbel:currentRequestAsString('$.path.other.value')}" matches "param"

  Scenario: Get Request to folder and test param is url decoded when access via $.path and ..value is url decoded
    When TGR send empty GET request to "http://httpbin/get?foo=bar%20and%20schmar"
    Then TGR find last request to path ".*"
    And TGR assert "!{rbel:currentRequestAsString('$.path.foo.value')}" matches "bar and schmar"
    And TGR assert "!{rbel:currentRequestAsString('$.path.foo')}" matches "foo=bar%20and%20schmar"

  Scenario: Test deactivate followRedirects
    When TGR disable HttpClient followRedirects configuration
    And TGR send empty GET request to "http://httpbin/redirect-to?url=!{urlEncoded('http://httpbin/status/200')}"
    Then TGR find the last request
    Then TGR current response with attribute "$.responseCode" matches "302"
    And TGR current response with attribute "$.header.Location" matches "http://httpbin/status/200"
    When TGR reset HttpClient followRedirects configuration
    And TGR send empty GET request to "http://httpbin/redirect-to?url=!{urlEncoded('http://httpbin/status/200')}"
    Then TGR find the last request
    Then TGR current response with attribute "$.responseCode" matches "200"

  Scenario: Test check filter POST request
    Given TGR send POST request to "http://httpbin/post" with body "{'foobar': '4'}"
    And TGR send empty GET request to "http://httpbin/anything?foobar=22"
    And TGR filter requests based on method "POST"
    Then TGR find last request to path ".*"
    Then TGR current response with attribute "$.body.data.foobar" matches "4"

  Scenario: Test check filter GET request
    Given TGR send empty GET request to "http://httpbin/anything?foobar=22"
    And TGR send POST request to "http://httpbin/post" with body "{'foobar': '4'}"
    And TGR filter requests based on method "GET"
    Then TGR find last request to path ".*"
    Then TGR current response with attribute "$.body.args.foobar.0" matches "22"

  Scenario: Test check filter method reset
    Given TGR reset request method filter
   # check resetting it works even if done twice
    And TGR reset request method filter
    And TGR send empty GET request to "http://httpbin/anything?foobar=22"
    And TGR send POST request to "http://httpbin/post" with body "{'foobar': '4'}"
    Given TGR reset request method filter
    Then TGR find the last request
    Then TGR current response with attribute "$.body.data.foobar" matches "4"

  Scenario: Test check filter POST request
    Given TGR send empty GET request to "http://httpbin/anything?foobar=66"
    When TGR find last request with "$.path.foobar.value" matching "66"
    Then TGR current response with attribute "$.body.args.foobar.0" matches "66"
5.8.1. Complete set of steps in HTTP client glue code
TGR sende eine leere {requestType} Anfrage an {tigerResolvedUrl}
Sends an empty request via the selected method. Placeholders in address will be resolved.
param method HTTP request method (see {link Method})
param address target address
see TigerGlobalConfiguration#resolvePlaceholders(String)
TGR sende eine leere {requestType} Anfrage an {tigerResolvedUrl} ohne auf Antwort zu warten
Sends an empty request via the selected method. Placeholders in address will be resolved.
This method is NON-BLOCKING, meaning it will not wait for the response before continuing the
test.
param method HTTP request method (see {link Method})
param address target address
see TigerGlobalConfiguration#resolvePlaceholders(String)
TGR sende eine leere {requestType} Anfrage an {tigerResolvedUrl} mit folgenden Headern:
Sends an empty request via the selected method and expands the list of default headers with the
headers provided by the caller. Placeholders in address and in the data table will be resolved.
Example:
    When TGR send empty GET request to "${myAddress}" with headers:
     | name | bob |
     | age  | 27  |
This will add two headers (name and age) with the respective values "bob" and "27" on top of
the headers which are used by default.
param method HTTP request method (see {link Method})
param address target address
param customHeaders Markdown table of custom headers and their values
see TigerGlobalConfiguration#resolvePlaceholders(String)
TGR send empty {requestType} request to {tigerResolvedUrl} without waiting for the response" + " with headers:
TGR sende eine leere {requestType} Anfrage an {tigerResolvedUrl} ohne auf Antwort zu warten" + " mit folgenden Headern:
Sends an empty request via the selected method and expands the list of default headers with the
headers provided by the caller. Placeholders in address and in the data table will be resolved.
This method is NON-BLOCKING, meaning it will not wait for the response before continuing the
test.
param method HTTP request method (see {link Method})
param address target address
param customHeaders Markdown table of custom headers and their values
see TigerGlobalConfiguration#resolvePlaceholders(String)
TGR eine leere {requestType} Anfrage an {tigerResolvedUrl} und dem folgenden body {string}" + " sendet
TGR sende eine {requestType} Anfrage an {tigerResolvedUrl} mit Body {string}
Sends a request containing the provided body via the selected method. Placeholders in the body
and in address will be resolved.
param method HTTP request method (see {link Method})
param body to be included in the request
param address target address
see TigerGlobalConfiguration#resolvePlaceholders(String)
TGR send {requestType} request to {tigerResolvedUrl} with body {string} without waiting for" + " the response
TGR sende eine {requestType} Anfrage an {tigerResolvedUrl} mit Body {string} ohne auf" + " Antwort zu warten
Sends a request containing the provided body via the selected method. Placeholders in the body
and in address will be resolved.
This method is NON-BLOCKING, meaning it will not wait for the response before continuing the
test.
param method HTTP request method (see {link Method})
param body to be included in the request
param address target address
see TigerGlobalConfiguration#resolvePlaceholders(String)
TGR sende eine {requestType} Anfrage an {tigerResolvedUrl} mit folgenden Daten:
Sends a request via the selected method. The request is expanded by the provided key-value
pairs. Placeholders in keys and values will be resolved. The values must not be URL encoded, as
this is done by the step. Example:
     When Send POST request to "http://my.address.com" with
      | ${configured_param_name}   | state                     | redirect_uri        |
      | client_id                  | ${configured_state_value} | https://my.redirect |
NOTE: This Markdown table must contain exactly 1 row of headers and 1 row of values.
param method HTTP request method (see {link Method})
param address target address
param parameters to be sent with the request
see RequestSpecification#formParams(Map)
see TigerGlobalConfiguration#resolvePlaceholders(String)
TGR eine {requestType} Anfrage an {tigerResolvedUrl} mit den folgenden mehrzeiligen Daten" + " sendet:
TGR sende eine {requestType} Anfrage an {tigerResolvedUrl} mit folgenden mehrzeiligen" + " Daten:
Sends a request via the selected method. For the given request’s body placeholders in keys and
values will be resolved. This step is meant to be used for more complex bodys spanning multiple
lines.
Example:
     When TGR send POST request to "http://my.address.com" with multiline body:
      """
        {
             "name": "value",
             "object": { "member": "value" },
             "array" : [ 1,2,3,4]
        }
      """
param method HTTP request method (see {link Method})
param address target address
param body body content of the request
see TigerGlobalConfiguration#resolvePlaceholders(String)
TGR send {requestType} request to {tigerResolvedUrl} with contentType {string} and multiline" + " body:
TGR eine {requestType} Anfrage an {tigerResolvedUrl} mit ContentType {string} und den" + " folgenden mehrzeiligen Daten sendet:
TGR sende eine {requestType} Anfrage an {tigerResolvedUrl} mit ContentType {string} und" + " folgenden mehrzeiligen Daten:
TGR sende eine {requestType} Anfrage an {tigerResolvedUrl} ohne auf Antwort zu warten mit" + " folgenden Daten:
Sends a request via the selected method. The request is expanded by the provided key-value
pairs. Placeholders in keys and values will be resolved. The values must not be URL encoded, as
this is done by the step.
This method is NON-BLOCKING, meaning it will not wait for the response before continuing the
test.
param method HTTP request method (see {link Method})
param address target address
param parameters to be sent with the request
see RequestSpecification#formParams(Map)
see TigerGlobalConfiguration#resolvePlaceholders(String)
TGR setze den default header {tigerResolvedString} auf den Wert {tigerResolvedString}
Expands the list of default headers with the provided key-value pair. If the key already
exists, then the existing value is overwritten by the new value. Placeholders in the header
name and in its value will be resolved.
param header key
param value to be stored under the given key
see TigerGlobalConfiguration#resolvePlaceholders(String)
TGR folgende default headers gesetzt werden:
Expands the list of default headers with the provided key-value pairs. If the key already
exists, then the existing value is overwritten by the new value. Placeholders in the header
names and in their values will be resolved.
param docstring multiline doc string, one key value pair per line
see TigerGlobalConfiguration#resolvePlaceholders(String)
5.8.2. XMLUnit Diff Builder
Using the validation steps TGR current response at {string} matches as XML: or
TGR current response at {string} matches as XML and diff options {string}: you are able to compare the content of any RbelPath node in the response.
The latter method even allows passing in the following options to the XMLUnit’s DiffBuilder:
-
"nocomment" for DiffBuilder::ignoreComments
-
"txtignoreempty" for DiffBuilder::ignoreElementContentWhitespace
-
"txttrim" for DiffBuilder::ignoreWhitespace
-
"txtnormalize" for DiffBuilder::normalizeWhitespace
Per default the comparison algorithm will ignore mismatches in namespace prefixes and URIs.
Comparison is also performed on similarity and not equal content.
For more detailed explanation about the XMLUnit difference evaluator we refer to the online documentation of the XMLUnit project.
5.8.3. JSONChecker
Using the validation step TGR current response at {string} matches as JSON: you are able to compare the content of any RbelPath node in the response to the doc string beneath the step, with the help of the JSONChecker comparison algorithm.
The purpose of JSONChecker class is to compare JSON structures, including checking for the integrity of the whole RbelPath node, as well as matching values for particular keys.
To make sure all the attributes in your JSON RbelPath structure are present, such features as ${json-unit.ignore}, $NULL, optional attributes, regular expressions and lenient mode can come in handy.
${json-unit.ignore} is a parameter which allows ignoring certain values in your RbelPath node while comparing, and the result of such comparison always returns true.
It also works when ${json-unit.ignore} is used in a JSON array or nested JSON object.
This parameter should be placed as a value of a key.
To ignore some attributes in the JSON structure, you can set a boolean value checkExtraAttributes as false.
In this case if you miss one attribute in your doc string, the comparison will still be equal to true.
To check whether the value for a particular key is null, you can either use null or parameter $NULL at the place of the value.
Checking whether a nested key is null also works with JSONChecker.
Four underscores "__" before the JSON keys indicate that these keys are optional and will be checked for the value ONLY if the value exists in the test JSON RBelPath node.
Please note that checking whether a nested key is optional, is not yet possible with JsonChecker.
JSON Arrays are compared in lenient mode, meaning that the order of elements in JSON array doesn’t matter.
Identifying missing keys is made easy in JSONChecker with the help of parameter $REMOVE.
If you specify the name of the key and then $REMOVE parameter as its value, the comparison will result in true, if the key is indeed missing and false, if the key is present.
It is worth noting that even if the value of the key is null, the key doesn’t count as missing.
Last but not least, regular expressions, which can be used for matching the whole JSON element, as well as particular values.
It will be first checked, whether the expected value is equal to the actual one, and only afterwards, if the actual value matches a regular expression.
It should also be noted, that although JSONChecker can match multilevel JSON objects at a high level, it is not yet possible to access nested attributes out of the box.
We are working on it :)
  {
    "alg": "dir",
    "enc": "A256GCM",
    "cty": "$NULL",
    "exp": "[\\d]*",
    "____kid": ".*",
    "dummyentry": "${json-unit.ignore}",
    "dummyarray": [ "entry1", "entry2" ],
    "dummyarray2":  "${json-unit.ignore}"
  }
The example above shows three main features of the JSONChecker.
-
Value specified as $NULL, meaning this value of this key is equal to null.
-
Usage of regular expression (e.g. ".*" and "[\\d]*") to match values.
-
Usage of "__" preceeding a JSON key: This indicates that the entry is optional but if it exists it must match the given value.
-
if a value is specified as "${json-unit.ignore}", there is no check performed at all.
This applies also to objects and arrays as seen in the dummyarray2 entry. -
if we match key dummyEntry2 to the value of $REMOVE, it will return true, because this key does not exist.
JSON Schema Validation
Using the validation step TGR current response at {string} matches as JSON_SCHEMA: you are able to assert that the content of any RbelPath node complies with the JSON Schema given in the doc string beneath the step.
We use the JSON Schema version 2020-12 for validation with the additional feature that we can have placeholders in the schema that will be replaced with values from the Tiger Global Configuration.
For example:
TGR current response at "$.body" matches as JSON_SCHEMA:
"""
{
  "type": "object",
  "properties": {
    "name": {
      "type": "string"
    },
    "age": {
      "type": "integer",
      "minimum": 0
    },
    "email": {
      "type": "string",
      "format": "email"
    },
    "address": {
      "type": "string",
      "const": "${tiger.value.from.config}"
    }
  },
  "required": [
    "name",
    "age"
  ]
}
"""
would validate a message with a JSON body like:
{
  "name": "hello",
  "age": 5,
  "email": "hello@example.com",
  "address": "Friedrichstraße"
}
assuming that the value of ${tiger.value.from.config} set in the Tiger Global Configuration is Friedrichstraße.
For full details how to specify a JSON Schema, refer to the external resource: Understanding JSON Schema.
In this list you can find a list of online validators which you can use to test your schema.
Remember to test under JSON Schema version 2020-12.
YAML Schema Validation
Using the validation step TGR current response at {string} matches as YAML_SCHEMA: you are able to assert that the content of any RbelPath node complies with the schema given in the doc string beneath the step, where both the content and the schema are expressed in YAML.
Since YAML is a superset of JSON, the content under test can be either YAML or JSON — the schema however must be in YAML format.
The same JSON Schema version 2020-12 is used for validation, and placeholder substitution from the Tiger Global Configuration works the same way as for JSON_SCHEMA.
For example:
TGR current response at "$.body" matches as YAML_SCHEMA:
"""
type: object
properties:
  name:
    type: string
  age:
    type: integer
    minimum: 0
  email:
    type: string
    format: email
  address:
    type: string
    const: "${tiger.value.from.config}"
required:
  - name
  - age
"""
would validate a message with a YAML body like:
name: hello
age: 5
email: hello@example.com
address: Friedrichstraße
or equivalently a JSON body like:
{
  "name": "hello",
  "age": 5,
  "email": "hello@example.com",
  "address": "Friedrichstraße"
}
assuming that the value of ${tiger.value.from.config} set in the Tiger Global Configuration is Friedrichstraße.
5.9. Exemplaric scenario Konnektorfarm EAU validation
The EAU Konnektorfarm scenario is a scenario where customers can use their Primärsystem to test signing and verifying documents via a set of Konnektoren and that this works interoperable.
For this purpose a phalanx of local Tiger Proxies is set up as reverse proxies for each Konnektor being hosted at the gematik location.
Any message that is forwarded by any of these proxies is forwarded to an aggregating tiger proxy which in turn forwards all the received messages to the local tiger proxy for assertion via the validation test suite.

So after starting the validation test suite (and the test environment), the customer / Primärsystem manufacturer must perform the specified workflow.
The test suite meanwhile will wait for a given order of requests/responses matching specified criteria to appear.
If all is well, at the end the test report JSON files will be packed into a zip archive and can be uploaded to the Titus platform for further certification steps.

5.10. Using Tiger test lib helper classes
If you don’t want to use the Tiger test framework but only pick a few helper classes the following classes might be of interest to you:
| All classes listed here are part of the tiger-common module |
For BDD feature files Tiger provides some helper steps too.
5.10.1. Complete set of helper steps in Tiger glue code
TGR Testsuite {string} Version {string}
NoOp step to allow marking test suites as being from a specific version, this step is shown in
the workflow ui, the serenity report and can be validated by the Titus validator. Tiger does
not resolve the test suite name and version string!
param testsuite name of the test suite
param version version of the test suite
TGR set global variable {tigerResolvedString} to {tigerResolvedString}
Sets the given key to the given value in the global configuration store. Variable substitution
is performed.
param key key of the context
param value value for the context entry with given key
TGR unset global variable {tigerResolvedString}
Remove the variable with the given key from the global configuration store. Variable
substitution is performed.
param key key of the context entry to remove
TGR set local variable {tigerResolvedString} to {tigerResolvedString}
Sets the given key to the given value in the global configuration store. Variable substitution
is performed. This value will only be available in the given scenario being clear up after the
scenario run is finished.
param key key of the context
param value value for the context entry with given key
TGR assert variable {tigerResolvedString} matches {tigerResolvedString}
asserts that value with given key either equals or matches (regex) the given regex string.
Variable substitution is performed. This checks both global and local variables!
param key key of entry to check
param regex regular expression (or equals string) to compare the value of the entry to
TGR assert variable {tigerResolvedString} is unknown
asserts that value of context entry with given key either equals or matches (regex) the given
regex string. Variable substitution is performed.
Special values can be used:
param key key of entry to check
TGR pausiere Testausführung
Pauses the validation test suite. Please note, these steps are only modified for the Workflow
UI and don’t work on a regular console (no failure, there is just no pause).
TGR pausiere Testausführung mit Nachricht {tigerResolvedString}
Pauses the validation test suite with a message. Please note, these steps are only modified for
the Workflow UI and don’t work on a regular console (no failure, there is just no popup /
pause).
param message message to be displayed in the Workflow UI.
TGR pause test run execution with message {tigerResolvedString} and message in case of error" + " {tigerResolvedString}
TGR pausiere Testausführung mit Nachricht {tigerResolvedString} und Meldung im Fehlerfall" + " {tigerResolvedString}
Pauses the validation test suite with a message shown and the option to either continue or fail
with the given error message. Please note, these steps are only modified for the Workflow UI
and don’t work on a regular console (no failure, there is just no popup / pause).
param message message to be displayed in the Workflow UI.
TGR stoppe Server {tigerResolvedString}
Stops the given server. If the server is not running or the server is not found, an exception
is thrown.
param servername The server to be stopped.
TGR starte Server {tigerResolvedString}
Starts the given server. If the server is already running or the server is not found, an
exception is thrown.
param servername The server to be started.
TGR speichere TigerGlobalConfiguration in Datei {tigerResolvedString}
Saves all the values of the Tiger Global Configuration in the given file formatted as yaml.
ATTENTION: If the file already exists it will be overwritten!
param filename the file to save the configuration to
throws IOException if an I/ O error occurs writing to or creating the file
TGR lade TigerGlobalConfiguration aus Datei {tigerResolvedString}
Loads the Tiger Global Configuration from the given file. The file must be formatted as yaml.
All previous values in the configuration will be cleared and only the values from the file will
end up in the configuration.
param filename the file to load the configuration from
throws IOException if an I/O error occurs reading the file
5.10.2. Banner
If you want to use large ASCII art style log banners you may find this class very helpful, for example take a look at the following figure.

Supports ANSI coloring and a set of different fonts.
Furthermore, all banner messages are displayed and highlighted in the Workflow UI, as seen in this figure.
5.10.3. TigerSerializationUtil
This class supports you in converting String representation of YAML and JSON data to an Java JSONObject or extract that or other loaded data to Java Maps.
If you are planning to implement test data management or configuration sets, we propose to use the TigerGlobalConfiguration class described in detail here.
5.10.4. TigerPkiIdentityLoader, TigerPkiIdentity
The loader class allows to easily instantiate PKI identities from given files.
For more details on the format and the supported file types please check this section in the test environment chapter.
5.10.5. Performing REST calls with Tiger
Tiger is closely integrated with SerenityBDD, which in turn has integrated the RestAssured library, so if you use the SerenityRest helper class, you will get detailed information about each call inside the test report.
The Tiger test library configuration also provides a flag to add curl command details to each of these calls, so that you can easily reproduce the REST call manually in case of test failure analysis.
For more information about REST testing in Tiger/SerenityBDD please check these two documents:
5.11. Synchronizing BDD scenarios with Polarion test cases (Gematik only)
Within gematik we maintain test cases via feature files being committed to git repositories.
To keep traceability to the requirements maintained in Polarion we have a Tiger sub project that synchronizes test cases in Polarion with the scenarios in our feature files.
It is a one way synchronisation, where the master are the feature files.
To use this feature the scenarios need a minimal set of mandatory annotations:
-
@TCID:xxx - a unique test case identifier, where 'xxx' matches the value of the custom field "cfInternalId" in Polarion
-
@PRODUKT:p,p,p - reference to the custom field "cfProductType".
You add this annotation above each feature, not each scenario. 'p' is a product, one is mandatory but it can be a list.
And following optional annotations exist:
-
@AFO-ID:xxx - a link to a defined requirement (Anforderung) in Polarion, where 'xxx' matches the custom field "cfAfoId"
-
@AF-ID:xxx - a link to a defined requirement (Anwendungsfall) in Polarion, where 'xxx' matches the custom field "cfAfId"
-
@AK-ID:xxx - a link to a defined requirement (Akzeptanzkriterium) in Polarion, where 'xxx' matches the work item id
-
@PRIO:n - priority number (1-4), default is '1'
-
@MODUS:xxx - describes the way of testing, default is 'automatisch'
-
@STATUS:xxx - describes the status of the test, default is 'implementiert'
-
@TESTFALL:n - describes if the test case is a negative testcase or positive one, default is 'positiv'
-
@TESTSTUFE:n - describes the test type, default is '3' (which is E2E-Test)
-
@DESCRIPTION - if your test case has a description, and you use this annotation, the description will be parsed.
If not, the description stays empty and won’t overwrite the one already existing in Polarion
If a scenario is identified that has no test case with a matching TCID, it will be created automatically in the sync run.
Background blocks will be merged to each scenario before exporting its steps to Polarion.
For more details on how to perform the synchronisation, all choices for the annotations and how to upload generated test run reports to Polarion and Aurora, please check the README.md in the PolarionToolbox project on the Gematik GitLab.
5.12. JUnit test report when using Scenario Outlines
When using Scenario Outlines in your feature files, the JUnit test report will show each example that has run in the scenario outline as a single test case.
To create a name for each example that is referencing the scenario outline, the system property cucumber.junit-platform.naming-strategy.short.example-name is set to the value pickle in case it is not set by the environment.
6. Tiger Configuration
Configuration is a key aspect of testing.
To simplify this process and make configuring different parts of the system as easy as possible, Tiger provides a central configuration store: TigerGlobalConfiguration.
It combines properties from multiple sources and feeds into various parts of the system.

This allows a vastly simplified retrieval and configuration of nearly all aspects of the system.
It is therefore recommended reusing this system for your own testsuite as well.
6.1. Inlets
The following inlets are considered in the TigerGlobalConfiguration (ordered from most to least important, meaning if a property occurs in multiple sources the one at the top is considered first):
-
Exports from ScopedExecutor
-
Thread-local exports
-
Exports done in glue code
-
Exports during runtime (
TigerGlobalConfiguration.putValue()) -
Command-line properties
-
System-Properties (System.setProperty)
-
Environment-Variables (export "FOO_BAR" = 42)
-
Full-text YAML file (value of
tiger.yamlconfiguration key) -
Additional YAML-Files (
additionalConfigurationFiles:) -
Profile YAML-file (
tiger-<profile>.yaml) -
Host YAML-File (
tiger-<hostname>.yaml) -
Main YAML-File (
tiger.yamlortiger.yml) -
Internal Defaults
6.2. Tiger YAML file resolution
Tiger resolves the main configuration file as follows:
-
If
tiger.testenv.cfgfileis set, that exact path is used.
If the file does not exist, Tiger fails immediately. -
Otherwise, Tiger searches for
tiger.yaml(preferred) ortiger.ymlstarting from the current working directory and walking upward through parent directories. -
The upward search stops when a VCS root directory is encountered (i.e. a directory containing
.git,.hg, or.svn).
The VCS root itself is still checked for a tiger YAML before stopping.
6.3. Additional YAML files
You can specify additional YAML files to be loaded into the TigerGlobalConfiguration.
This allows you to split your configuration into multiple files, for example to separate default values from environment-specific overrides or to keep sensitive data in a separate file that is not checked into version control.
The following YAML snipplet shows an example of three additional YAML files being loaded:
additionalConfigurationFiles:
  - filename: defaults.yaml
  - filename: tiger-${environment}.yaml
    baseKey: tiger
  - filename: demoData.yaml
    baseKey: demo
The attribute tiger.additionalConfigurationFiles is a list, each list entry has two properties:
-
filenamepointing to the file to be read.
This can be relative to thetiger.yaml(primary) or relative to the working directory (secondary).
Keep in mind that placeholders can be used in the filename. -
baseKey, an optional attribute, which allows you to prefix every property from the given file with this key (keep in mind that thetiger.yamlhas a base key oftiger).
The example above would lead to the following behavior:
-
defaults.yamlis loaded without abaseKey, meaning its properties are merged at the root level of the configuration. -
tiger-${environment}.yamlis loaded with thebaseKey: tiger, so all its properties are prefixed withtiger..
The${environment}placeholder is resolved at runtime from the Tiger Global Configuration or environment variables. -
demoData.yamlis loaded with thebaseKey: demo, so all its properties are accessible under thedemo.prefix.
6.4. Key-translation
To easily convert between the multiple sources the TigerGlobalConfiguration offers key-translation:
tiger.foo.bar is equal to TIGER_FOO_BAR is equal to tIgER.fOO.BaR
-
When the key consists only of letters and underscores then the underscores are converted to points.
-
Names are compared without considering the case.
-
Keys that contain '{', '}' or '|' are forbidden.
To allow a clean startup on systems that have values like this configured the given characters are replaced by '_'.
6.5. Thread-based configuration
To enable execution of multiple tests simultaneously some data has to be stored in a thread-based manner (the first step could for example store the result of a request in a variable, the second step could read it from that variable).
To enable this simply reference the Thread-context when storing a variable:
TigerGlobalConfiguration.putValue("foo.value", "bar", ConfigurationFileType.THREAD_CONTEXT);When retrieving the variable you could simply ask for foo.value: Only when you are in the thread that stored this variable you will find it again.
6.6. Placeholders
The TigerGlobalConfiguration supports the use of placeholders.
Say for example you have a test-environment with two servers, "A" and "B".
For the server "A" you have two choices: Either a real URL in the internet or a locally booted server.
The use can choose which to activate by setting "active" of the server to use.
The server "B" should now use the activated server, without having to set it manually while booting.
You could achieve this by exporting the URL (servers.myServer.exports) and referencing it in an argument which is passed into server "B" (serverAUrl=${serverA.url}.
The first part here before the equal is the name of the environment variable passed into server "B" while booting, the second part behind the equal is the name of the property. compare this to the exports in the two serverA-options):
servers:
  serverAInternet:
    active: true
    type: externalUrl
    source:
      - https://my.real.server/api
    exports:
# The string SERVERA_URL is split internally into SERVERA and URL, which are then considered
# as lowercase keys
      - SERVERA_URL=https://my.real.server/api
  serverALocal:
    active: false
    type: externalUrl
    source:
      - https://localhost:8080/api
    exports:
      - SERVERA_URL=https://localhost:8080/api
  serverB:
    type: externalJar
    source:
      - http://nexus/download/server.jar
    healthcheckUrl: http://127.0.0.1:19307
    externalJarOptions:
      arguments:
# The second part is the placeholder which will be resolved using the internal value store.
# The string "serverA.url" is split into "serverA" and "url", again considered as lowercase,
# which then matches to "SERVERA_URL",
- --serverAUrl=${serverA.url}| Placeholders which can not be resolved will not lead to errors but rather they will simply not be replaced. |
6.7. RbelPath-style retrieval
The placeholders also support RbelPath-style expressions to allow for more flexible, dynamic retrieval of properties.
Consider for example the following YAML:
myMap:
  anotherLevel:
    key1:
      value: foobar
      target: schmoo
    key2:
      value: xmas
      target: blublub
  hidden:
    treasure:
      buried: deep
To retrieve values from this map you can use the following expressions:
-
${myMap.anotherLevel.[?(@.value=='foobar')].target}will resolve to "schmoo", retrieving the nodemyMap.anotherLevel.key.target. -
The same value can be retrieved via
${..[?(@.target=='schmoo')].target}.
This expression uses the recursive descent mechanic of RbelPath. -
${..buried}will resolve to "deep", retrieving the nodemyMap.hidden.treasure.buried.
6.8. Fallback values
Sometimes a default value is desired when a given key is not set.
To define such a value, just use the pipe (|) after the key, like so:
${foo.bar|orThisValue}
This will first test for the presence of "foo.bar" as a configuration key.
If that key is not found, the fallback value "orThisValue" will be used.
In cases where no fallback value is desired but the user still wants to avoid unresolved placeholders, the pipe can be used without a value:
${foo.bar|}
6.9. Localized configuration
It is possible to set a local variable in the TigerGlobalConfiguration which will only be active for the duration of the test case execution.
This can be achieved with the glue code step:
TGR setze lokale Variable {tigerResolvedString} auf {tigerResolvedString}
TGR set local variable {tigerResolvedString} to {tigerResolvedString}
The variables will be removed from the TigerGlobalConfiguration after the test case execution.
Bear in mind that this does not work with threading: The values are added to the global store and are removed automatically, but will still be visible by any parallel thread that attempts to read the TigerGlobalConfiguration.
It is also possible to set a variable that is local to the feature file where it is defined.
With the glue code step:
TGR setze lokale Feature Variable {tigerResolvedString} auf {tigerResolvedString}
TGR set local feature variable {tigerResolvedString} to {tigerResolvedString}
a variable can be set that will be removed from the TigerGlobalConfiguration when the execution of the feature file is finished.
6.10. Examples
Below there are some examples of how to use the TigerGlobalConfiguration in different scenarios.
6.10.1. Example: Overriding Proxy Routes via Environment Variables
Say you have an environment configured in your testenv.yaml.
You want the tiger proxy to forward traffic on one route to your backend-server.
This will normally be a local server, but on the build-server you want to address another host.
You can simply set an environment variable to do the job for you.
Below are the relevant snippets:
tigerProxy:
    proxyRoutes:
        - from: /
          to: http://127.0.0.1:8080
In the buildserver you can now simply overwrite the "to"-part of this route like so:
export TIGERPROXY_PROXYROUTES_0_TO = "http://real.server"6.10.2. Example: Customizing Individual Values via Placeholders
In the above example let’s say you only want to customize the port.
This can be done by using placeholders:
tigerProxy:
    proxyRoutes:
        - from: /
          to: http://127.0.0.1:${backend.server.port}
This time we don’t overwrite the complete to-url but only the port like so:
export BACKEND_SERVER_PORT = "8080"6.10.3. Example: Referencing Dynamic Values in Test Assertions
Now we want to assert that the reply coming from the server has the correct backend-url in the XML that is returned to the sender.
To do this we have to reference the configured URL from above, since the value could be different on every execution.
We can solve this using placeholders:
TGR current response with attribute "$.body.ReplyStructure.Header.Sender.url" matches "http://127.0.0.1:${backend.server.port}"The glue-code in Tiger automatically resolves the placeholders.
6.11. Pre-Defined values
Tiger adds some pre-defined values to make your life easier configuring the environment.
Currently, these are:
-
free.port.0-free.port.255: Free ports that are randomly determined at startup but stay fixed during the execution.
This enables side effect free execution of the testsuite.
6.12. Inline JEXL
In addition to the ${foo.bar} syntax allowing the retrieval of configuration values there exists the !{'foo' != 'bar'} syntax allowing the execution of JEXL expressions.
The JEXL-syntax is described in more depth here: https://commons.apache.org/proper/commons-jexl/reference/syntax.html
To give you more power and flexibility when creating inline-JEXL-expression you can access several namespaces from inside the JEXL expression.
You will find two predefined namespaces and also the ability to add your own, allowing further customization.
6.12.1. The default namespace
The default-namespace of the inline JEXL-expression carries the following functions:
-
file(<filename>)loads the given file and returns it as a UTF-8 parsed string. -
sha256returns the HEX-encoded SHA256-value of the given string. -
sha256Base64returns the Base64-encoded SHA256-value of the given string. -
sha512returns the HEX-encoded SHA512-value of the given string. -
sha512Base64returns the Base64-encoded SHA512-value of the given string. -
md5returns the HEX-encoded MD5-value of the given string. -
md5Base64returns the Base64-encoded MD5-value of the given string. -
base64Encodereturns the Base64-Encoding of the given string (non-url safe). -
base64UrlEncodereturns the Base64-URL-Encoding of the given string. -
base64Decodedecodes the given Base64-String (URL and non-url) and converts it into a UTF-8 string.
An example of a function-invocation in the default namespace:
!{file('src/test/resources/testMessage.json')}This will load the given file and replace any placeholders found in it.
6.12.2. The rbel namespace
To give you direct access to the messages sent please use the rbel-namespace:
-
currentResponsereturns the current response, optionally filtered by a given Rbel-path -
currentResponseAsStringreturns the string-representation of the current response, optionally filtered by a given Rbel-path -
currentRequestreturns the current request, optionally filtered by a given Rbel-path -
currentRequestAsStringreturns the string-representation of the current request, optionally filtered by a given Rbel-path
This can be done like so
!{rbel:currentResponseAsString('$.body.html.head.link.href')}This will immediately return the href-attribute of the link in question as a string.
6.12.3. Adding custom namespaces
Using code
You can register additional namespaces by calling TigerJexlExecutor.registerAdditionalNamespace(<namespace-prefix>, <namespace class or object).
Conversely, you can deregister an existing namespace with TigerJexlExecutor.deregisterNamespace(<namespace-prefix>)
Using annotations
If you need to register a namespace early in the start up process you can use annotated classes.
For example, you may need the namespace to be already registered when tiger reads the tiger configuration.
To do it, create a class with the inline methods in the java package de.gematik.test.tiger.common.jexl and add the annotation @InlineJexlMethods(namespacePrefix = <namespace-prefix>).
Below is an example:
package de.gematik.test.tiger.common.jexl;

@InlineJexlMethods(namespacePrefix = "test")
public class DummyJexlMethods {
  public String testMethod() {
    return "test";
  }
}
Tiger will scan the classes in the package and add register all annotated classes.
6.13. Configuration Editor
The configuration editor allows to view and edit the tiger configuration during a test run.
The editor is part of the Workflow UI and can be opened by clicking the gears icon in the sidebar (Figure 12).
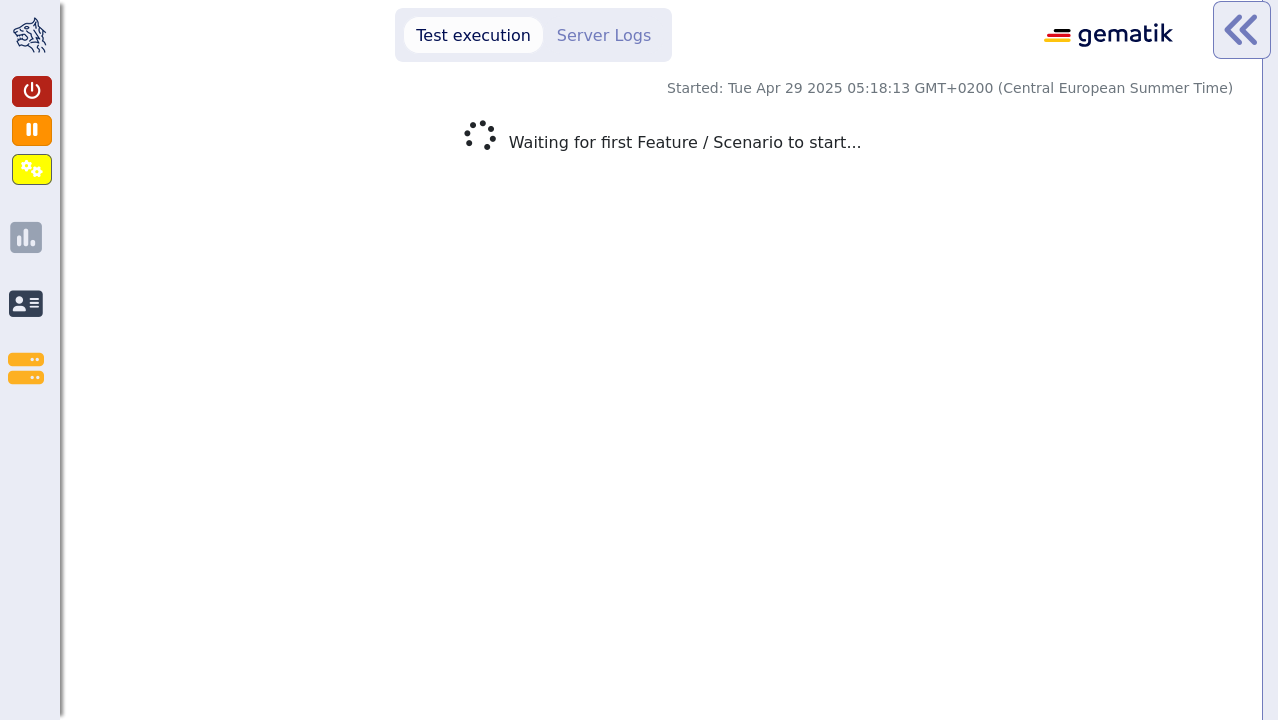
The configuration editor displays a table where you can view the current configuration properties loaded in the Tiger global configuration (Figure 13).
This includes properties from all inlet sources.
If a property is defined multiple times in different sources, only the one with higher importance is displayed.
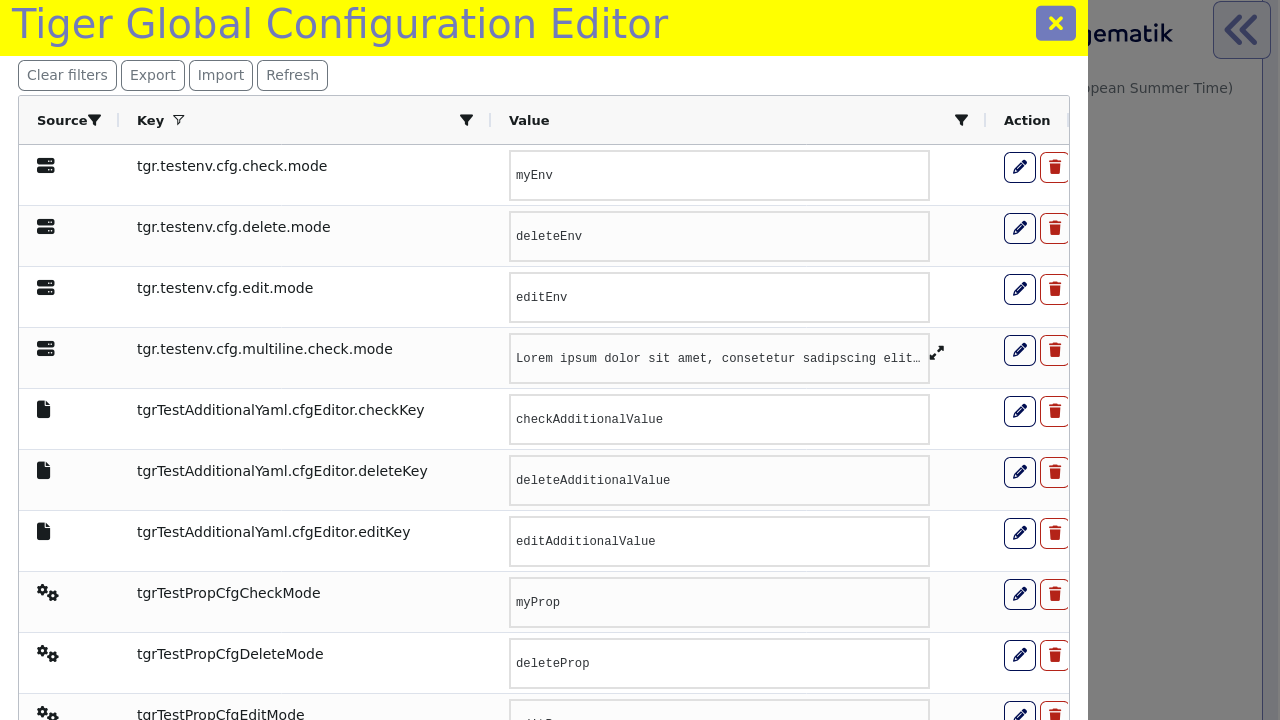
The editor allows sorting and filtering each column so that you can easily find a specific property (Figure 14).
Given that the Tiger global configuration includes many environment variables and system properties which are not directly relevant to Tiger, the filtering functionally proves to be especially useful.
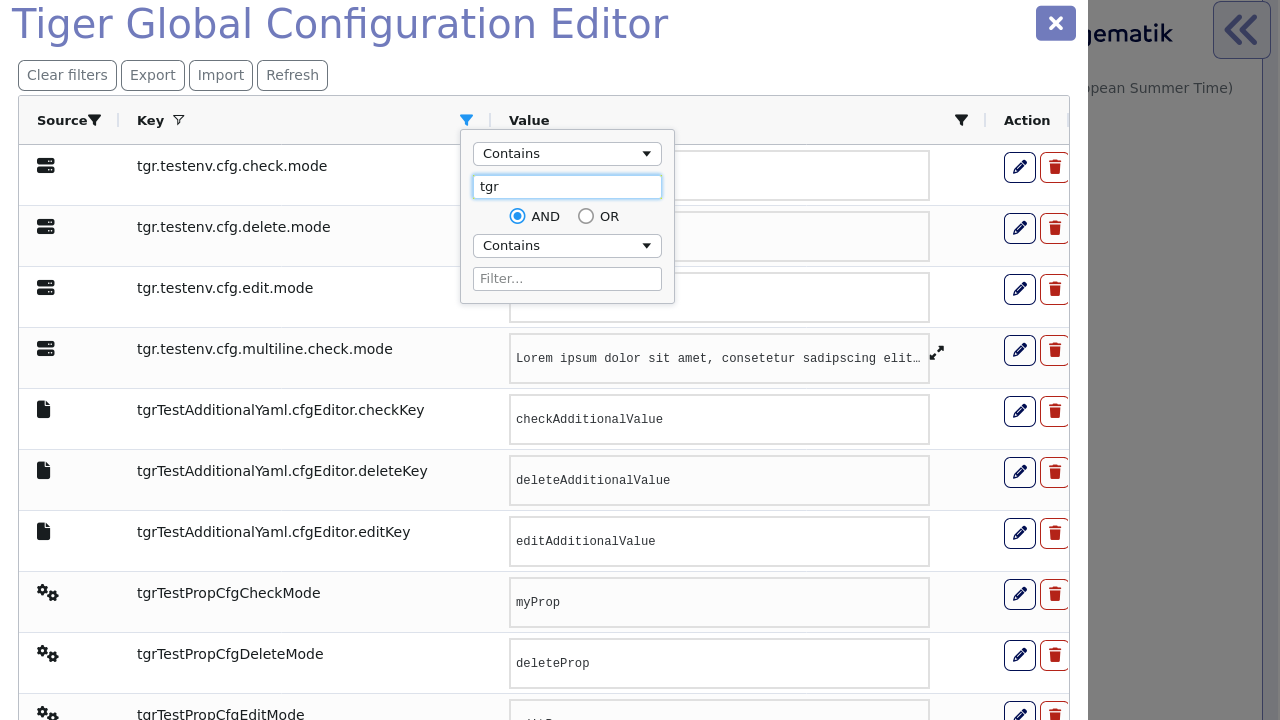
The values of existing configuration properties can be edited by double-clicking the value cells.
This opens an input field where you can input a new value (Figure 15).
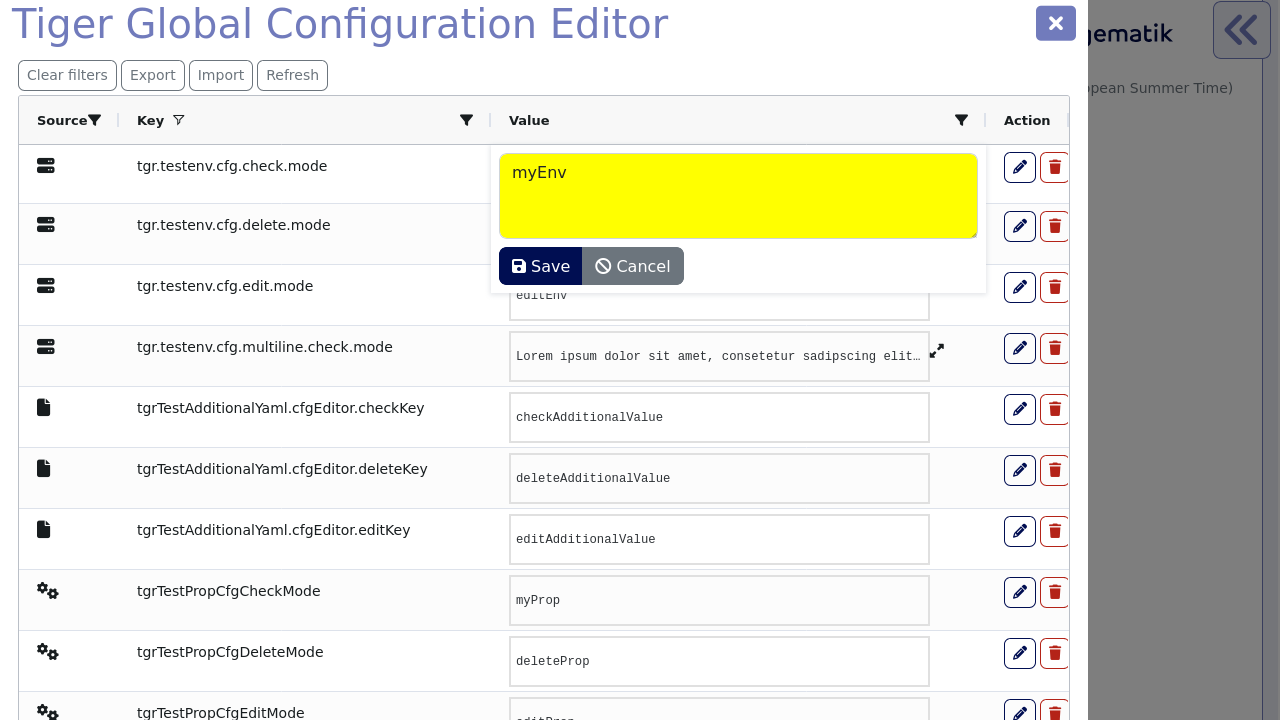
Additionally, you can remove existing configuration properties by clicking the delete button (Figure 16)

|
Editing or removing configuration properties will not affect already ran tests. If you want to use edited properties in a specific test, then you should pause the test before editing the configuration. In Workflow UI you can see how to use custom steps to pause the test suite. |
Some variables in the table have multiline values, causing the text to appear truncated initially.
These cells are equipped with an expand icon (Figure 17), indicating the availability of additional content.
Clicking the expand icon uncover the complete multiline content, ensuring it is fully visible within the cell.
To hide the multiline content and return to a truncated view, simply click on the collapse icon.
This action collapses the multiline content, returning the text to its truncated state.
7. Tiger User interfaces
7.1. Workflow UI
The Workflow UI is a feature for a better user experience during the test run of feature file(s).
If activated via the tiger.yaml configuration file, the Workflow UI will be opened in the current browser window during the test run and shows the status and logs of the servers as well as the results and request calls of the scenarios and feature files during the test run.
If no browser is open at the time a new instance will be launched.
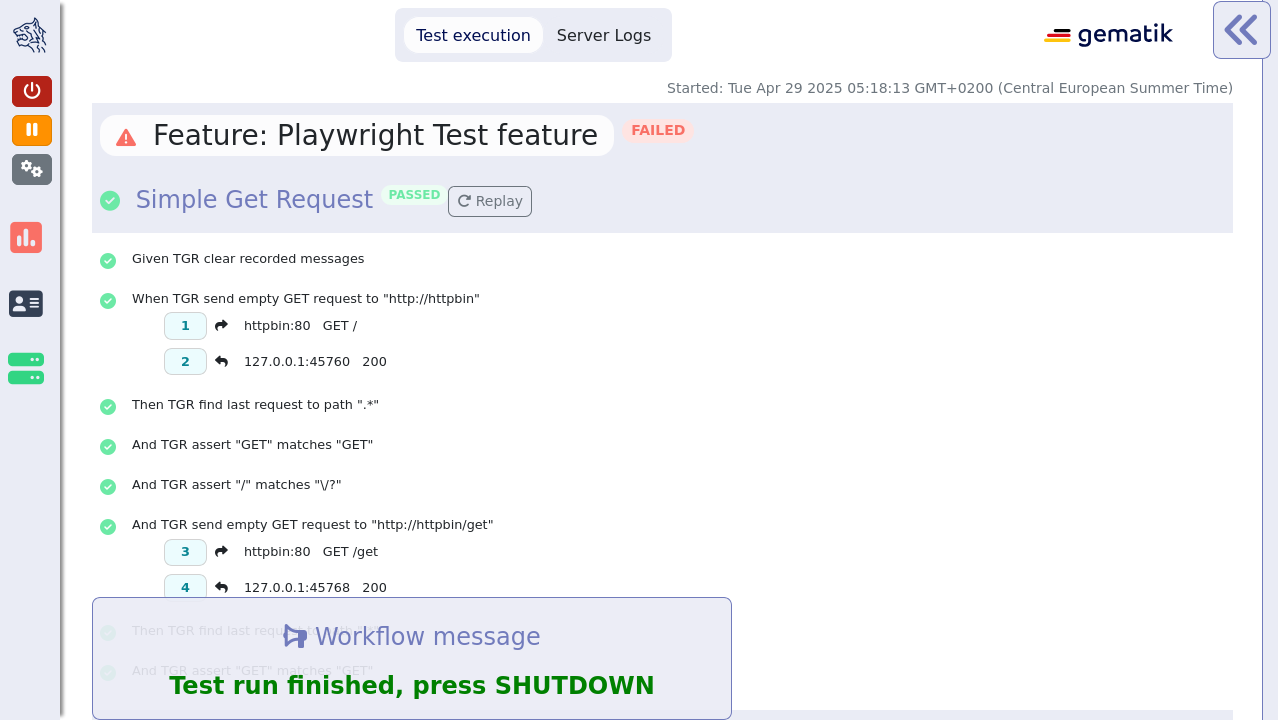
The image above shows the initial startup of the Workflow UI.
The Workflow UI is divided into three sections: the status bar, the main window with test execution and server logs and the Rbel log details (a slimmed down version of the WebUI).
7.1.1. Status Bar
The section on the left is called status bar as shown in the picture below.
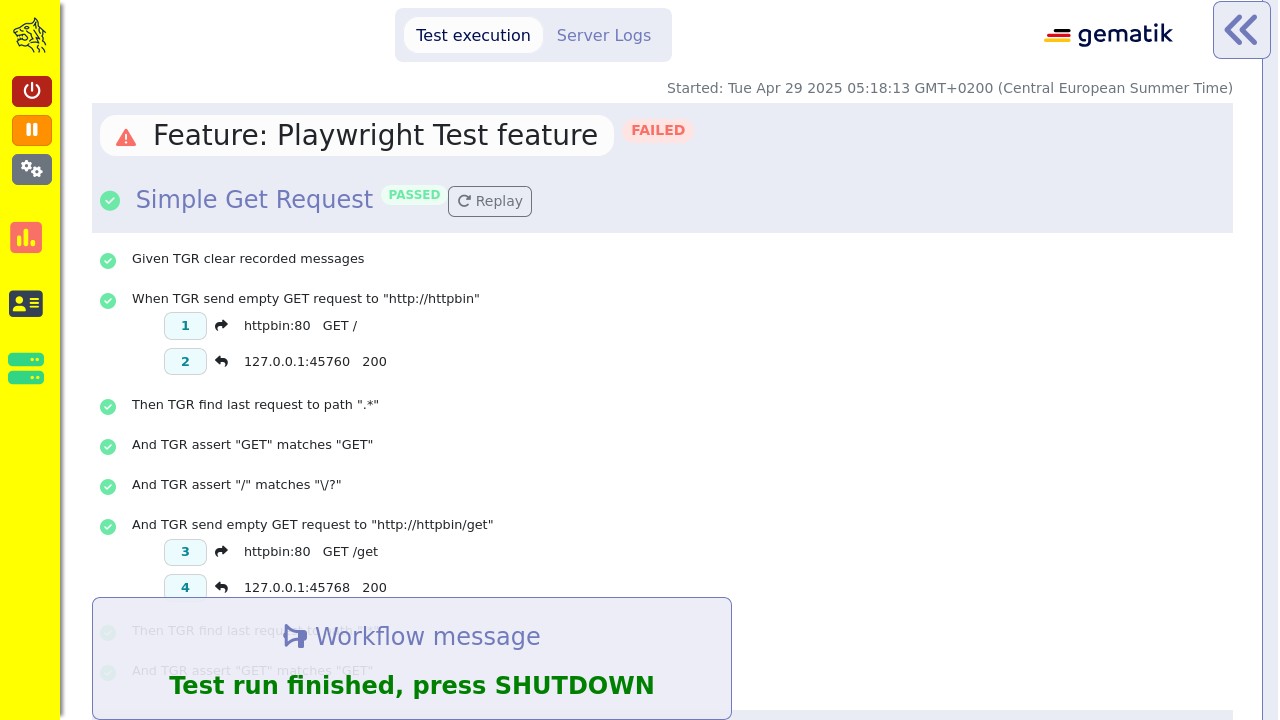
When the user clicks on the tigers head on the top left the status bar slides open as shown below.
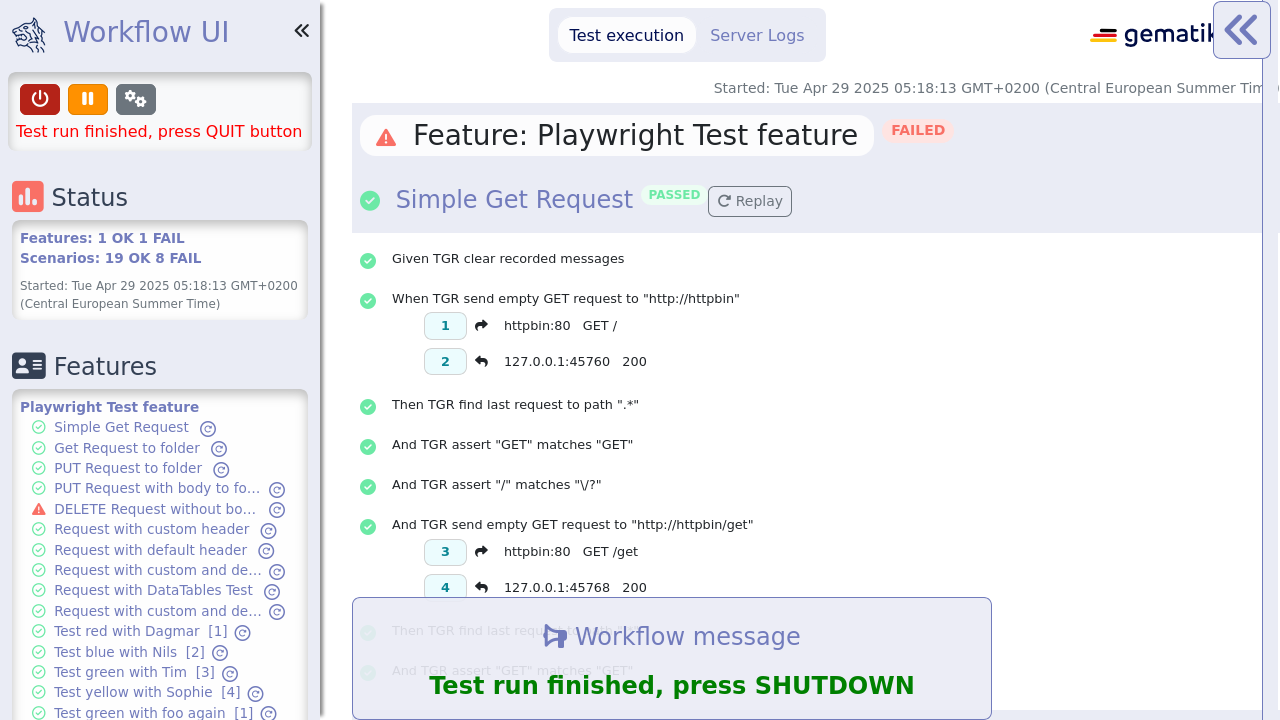

The first button stops the test execution and terminates the servers.
As seen in the following screenshot the background color of the status bar changed to red and at a banner is shown that tells the user that the test execution has been aborted.
Once the Workflow UI has quit, searches and filtering on the Rbel log details as well as on the Web UI are no longer possible.
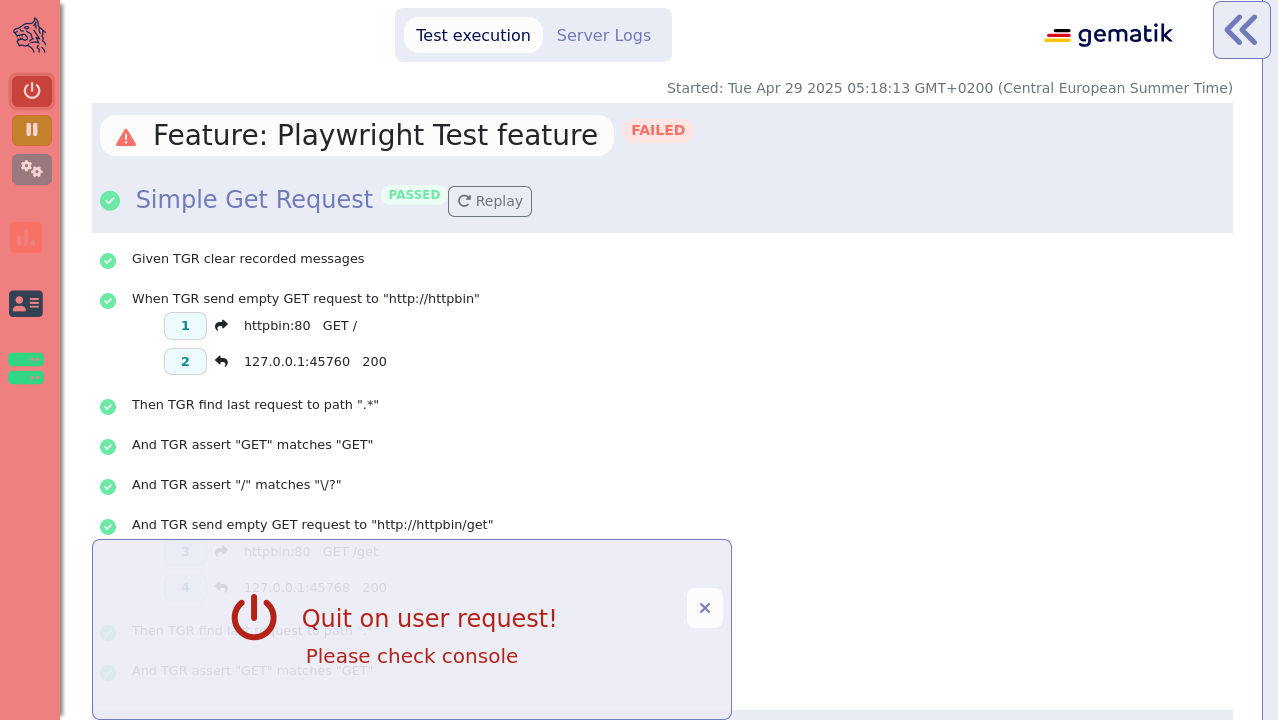
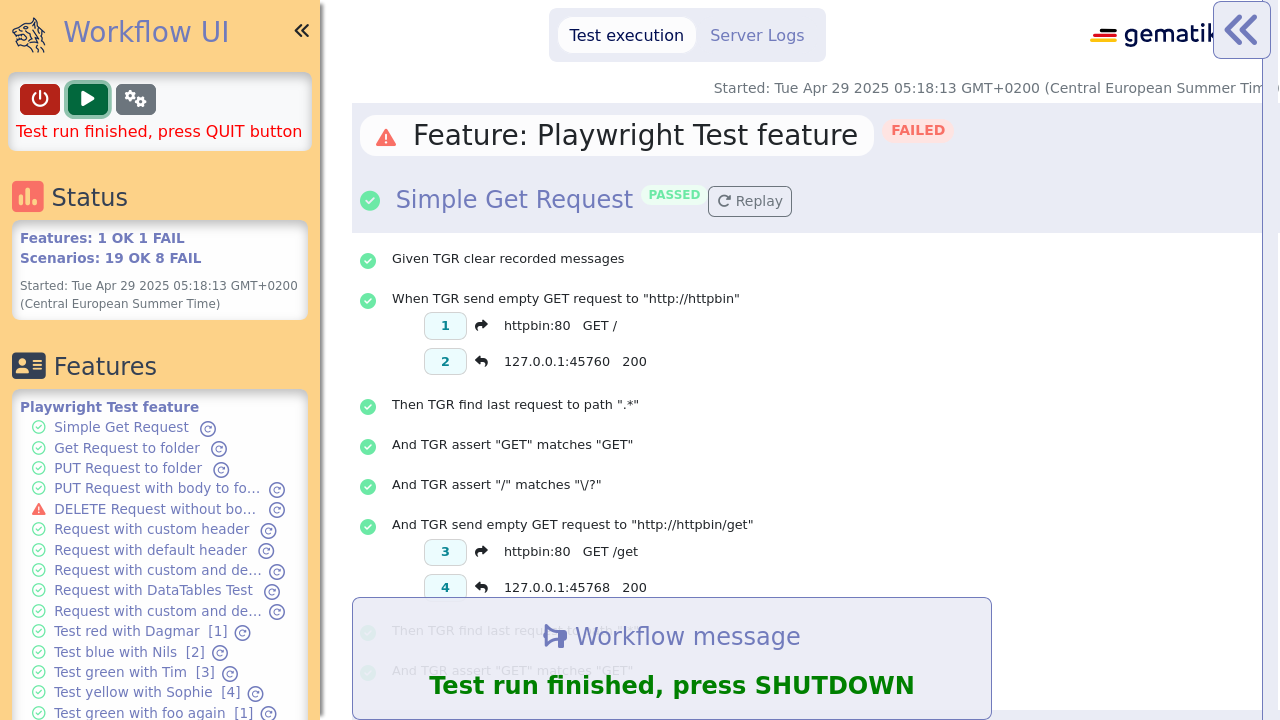
The test execution will be resumed once the user clicks on the green play button.
The third button opens the Configuration Editor which is explained in detail in this section.
Below the buttons the status box shows how many feature files and how many scenarios were executed and also the amount of failed tests are shown.
In the feature box below each scenario name is displayed.
The names are linked to the test and when the user clicks on the scenario the test is shown in the test execution on the main section.
The green icon in front of the name indicates a passed scenario, the red exclamation mark indicates a failed scenario.
The numbers in square brackets indicate that this is part of an outline scenario, meaning a test scenario that is run multiple times with different test data.
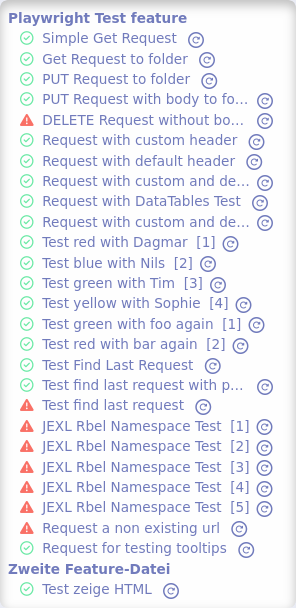
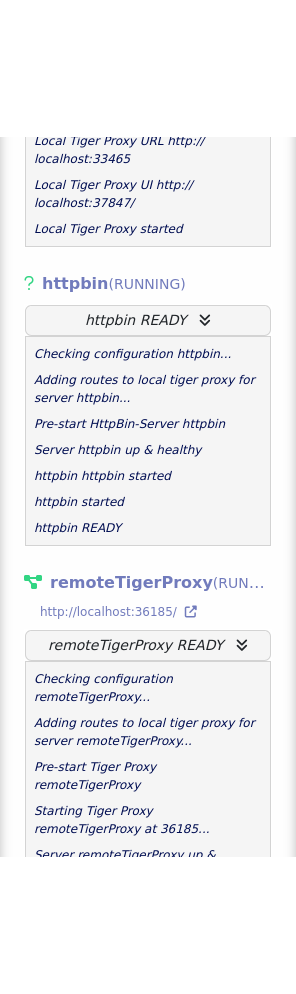
The server box above displays the configured servers, its status (e.g. STARTING, RUNNING, STOPPED) and some outputs of its logs.
When the icon color before the server name is green then the server is up and running correctly.
Below the server box the version number and the build date of the currently used tiger release is displayed.

The status bar can be minimized by clicking on the double arrow or by clicking on any of the icons in the status bar (e.g. status box icon, feature box icon, server box icon, tiger head icon).
7.1.2. Main window
The main window of the Workflow UI has two sections: the test execution and the server logs which can be selected by the two buttons on top of the Workflow UI as seen in the picture below.
Server logs
By clicking on the server logs button on top of the main window the user can have a look at the log files of each server.
There the user can use several filter options to search in the log files.
There are the following server buttons: you can see all logs of all servers, or only the logs of one or more servers by clicking on the corresponding buttons.
The user can also search via text input after a certain text phrase.
It is also possible to distinguish between the different log levels.
In the picture below only the httpbin server is selected.

Test execution
In the test execution tab the user sees the executed features and their scenarios as well as their execution status.
A test can be either passed or failed.
In the example below the scenario has passed but the feature itself has failed, which means that at least one of the scenarios of the feature has failed.
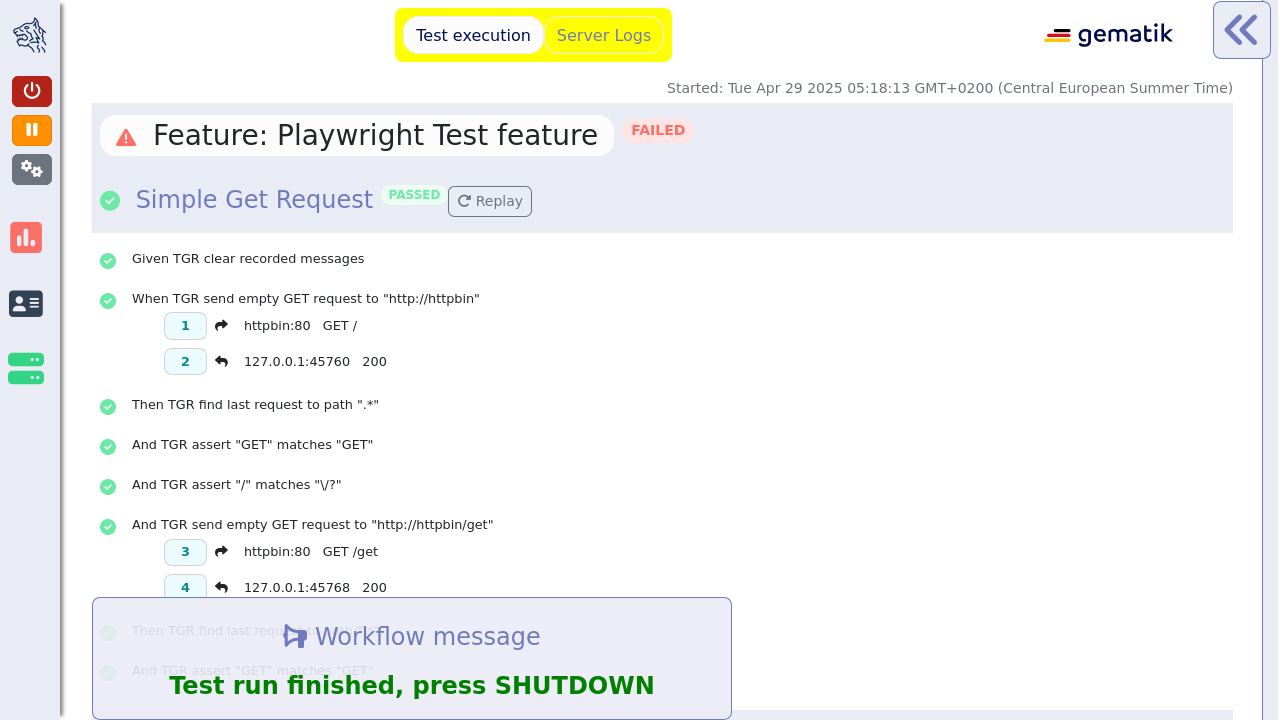
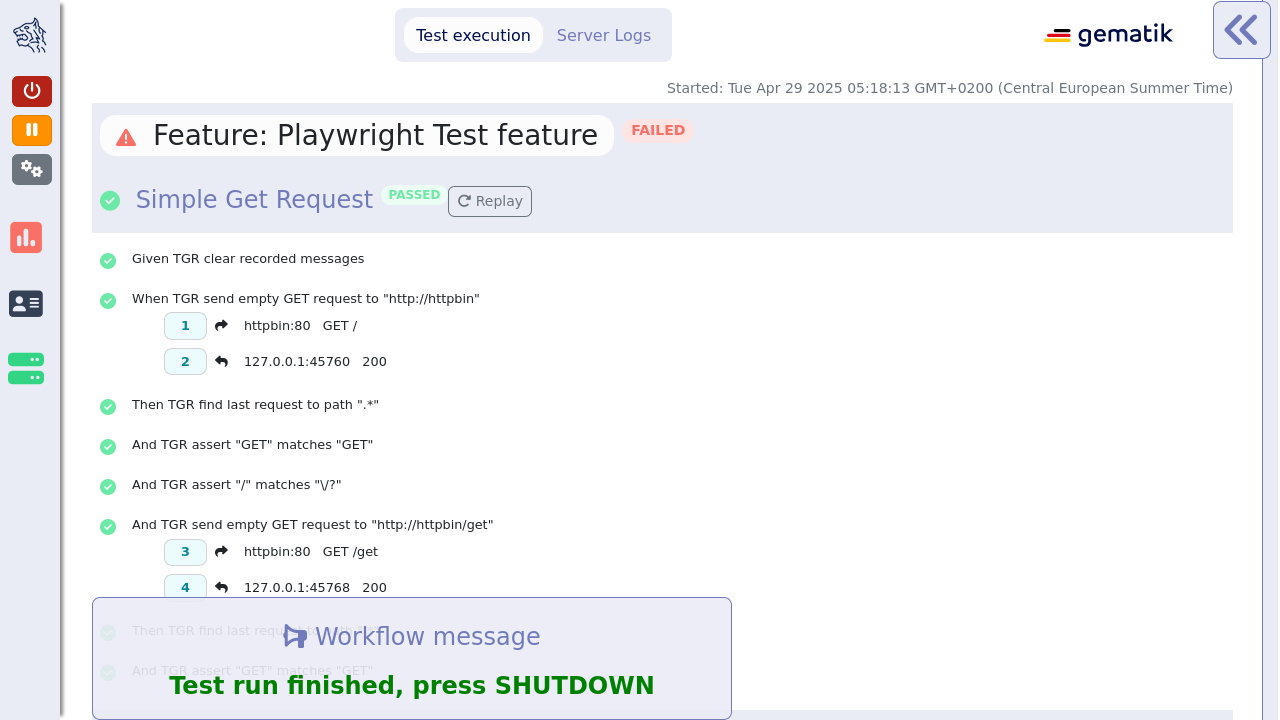
Beside the status at the end of the feature/scenario name the user can also see the status at the icon before the name.
During text execution or while pausing the Workflow UI there is a third status the feature/scenario can have which is "pending".
The icon before the name would be a spinner icon to indicate that status.
TGR banner step will be displayed at the bottom of the Workflow UI and will stay there till the next banner step replaces the message.
This way you can instruct manual testers to follow a specified test workflow.
This feature is used in the EAU Konnektorfarm validation test suite to guide the Primärsystem manufacturers through the interoperability combinations of signing/verifying documents against all Konnektors available.
Additionally, a test scenario can be replayed.
When clicking the replay button next to the scenario name, the scenario will be rerun again.
If placeholder variables were modified with the configuration editor, the new values will be used when replaying the scenario.

Alternatively, a scenario can be replayed by clicking the small replay button in the feature box in the sidebar.
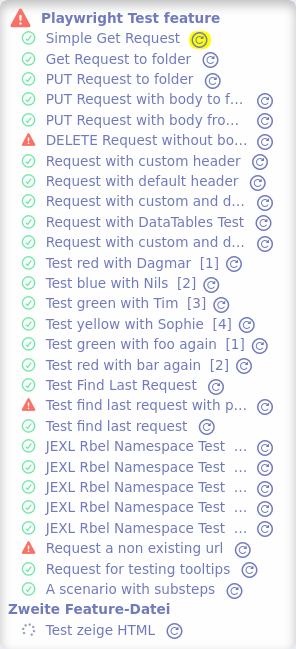
When a scenario has failed, the failure message is displayed beneath the failed step description.

Additionally, the stack trace of the failure can be expanded and collapsed by clicking the button beside the failure message.
To navigate to the failed step of a scenario, the user can click on the failed icon beside the scenario title.
The same works when clicking on the failed icon beside the scenario in the feature list.
Hovering over the failed icon will display the failure message as a tooltip.
Mismatch Notes
If a step failed because of a mismatch, i.e. no message could be found matching the search criteria, the cause for the mismatch can potentially be in any number of messages that were observed before the validating step.

In this case, it is possible to iterate through all the mismatching messages that were checked during search by using the up and down arrows beside the Select mismatch dropdown box beneath the failure message or by selecting a specific mismatch reason from the dropdown box.


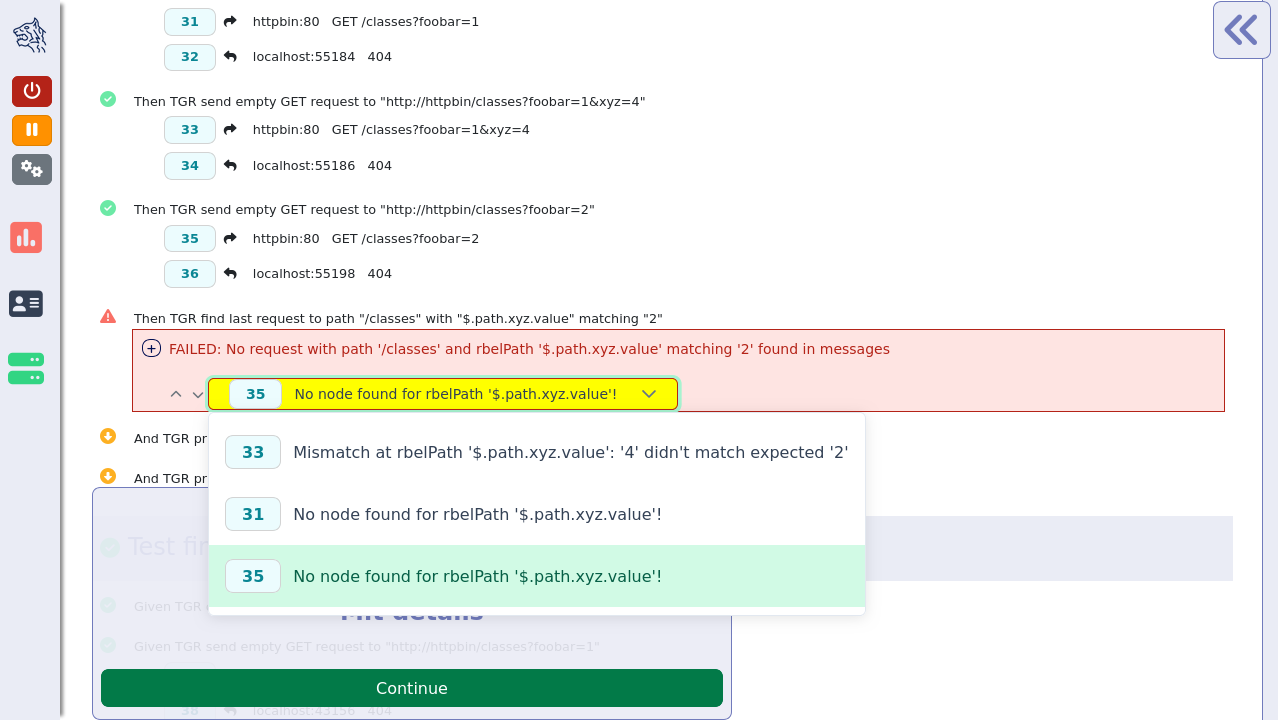
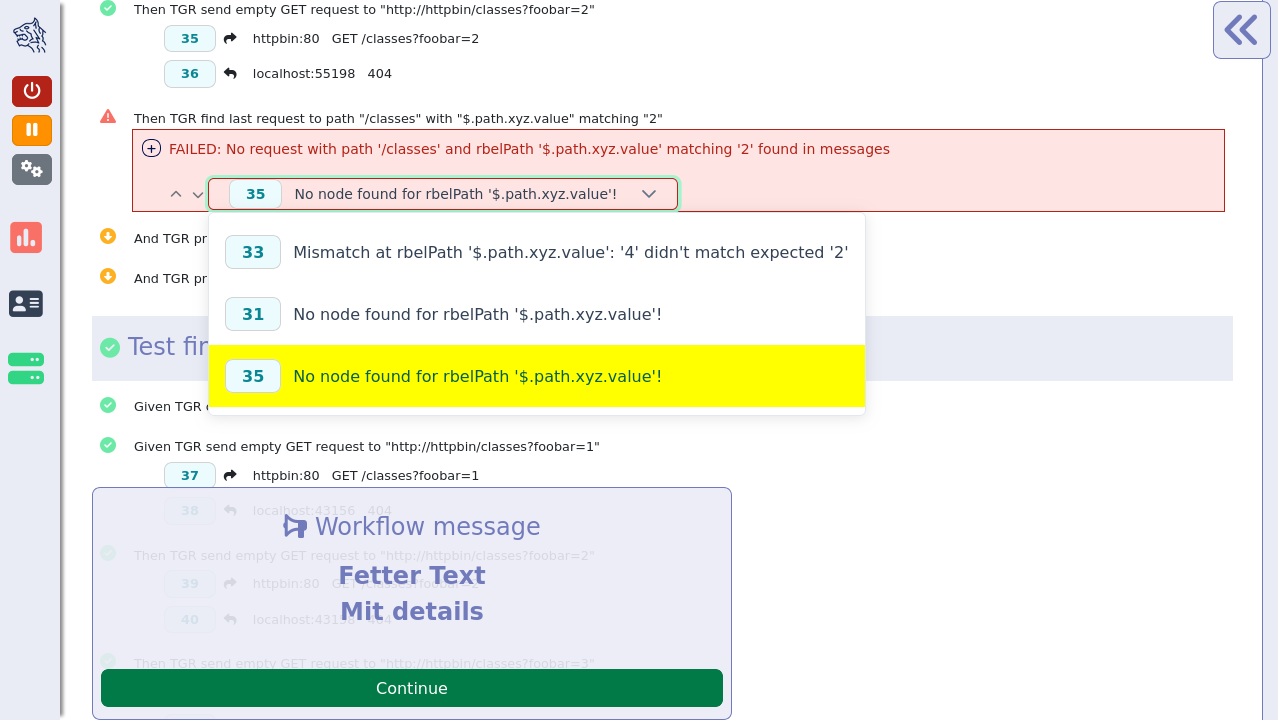
This will lead to the mismatching message being displayed in the Rbel Log Details view on the right hand side of the Workflow UI.
If the mismatching node exists in the message, it should be annotated there with an error note.
Sub-Steps
If a test step executes sub-steps, these are displayed (per default collapsed) in the test execution section beneath their parent test step.
They can be expanded by clicking on the small plus symbol to the left of the step description.
Steps without sub-steps will not have the plus symbol and will not be expandable.
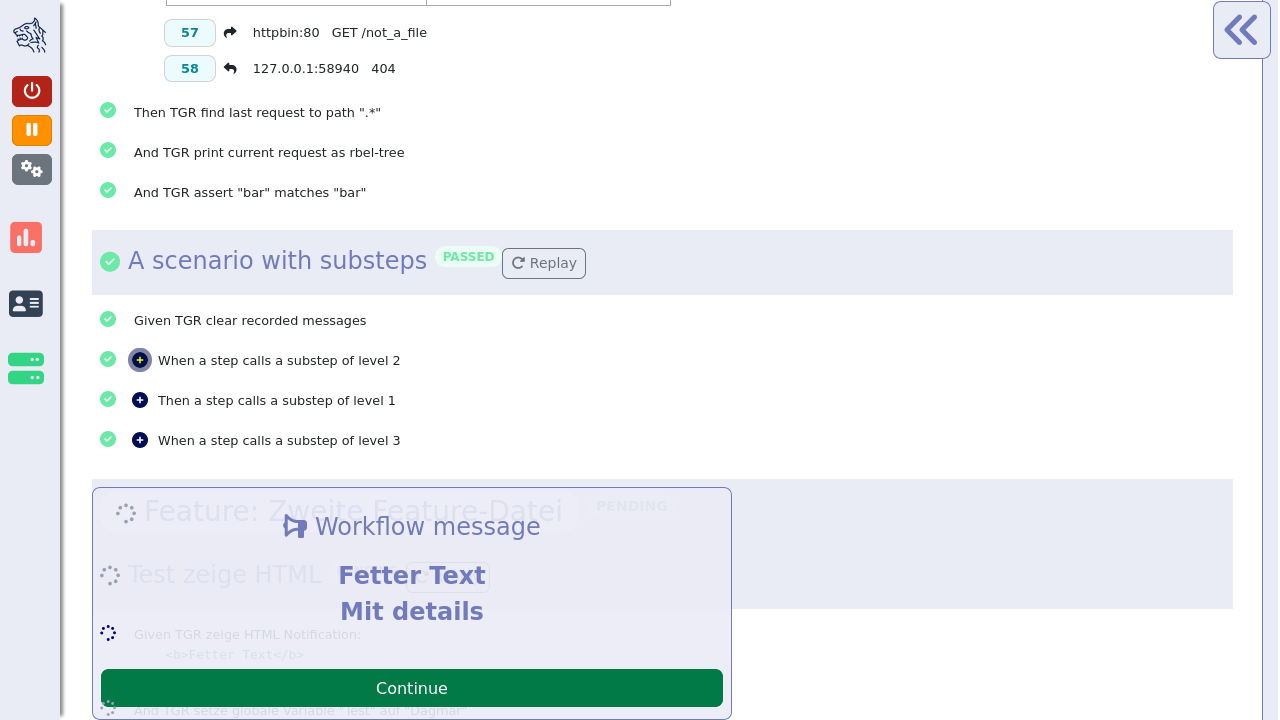

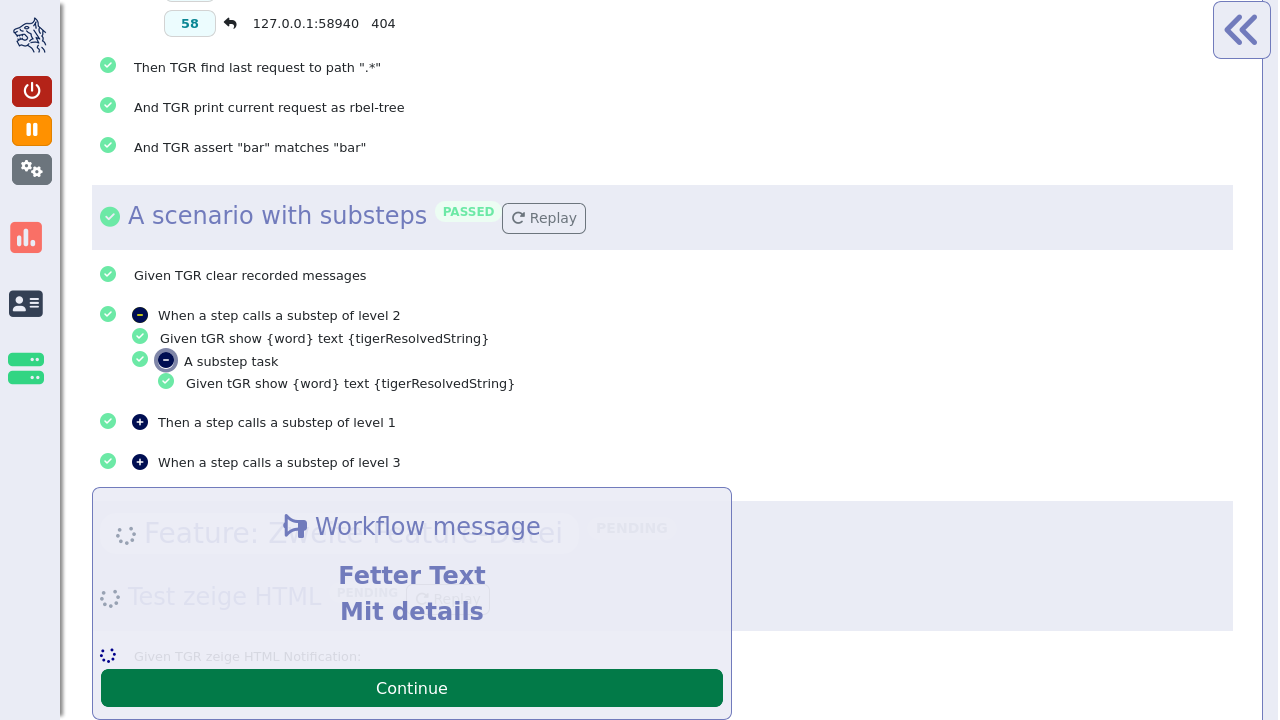
Sub-steps can not be defined in feature files directly.
They can be produced by glue code calling methods that are also glue code steps.
The serenity screenplay pattern also produces sub-steps, e.g. for each task an actor performs.
The communication requests that are called during the step execution are displayed beneath the step that initiated the request.
When the user clicks on the light blue rectangle with the number (whereas uneven numbers are requests, even number are responses) of the request then the Rbel Log view opens on the right hand side of the Workflow UI as shown on the screenshot below.
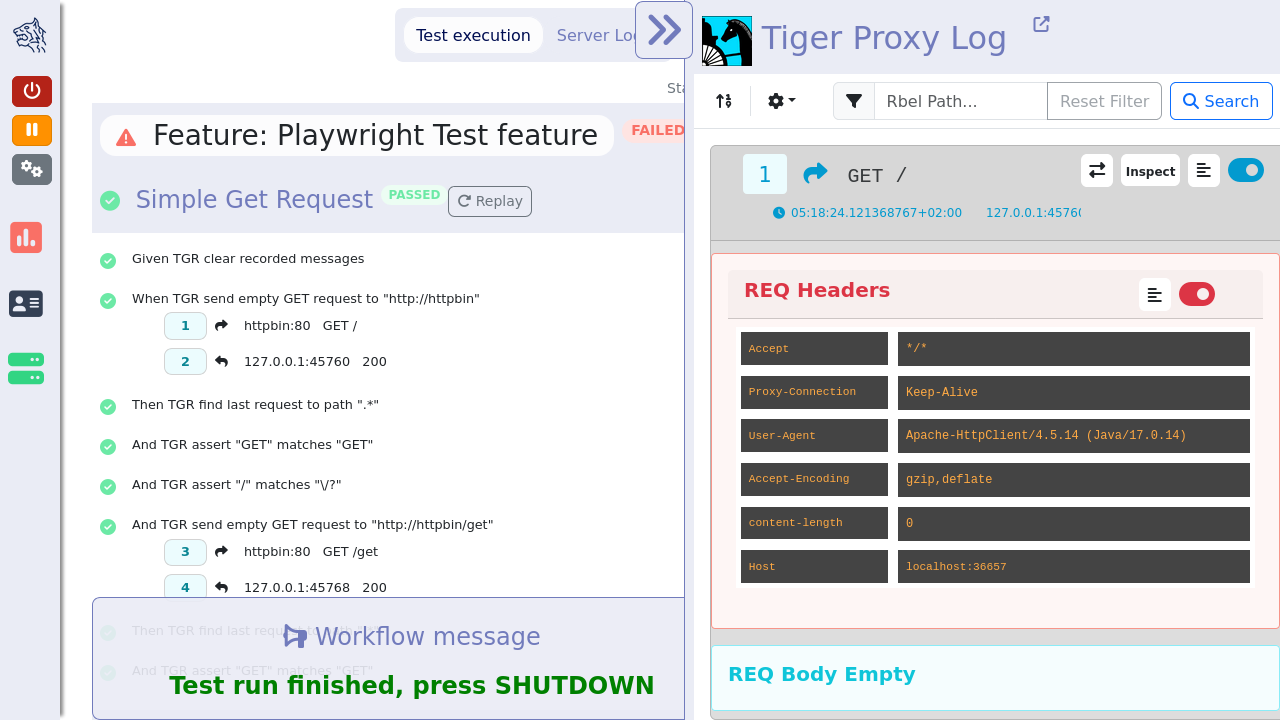
In the Rbel Log Details view the RbelMessages are displayed that are also saved as HTML files as described in the Cucumber and Hooks section.
Next to the headline there is a link to the WebUI (aka tiger proxy UI) which opens the WebUI in a new tab as shown in the picture below.
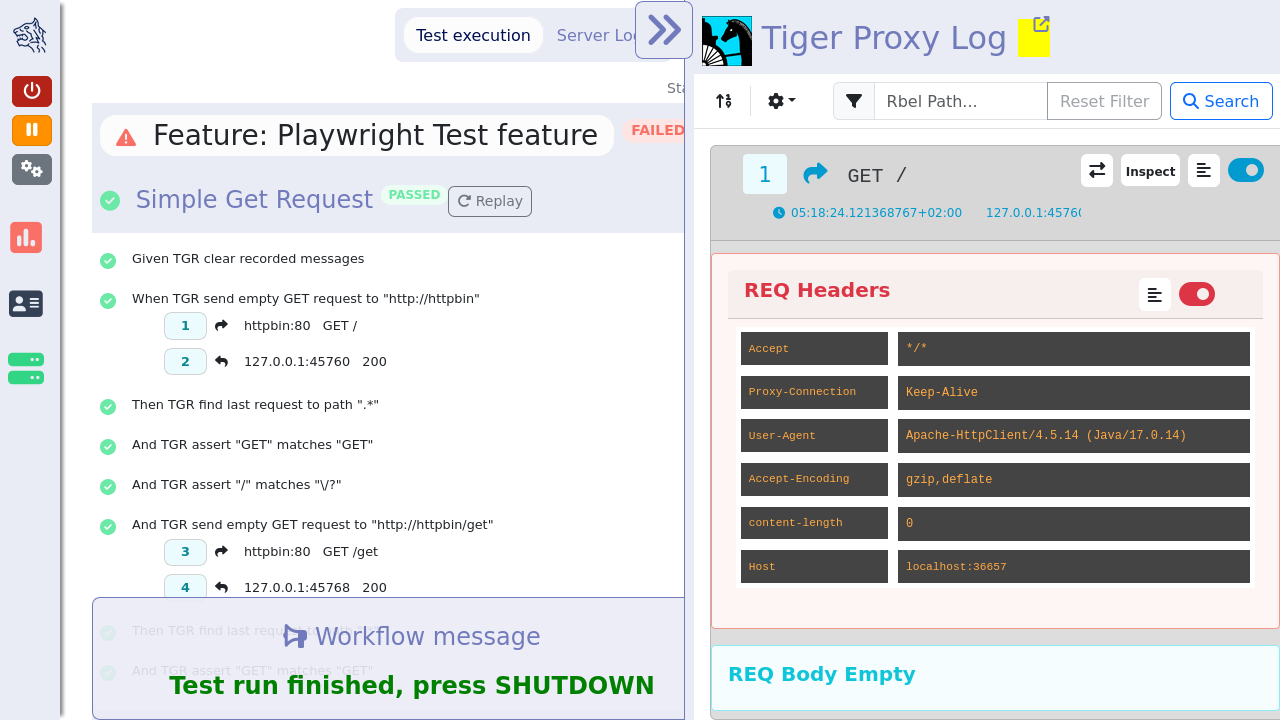
The Rbel Log Details view is described in the WebUI section as it is a slimmed-down version of the WebUI.
In order to increase/decrease the width of the Rbel Log Details view, the user can drag the border between the main window and the Rbel Log Details view.
The Rbel Log Details can be minimized by clicking on the double arrow on the top left of the Rbel Log Details section.
7.1.3. Traffic Visualization
An additional feature of the Workflow UI is the traffic visualization.
This feature allows to visualize the traffic between the servers under test in a sequence diagram.
The feature needs to be explicitly enabled in the tiger.yaml configuration file.
lib:
  trafficVisualization: true
This will enable a third section in the main window of the Workflow UI where a sequence diagram is displayed.
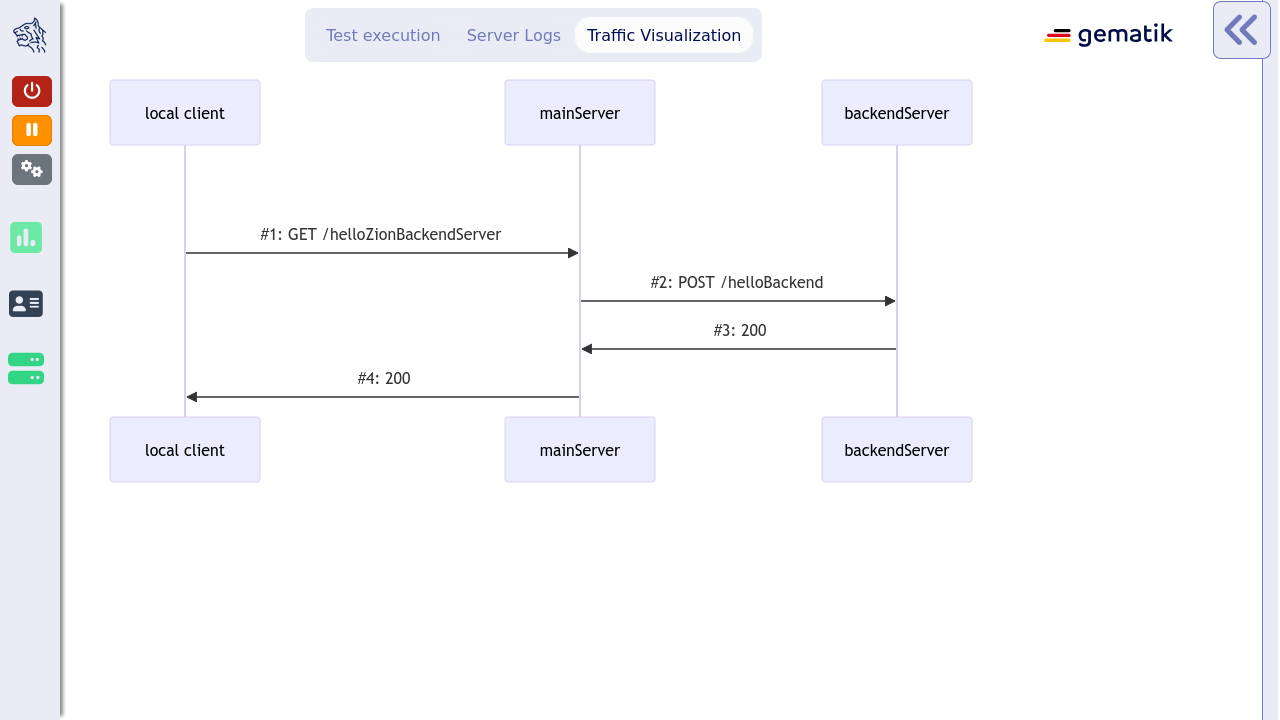
The sequence diagram shows the messages that were exchanged between the servers under test.
By clicking on a message in the sequence diagram, the corresponding Rbel Log Details will be displayed in the Rbel Log Details section.
The traffic visualization currently supports the following server types: externalJar, externalUrl, zion, docker and compose.
For messages to show up in the sequence diagram they need to be routed through the tiger proxy.
This is the case for all the messages originating in the local tiger client and their responses.
If there are additional messages originating on one the servers under test, they need to be routed through the tiger proxy as well.
In Zion servers this is automatically configured.
For external jars this can be achieved by configuring the servers with the following VM options:
externalJarOptions:
  options:
    - -Dhttp.proxyHost=127.0.0.1
    - -Dhttp.proxyPort=${tiger.tigerProxy.proxyPort}
For the server types docker and compose, we do not yet support the visualization of messages originating on a client port of these servers.
7.1.4. Postpone start of test scenarios
It is possible to configure the Workflow UI to not start all tests automatically at startup.
When setting the following configuration option in the tiger.yaml:
lib:
    runTestsOnStart: false # default is true
the tests will only be discovered and displayed in the Workflow UI.
That includes all the tests in the feature files, even if they don’t match the "cucumber.filter.tags" configuration.
This allows you to run manually any selection of tests.
The user can then choose which test scenario he/she wants to execute.
This can be done by clicking the play buttons in either the Test Execution pane or in the Status Bar.
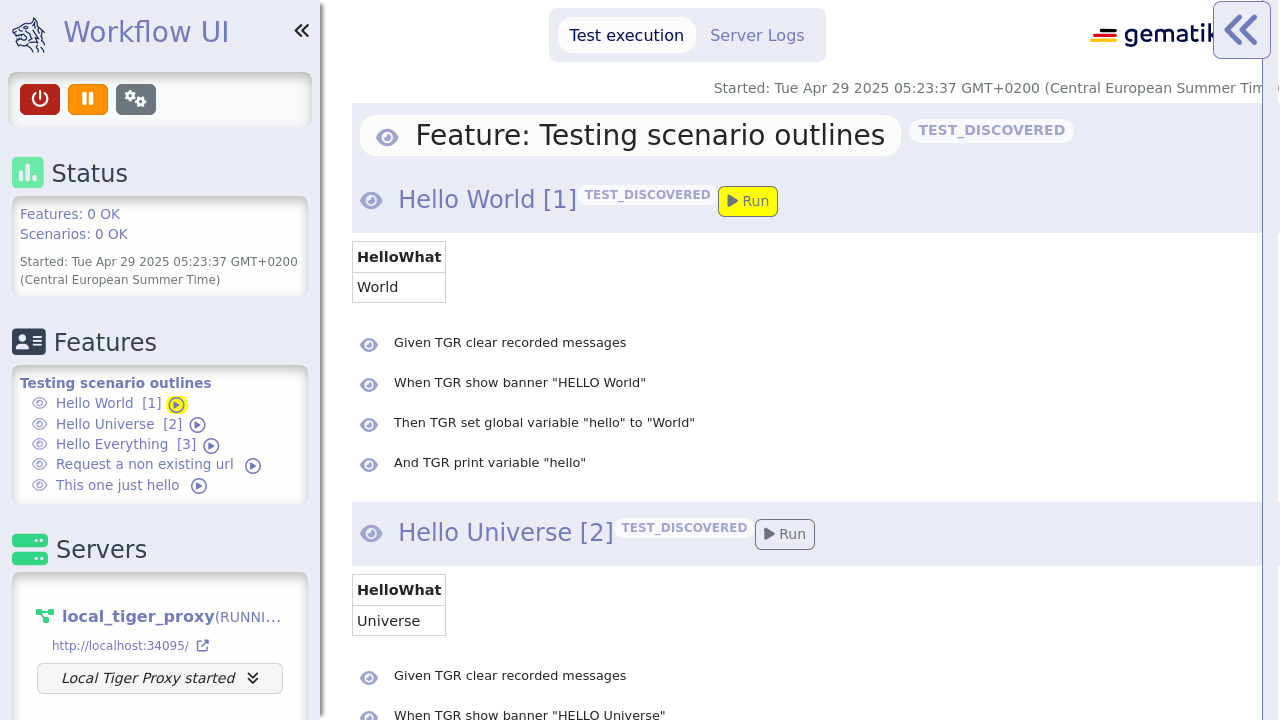
7.1.5. Select a subset of tests to run
Tests can be selected in the sidebar, or an advanced selection modal can be opened by clicking the "Advanced selection…" button in the Status Bar.
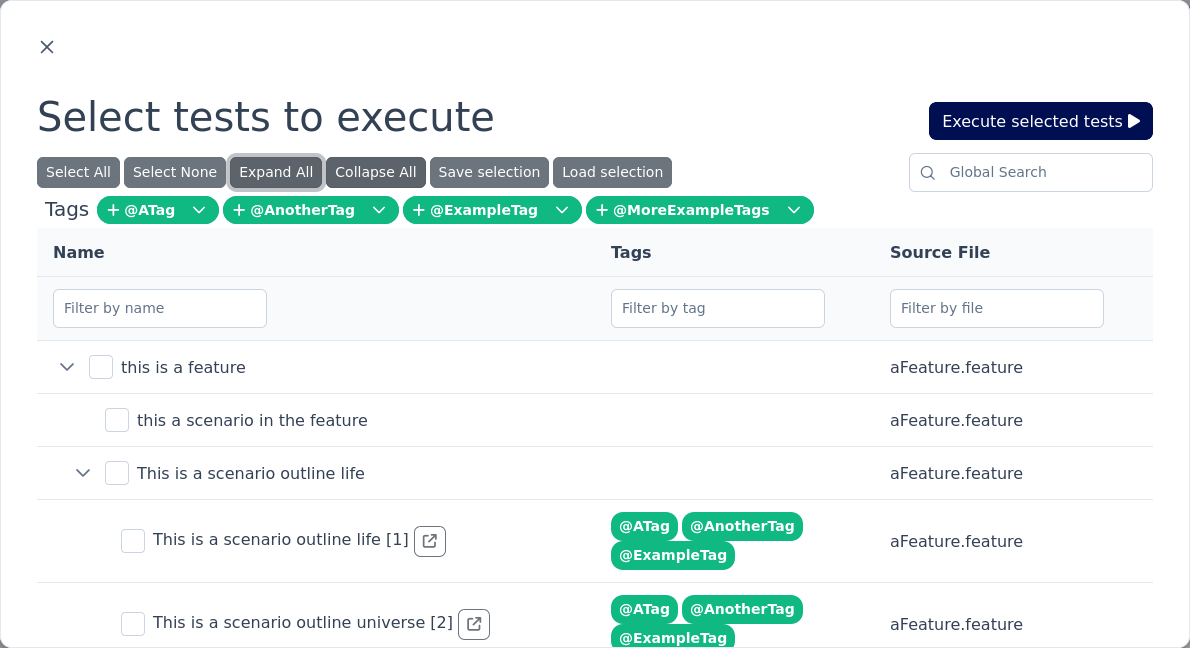
The Test Selector modal window presents the tests in a tree table, where tests are organized by the folder structure of the feature files, and by scenarios within the feature files.
The folder structure is omitted if the feature files are located all in the same folder.
Additionally, the Test Selector modal window allows selecting tests by tags.
The tags are displayed on the right side of the modal window.

By clicking on a tag, all tests with that tag will be selected.
Additionally, one can remove a given tag from the selection or replace the full selection with just the selected tag.
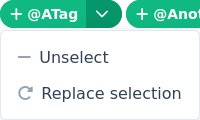
A global search field as well as individual search fields for each column allow filtering the tests by name, tags or description.

It is possible to save the current selection of tests in a file, which can be loaded later on.

This may be useful for collaboration with other team members or for reusing the same selection in future test runs.
|
Cucumber discovers and identifies tests partially based on the feature file location and the line number where the tests are located. When saving a test selection, we save the relative path of the feature path in relation to the current working directory of the java process. When loading the selection, the relative path is again resolved. When loading a selection configuration, the relative directory structure must be the same, and the tests must be located in the same line number within the files. Otherwise, we cannot unambiguously identify the tests. |
After selecting the tests, the user can click the "Run selected tests" button to start their execution.

7.1.6. Topology Visualizer
The topology visualizer displays the test environment configuration in a graphical way. It reads the tiger configuration and displays the configured servers and how they are connected to each other.
You can access the topology visualizer directly from the Workflow UI.


Server Types represented in the Topology Visualizer
Each configured server is displayed as a node in the diagram. An info icon on the node opens a popover dialog with the corresponding YAML configuration.
TigerProxy
A tiger proxy is displayed and connected to:
-
other proxies from which it receives traffic — these are the ones configured under
tigerProxy.trafficEndpoints. If one of these traffic endpoints is an external remote proxy, not configured directly in the yaml, we read its configuration from its admin api and display it in the corresponding node. -
to explicitly configured routes — configured under
tigerProxy.proxyRoutes -
to implicit routes — routes that are automatically created for other server types. This is the case for servers of type
externalUrl,externalJar,zion,httpbin,dockerandcompose. -
to the reverse proxy target — when configured as a direct reverse proxy, the target is displayed and the proxy connects to it.
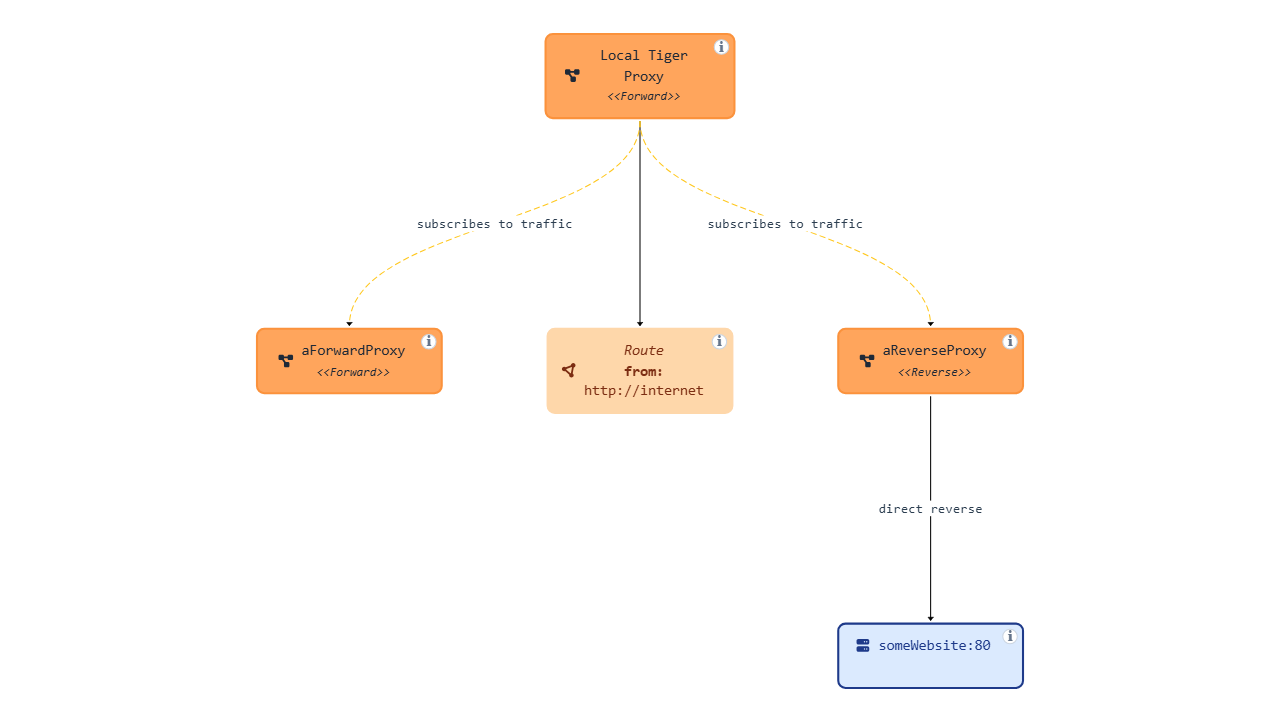
External URL
An externalUrl server type is displayed as a simple node with an incoming edge for the implicit route from the local proxy.
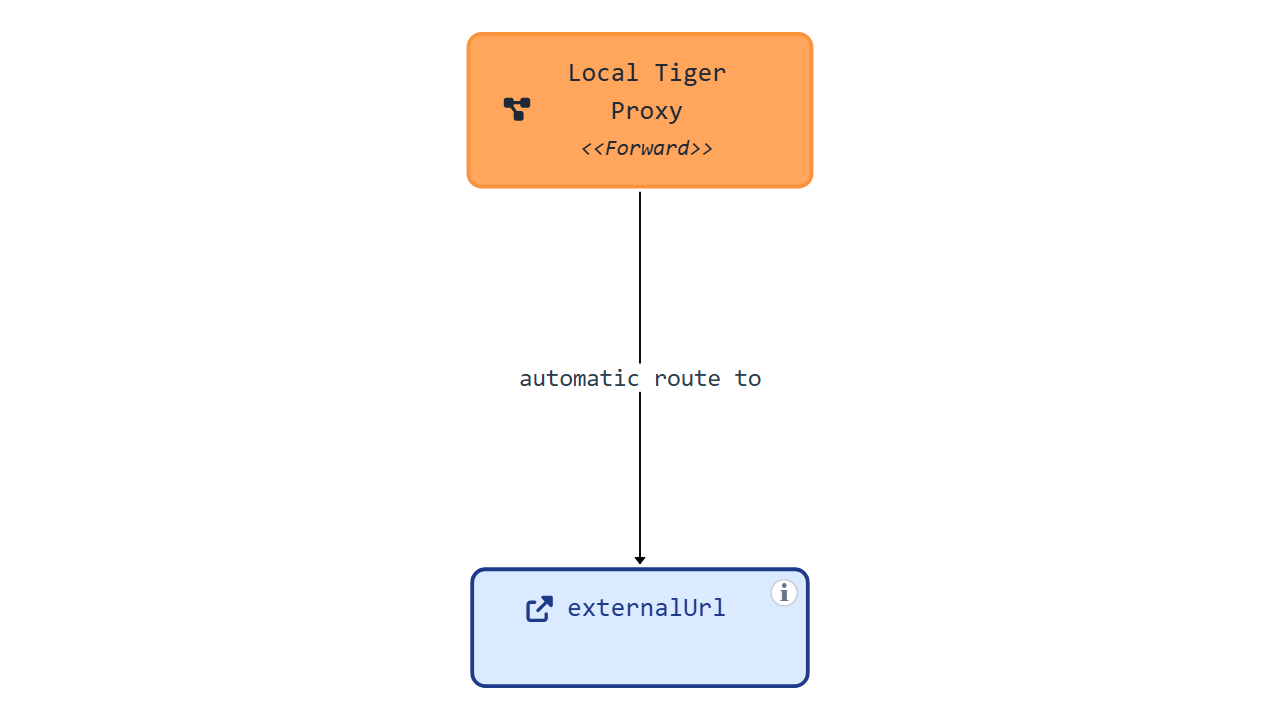
External JAR
An externalJar server type is displayed as a simple node with an incoming edge for the implicit route from the local proxy. Additionally, if the externalJar has the configuration properties set to use a proxy (http.proxyHost and http.proxyPort), then an outgoing edge is displayed to the local proxy. These properties can be set in the tiger.yaml like this:
externalJar configuration with proxy settingsservers:
mainServer:
type: externalJar
externalJarOptions:
options:
- -Dhttp.proxyHost=127.0.0.1
- -Dhttp.proxyPort=${tiger.tigerProxy.proxyPort}`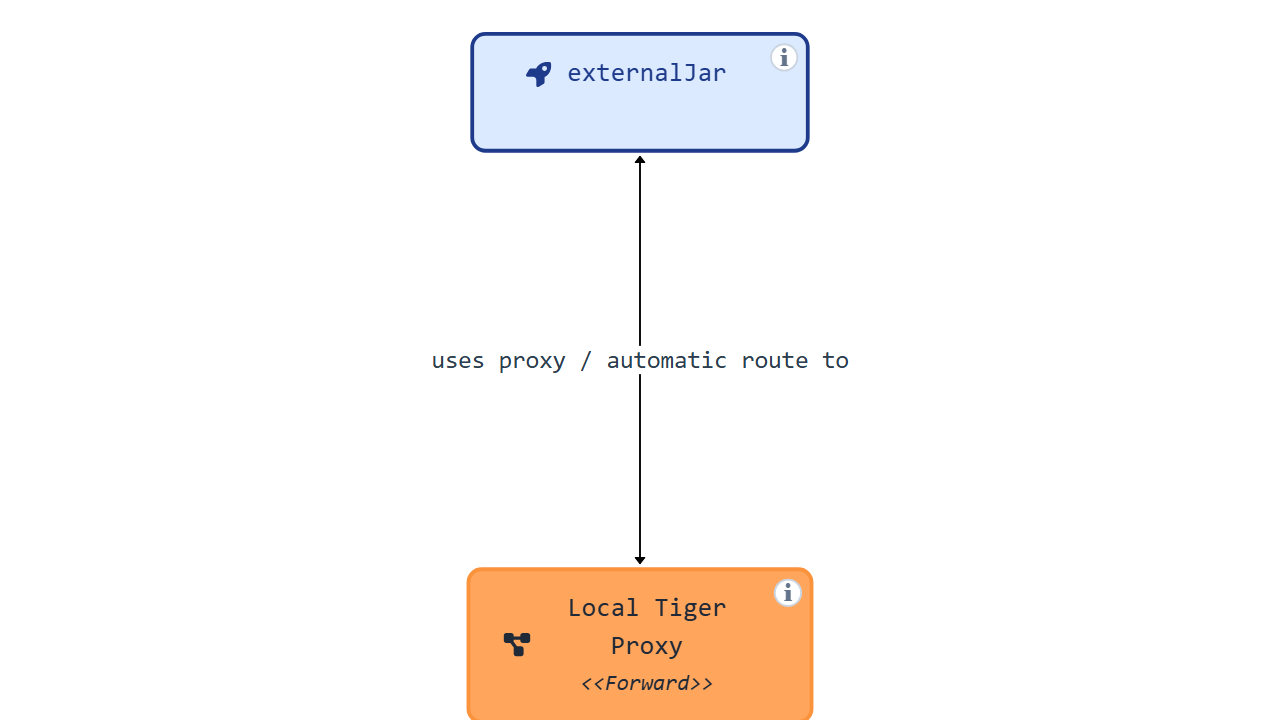
httpbin
A httpbin server type is displayed as a simple node with an incoming edge for the implicit route from the local proxy.
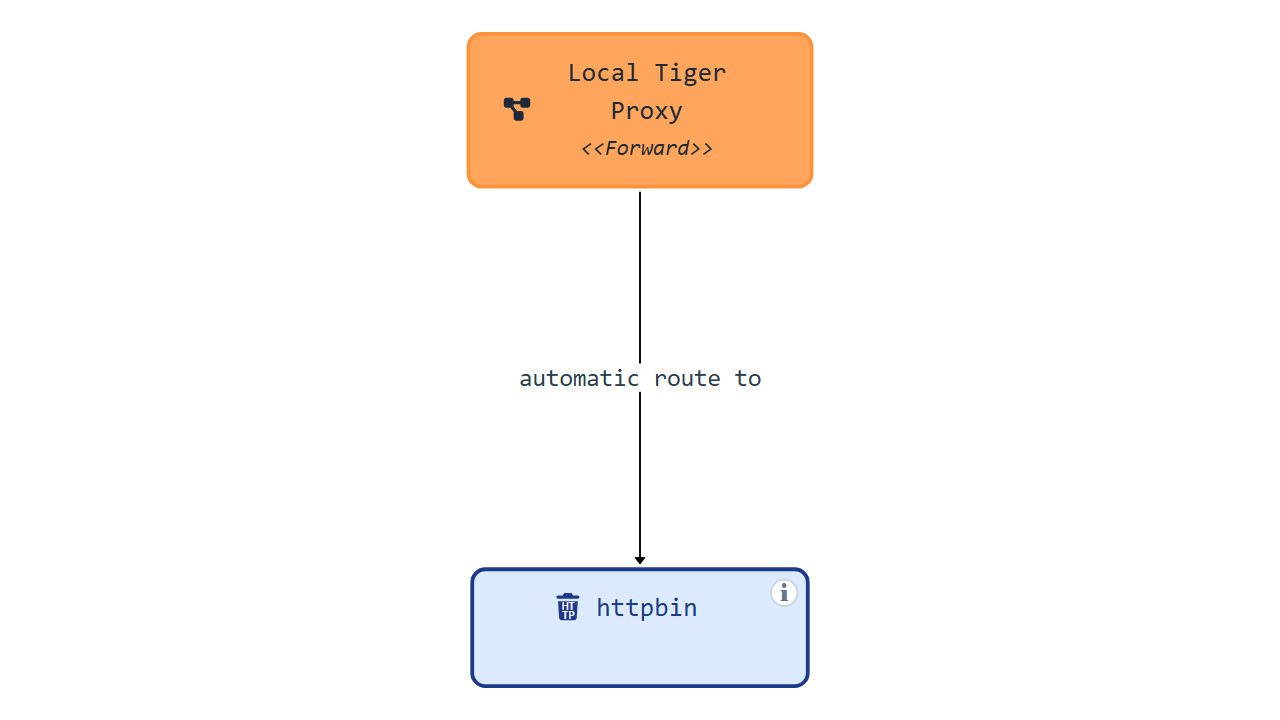
Zion
A zion server type is displayed as a simple node with an incoming edge for the implicit route from the local proxy. Additionally, a zion server is automatically configured to use the local proxy and this is represented in the diagram. If there are backend requests in the zion configuration, the server is connected to the target of the backend request. Since the zion server is automatically configured to use the tiger proxy, the backend request actually goes through the proxy. This is represented by a "proxy" icon on the backend request connection. Hovering or selecting this connection highlights the proxy through which the backend request goes.
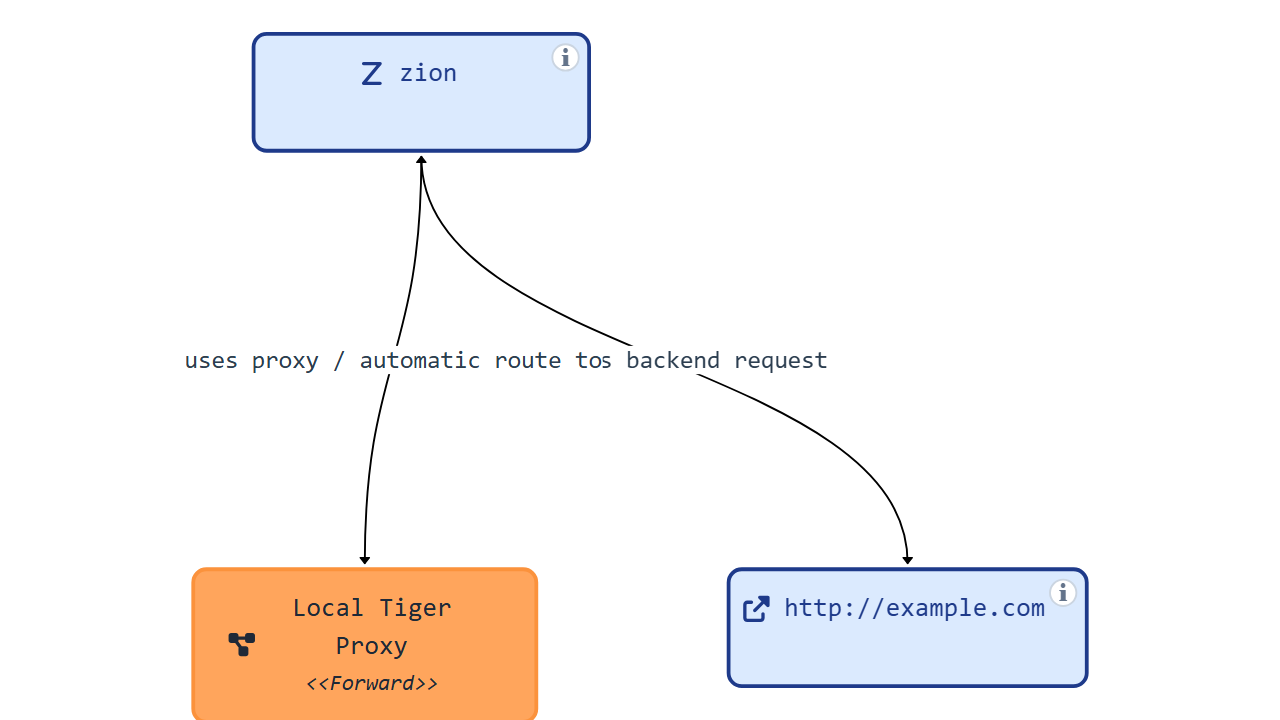
docker
The docker server type is displayed as a simple node with an incoming edge for the implicit route from the local proxy.
The docker node runs inside a docker host. This is represented in the diagram by a dashed box.
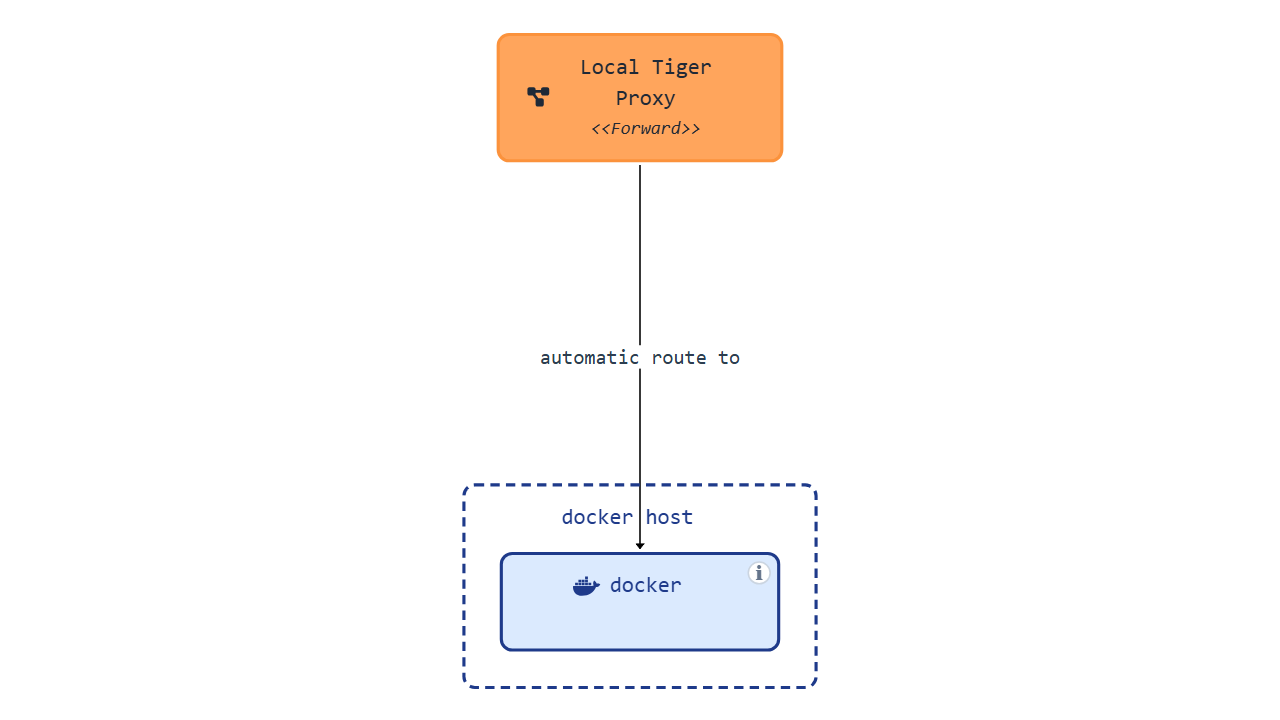
compose
A compose server type is based on a docker compose configuration file. This configuration is represented as a nested node inside the docker host node. For each service defined in the docker compose file, a child node is displayed with an incoming edge for the implicit route from the local proxy.
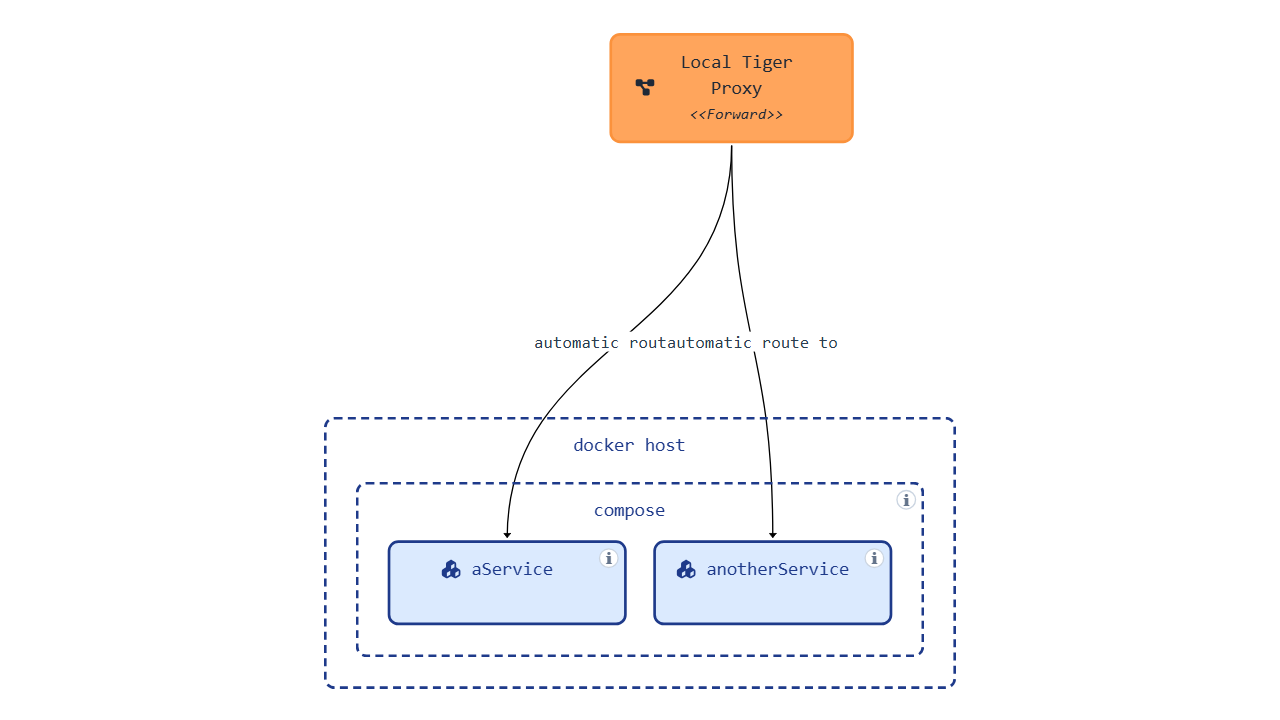
Live data
The topology diagram displays initially all information that can be determined from the tiger configuration. When running a test suite, we may gain additional information about which nodes communicate with each other. Such additional information is gathered based on the metadata of the requests that go through the tiger proxy. We use this information to enrich the diagram with "live edges", indicating that a live data transmission was detected.

It is possible to toggle between the display of all data, only static data and only live data.

Standalone mode
As an alternative to the integration in the Workflow UI, the topology visualizer can be used in a standalone mode.
You can download the standalone JAR from the Maven repository: https://repo1.maven.org/maven2/de/gematik/test/tiger-topology-visualizer/4.4.0/tiger-topology-visualizer-4.4.0-standalone.jar
and run it with:
java -jar tiger-topology-visualizer-4.4.0-standalone.jarThis starts a Spring Boot application with the topology visualizer. You can access it at http://localhost:8080. You can upload a tiger configuration file and visualize the topology.
When in standalone mode, you can upload the tiger.yaml and any additionalConfiguration files that are referenced from the main tiger.yaml. File names are resolved based on the base file name, ignoring the file path.
7.2. Standalone Tiger Proxy Log
To watch the recorded messages and to be able to analyze issues at test run time already you can visit the tiger proxy web user interface at:
http://127.0.0.1:${ADMINPORT}/webuiWith ADMINPORT being the configured server port of the tiger proxy.
When the user works with the Workflow UI the tiger proxy UI can be opened via a link in the Rbel Log Details view in a new browser tab.
7.2.1. Overview
The following screenshot shows the WebUI.
On the left side the request/response pairs are displayed.
The user can see the request type and the error code of the response as well as the timestamp of the request.
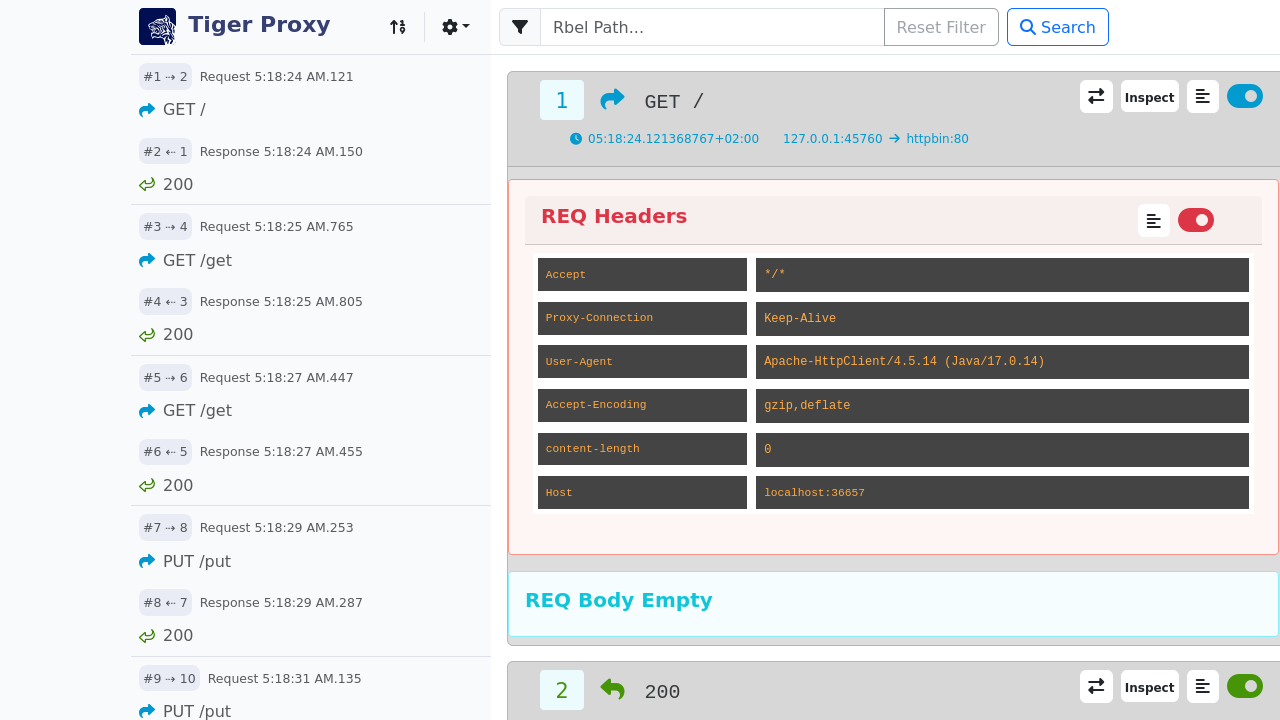
On the top right the tiger version and the build date are displayed.
In the middle the full request and response messages are shown with detailed header and body.
Filter Modal
When a lot of messages are recorded, it is sometimes hard to find the message you are looking for.
Therefore, the user can filter the messages with a Rbel-Path or a regex using either the filter modal as shown in the picture below or the JEXL Debugging modal described here.
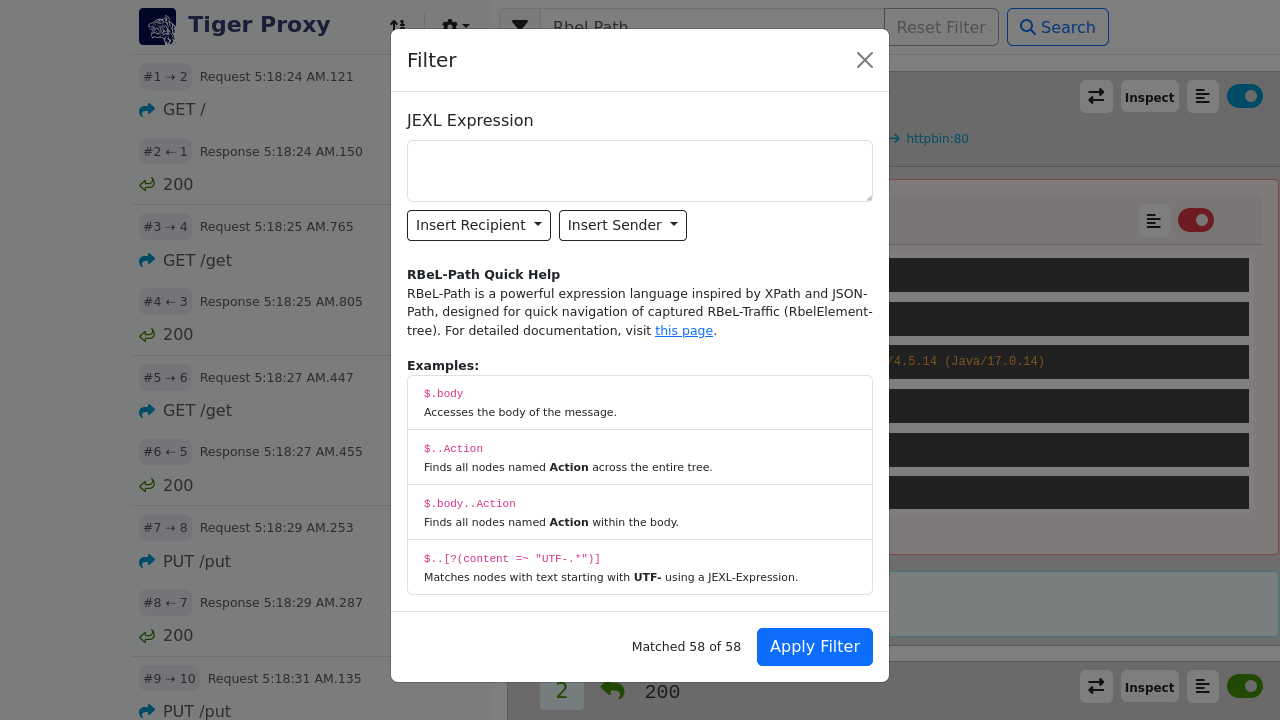
RBel-Path/JEXL Debugging Modal
When the user wants to inspect a Rbel-Path or have a look at some JEXL expressions, the user can click on the corresponding button in the top right corner of the request or the response that is highlighted in the following screenshot.
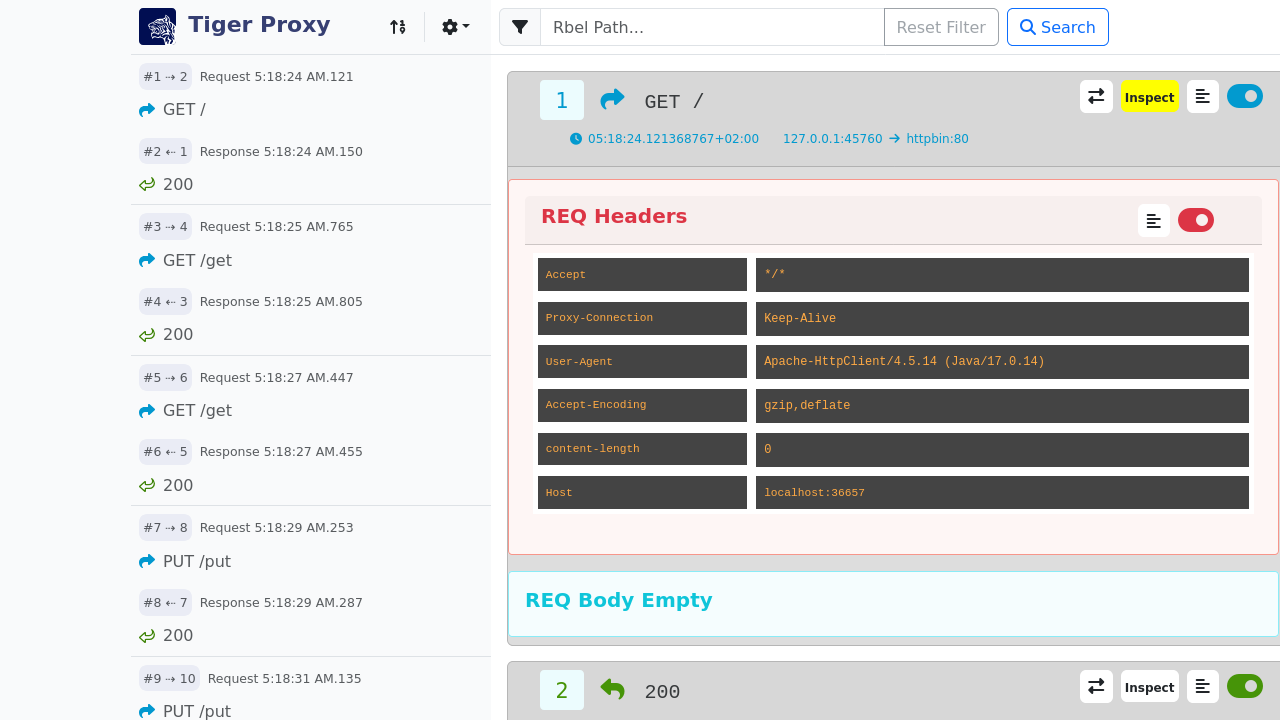
The picture below shows the RBel-Path tab.
The user can execute the RBel-Path on the request or the response and the result is displayed in the bottom part of the modal.
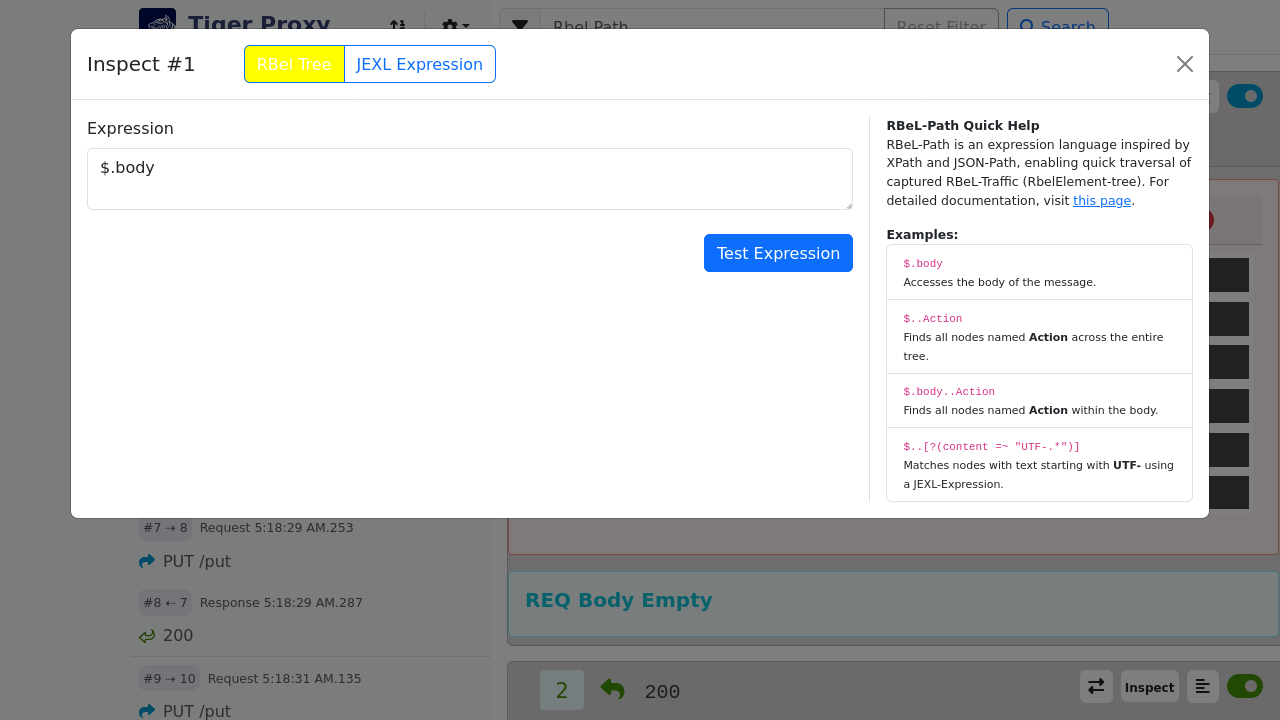
For more information in the Rbel-Path check out this section.
The picture below shows the JEXL Debugging tab.
The user can execute the JEXL expression on the request or the response and the result is displayed in the bottom part of the modal.
Further information on JEXL expressions can be found in Explanation of JEXL Expressions.
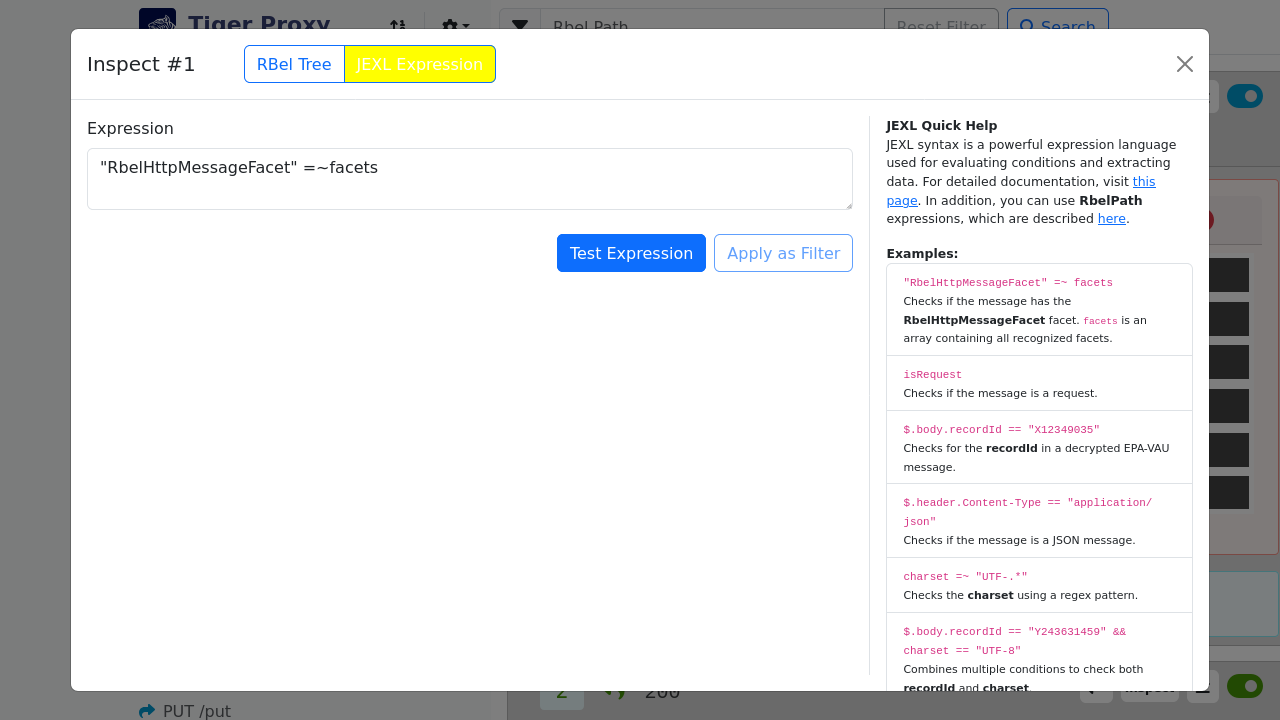
When the user wants to filter the messages with a JEXL expression, the user can click on the "Use as filter" button in the modal.
Behind the settings icon are some modals that are explained in more detail in the following sections.
Settings
Behind the settings icon several actions can be triggered:
-
Message Options … has two possibilities (hide headers and hide details) which collapses either all headers (request headers as well as response headers) or all the detailed information of the requests and responses
-
Sort messages by … controls the order in which the messages are displayed in the list (see Message Sort Order below).
-
Export … allows you to export all or the currently filtered received messages as an HTML page or as a machine-readable tgr file.
-
Configure Routes … allows you to modify and add the routes configured on this tiger proxy
-
Reset Messages … allows you to reset all the messages and import a previously stored traffic file.
-
Quit Proxy … quits the tiger proxy.
Message Sort Order
The Tiger Proxy WebUI offers two ways of ordering the recorded messages.
The selection is persisted in the browser, so it is remembered across reloads, and can be changed at any time via the Sort messages by radio buttons in the settings dropdown:
-
Transmission timestamp (default) — messages are displayed in chronological order based on the timestamp at which they were transmitted on the wire.
This is the most intuitive ordering for most use cases, especially when traffic is aggregated from multiple Tiger Proxy instances (proxy mesh setups), where the receive order at the local proxy can differ from the actual chronological order. -
Received order — messages are displayed in the order in which they were registered in the local Tiger Proxy (sequence number).
This is the same ordering that the test step validation uses internally (e.g.TGR find request to URL,TGR current response …).
When debugging a failing validation step it is often useful to switch to this view in order to see exactly the sequence the validator is iterating over.
|
The two orderings only differ when the messages do not arrive at the local Tiger Proxy in chronological order. |
The orthogonal Up/Down button in the header still controls the sort direction (oldest first vs. newest first) for whichever sort key is currently selected.
Routing Modal
The user can add/delete routes in the routing modal which is shown in the following screenshot.
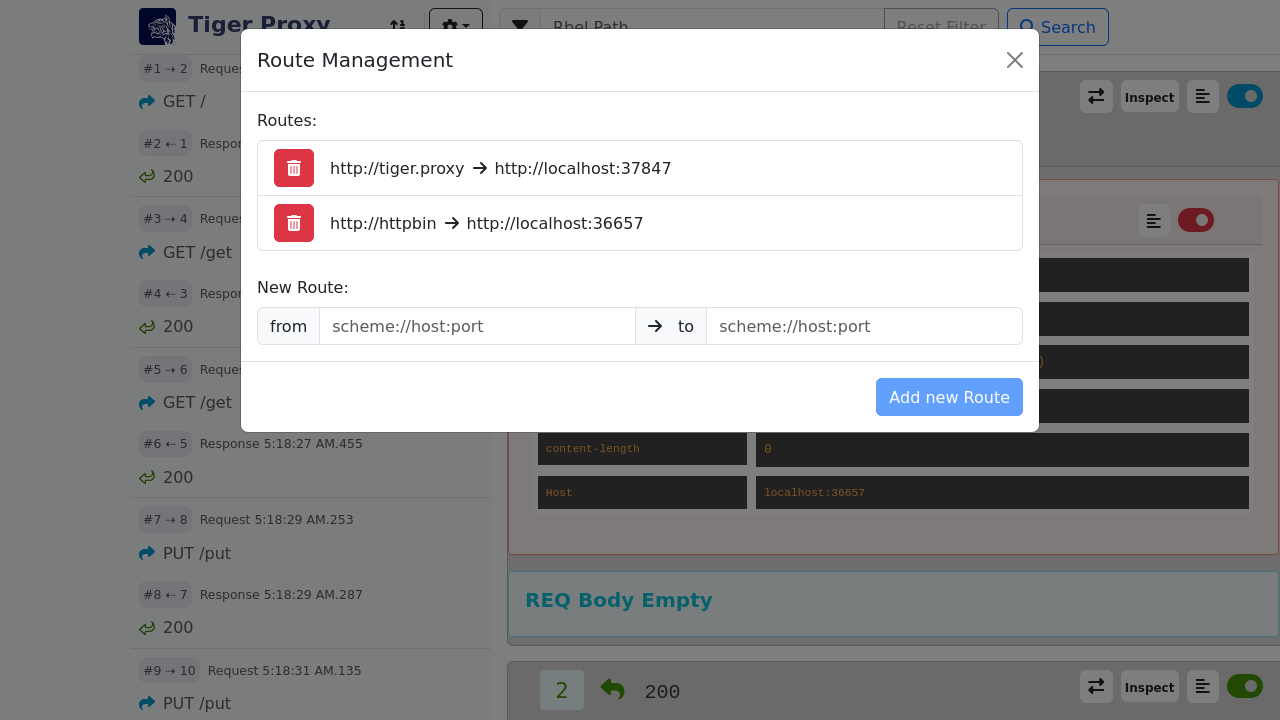
Message Content
The user can have a look at the request/response message content of the header, body or both by clicking on the corresponding button in the top right corner of the request or the response that is highlighted in the following screenshot.
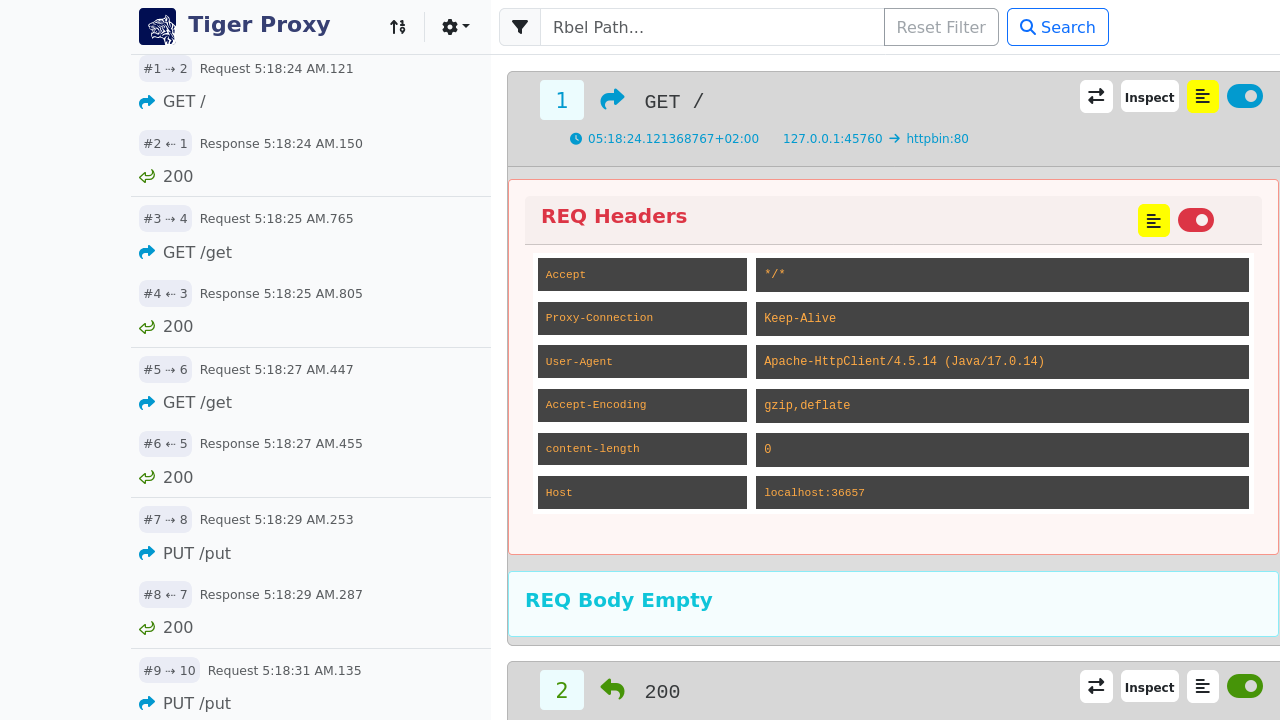
The picture below shows the content of the whole response.
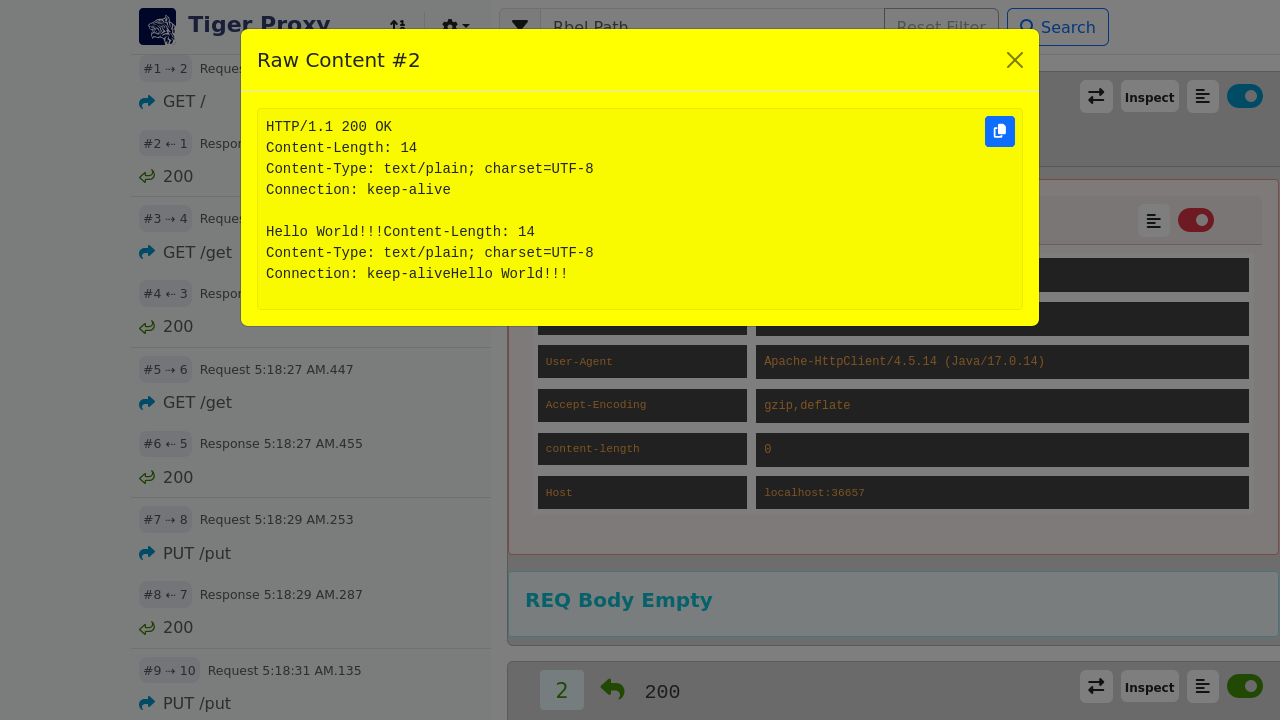
In case that the message is too large to be rendered fully (displaying a "<…redacted due to size of" text), the message will have a "Full Message" button in the top right corner of the request or the response that is highlighted in the following screenshot.
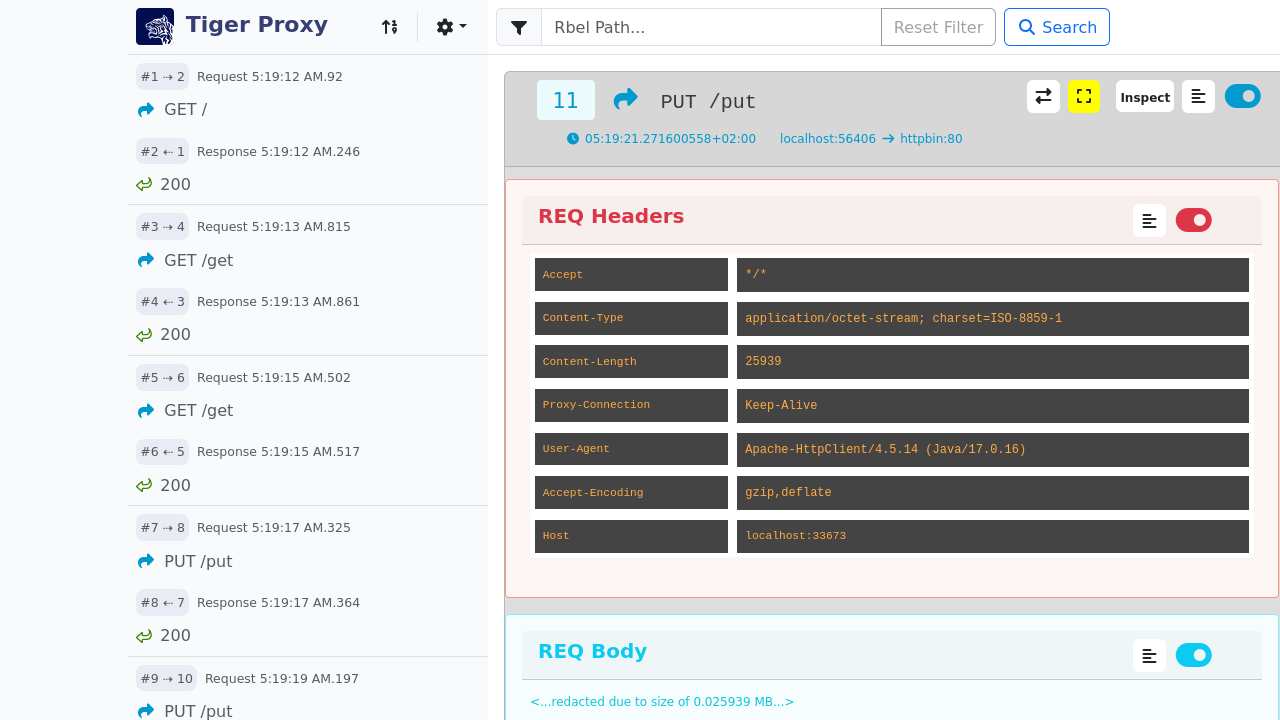
By clicking on this button the full message will be displayed in a new tab/window.
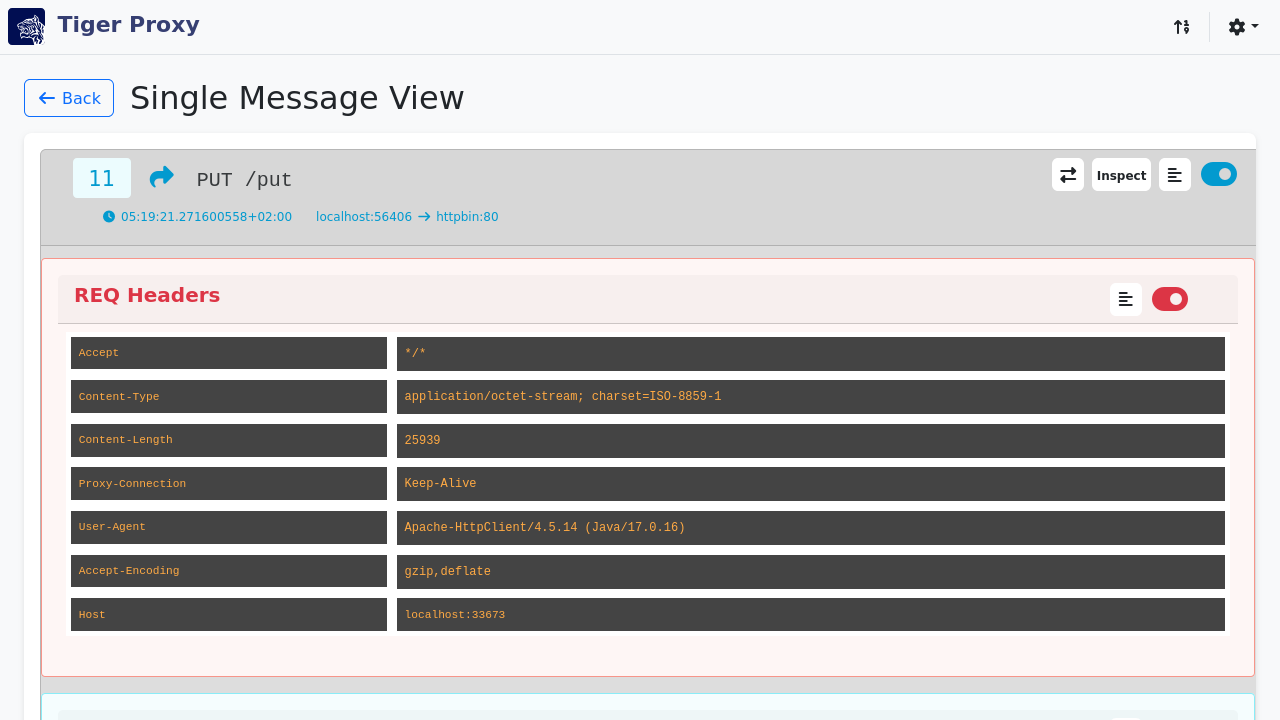
Switching between request/response
Since the order in the list is based upon the reception of the corresponding message it can be hard to find the corresponding request or response to a given message.
To make this easier the user can switch between the request and the response by clicking on the corresponding button in the top right corner of the request or the response that is highlighted in the following screenshot.
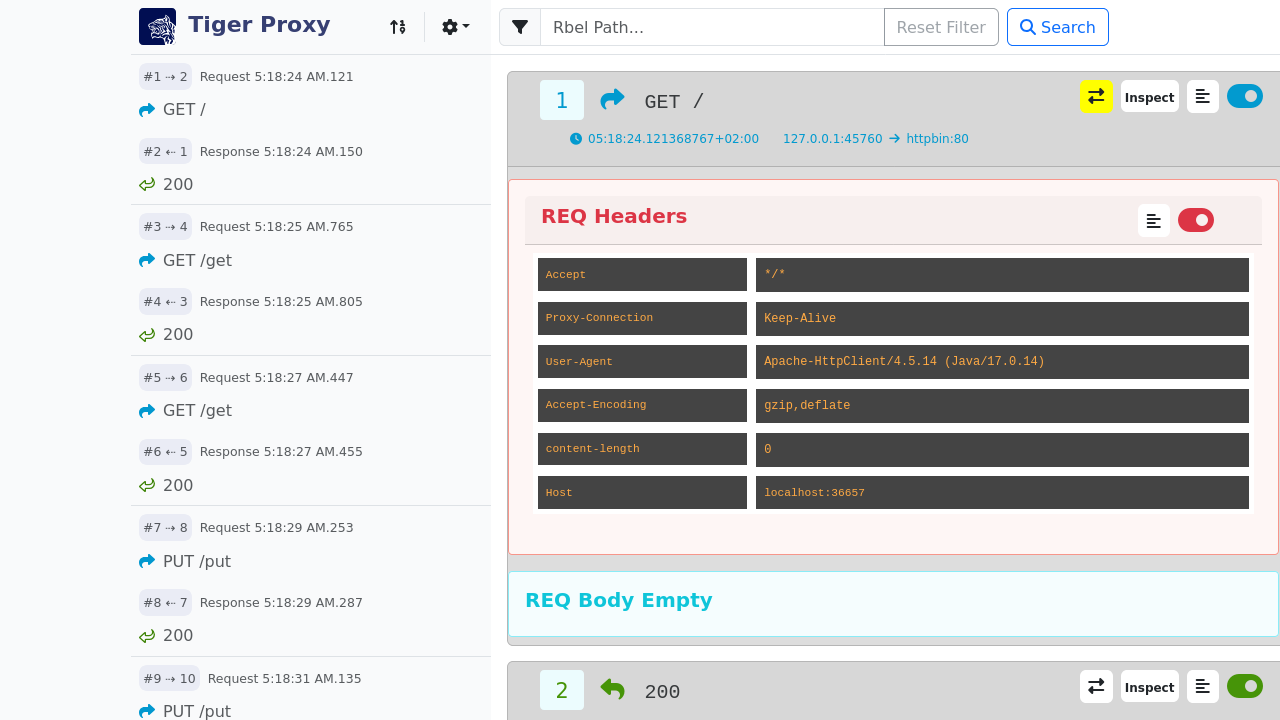
7.3. Explanation of JEXL Expressions
In the Workflow UI and in the WebUI you can inspect the requests and response messages.
For that you can use RbelPath and/or JEXL expressions. This section should give you a brief review on the JEXL expressions.
Important to know is that an JEXL expression is usually a "condition1 operator condition2" expression which is compared.
Therefor the following operators could be used.
7.3.1. Operators
| Operator | Description |
|---|---|
and | && |
cond1 and cond2 and cond1 && cond2 are equivalent |
or | || |
cond1 or cond2 and cond1 || cond2 are equivalent |
not | ! |
The ! operator can be used as well as the word not, e.g. !cond1 and not cond1 are equivalent |
== |
Equality, e.g. cond1 == cond2 |
!= |
Inequality |
> |
Greater than |
< |
Less than |
>= |
Greater than or equal |
⇐ |
Less than ot equal |
=~ |
In or match, can be used to check that a string matches a regular expression. |
!~ |
Not in or not-match, can be used to check that a string does not match a regular expression. |
=^ |
startsWith, for example "abcdef" =^ "abc" returns true |
!^ |
startsNotWith, "abcdef" !^ "abc" returns false |
=$ |
endsWith, for example "abcdef" =$ "def" returns true |
!$ |
endsNotWith, for example "abcdef" !$ "def" returns false |
Empty |
The unary empty operator behaves like the corresponding function empty(). |
size |
The unary size operator behaves like the corresponding function size(). |
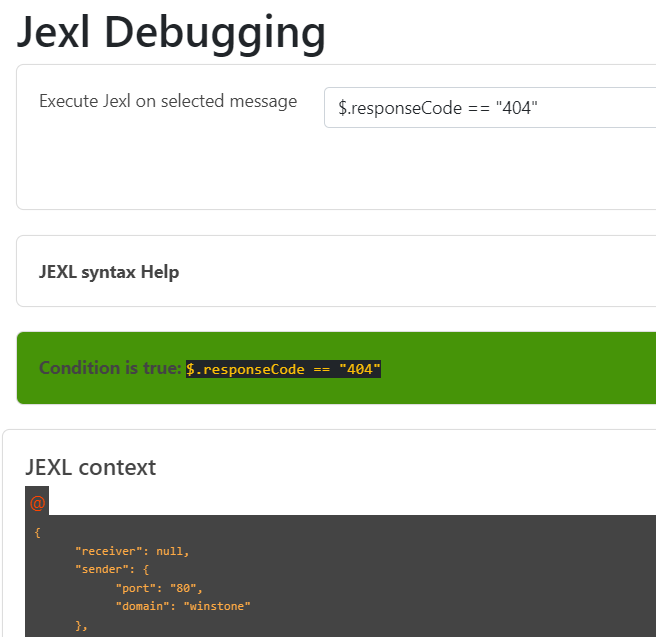
7.3.2. Access on Array, Lists and Maps
To access maps in JEXL/RbelPath the point notations is used. In case of lists use the number of the list entry you want to access, starting with 0, 1, 2 and so on.

7.3.3. Access JEXL contexts
There are predefined JEXL contexts which can be used for the query, for example isRequest, isResponse, charset, content or also more
complex contexts like response.statuscode, request.url, message.method etc.
For more details check the InlineJexlToolbox
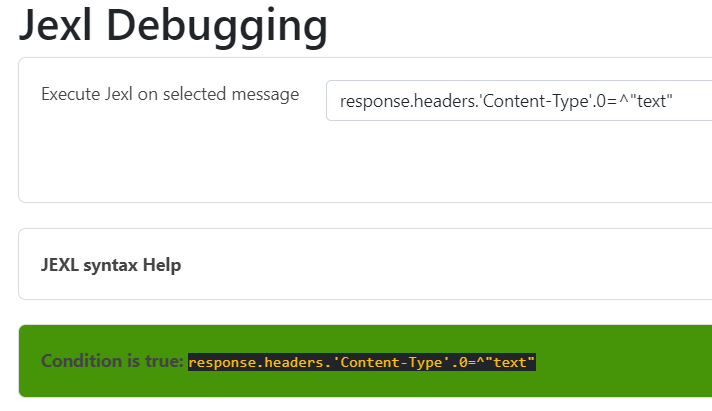
7.3.4. More Examples
message.headers.'content-length'.0 == "0" → Use single quotes when using JEXL contexts with a hyphen.
@.body.0.name.content =^ "Jasmin" → check whether the content starts with "Jasmin"
$.body.recordId == "X12349035" → checks for the recordId of a decrypted EPA-VAU-message
$.header.Content-Type == "application/json" → check if the message is a JSON-message
request.method == "GET" → check if request is da GET request
charset =~ "UTF-.*" → check the charset with a regex
empty(response.url)==true oder auch empty(response.url) → url is not set
$.body.recordId == "Y243631459" && charset == "UTF-8" → combines the two criterions
7.3.5. POST Form / GET parameters
When accessing parameters POST and GET are handled differently.
POST form data requests contain the data as Url encoded query string in the body of the request.
There is no easy way to decode this data generically within Rbel/JEXL.
To help you ease the situation for POST we do have a helper JEXL inline method: !{urlEncoded('value')}
To access POST form data you may use $.body.paramname
For GET requests you have two options:
-
$.path.paramname -
$.path.paramname.value
For further help on JEXL please check out the official website (https://commons.apache.org/proper/commons-jexl).
8. Tiger Extensions
Tiger has certain extensions that fulfil certain tasks.
The different extensions are shortly described in the following sections.
8.1. Public Tiger Extensions
8.1.1. Zion Extension
Tiger Zion Extension is a highly configurable mock server designed to simulate a real backend.
It supports the communication protocol HTTP and allows you to define, manipulate, and replay requests and responses.
With Tiger Zion, you can create complex test scenarios, simulate error cases, and validate the integration of your application with Zion systems.
It is ideal for automated, reproducible integration and interface testing, enabling dynamic scenario definition and message manipulation for robust test automation.
More information and source code can be found on GitHub: https://github.com/gematik/tiger-zion
8.1.2. Mail Extension
The Tiger-Mail-Extension enables automated testing of email flows within test scenarios.
It provides steps and utilities to send, receive, and validate emails as part of your test cases.
More information and source code can be found on GitLab: https://gitlab.prod.ccs.gematik.solutions/tiger/tiger-mail-extension
8.1.3. Tiger Cloud Extension
The Tiger-Cloud-Extension allows to embed docker-image-based containers, docker compose scripts and even helm charts to local or remote kubernetes clusters.
The GitHub repo is https://github.com/gematik/tiger-cloud-extension.
8.1.4. Tiger On FHIR Extension
The Tiger-On-Fhir-extension provides a set of simple BDD steps which can be used to check for valid FHIR content therein.
FHIR stands for Fast Healthcare Interoperability Resources.
The tiger-on-fhir can be found on GitHub https://github.com/gematik/tiger-on-fhir and it uses the Gematik Referenzvalidator located on GitHub https://github.com/gematik/app-referencevalidator.
8.2. Gematik intern Extensions
8.2.1. Tiger Konnektor Management Extension
The Tiger-Konnektor-Management-Extension provides an interface to the KMS system of different connector providers.
It also provides cucumber feature steps to access the different connectors.
This internal gematik extension can be found on GitLab https://gitlab.prod.ccs.gematik.solutions/konnektor/tiger-konnektor-management-extensions.
8.2.2. Tiger CATS Extension
CATS stands for Card Terminal Simulator.
Tiger-Cats-Extensions offers the option to use the REST interface of CATS as Java functionality or as BDD steps.
This internal gematik extension can be found on GitLab https://gitlab.prod.ccs.gematik.solutions/cats/tiger-cats-extensions.
8.2.3. Tiger PSSIM Extension
The Tiger-PSSIM-Extension is an extension for simulating a Primärsystem (PS) in your tests.
It provides a wide range of BDD Steps and covers the majority of PS functionalities.
This internal gematik extension can be found on GitLab https://gitlab.prod.ccs.gematik.solutions/konnektor/tiger-pssim-extension.
8.2.4. Tiger Robot Extension
The Tiger-Robot-Extension is an extension designed to control the Cardterminal Robot created by the gematik.
This internal gematik extension can be found on GitLab https://gitlab.prod.ccs.gematik.solutions/roboter/tiger-robot-extension.
8.3. Tiger Canopy Extension
The Tiger-Canopy-Extension adds a canopy server type to tiger.yaml: a programmable DNS
server that reroutes selected hostnames to a sibling tigerProxy and forwards everything
else to the system resolver — replacing brittle, static Docker network aliases.
Bundled by default in tiger-starter-parent; otherwise pull in de.gematik.test:tiger-canopy-extension.
Architecture and full YAML surface: doc/adr/canopy.md.
9. Rest API
The tiger test environment provides a Rest API which allows the automation of test execution and retrieval of the corresponding test results.
The Rest API is disabled by default.
You can enable it by setting the following configuration entry in the tiger.yaml
lib:
    enableTestManagementRestApi: true # set to true to enable the Rest API. default is false
To enable the Rest API it is required to have the cucumber-junit-platform-engine in the class path.
E.g.:
<dependency>
    <groupId>io.cucumber</groupId>
    <artifactId>cucumber-junit-platform-engine</artifactId>
    <version>7.19.0</version>
    <scope>test</scope>
</dependency>
This is transitively included if you are importing the tiger-test-lib.
But it is not included if you just import the tiger-testenv-mgr.
The following section provides an overview of the available endpoints and their functionality. The endpoints are followed by the Workflow UI URL, for example: <workflui_url>/tests.
Additionally, the OpenApi specification YAML can be found and tried out in the tiger repository.
When the YAML file is opened in a compatible editor (e.g. IntelliJ) you can directly trigger the API calls and see the responses.
9.1. Tests
getAvailableTests
GET /tests
get list of available tests
Return Type
array[TestDescription]
Responses
| Code | Message | Datatype |
|---|---|---|
200 |
List of available tests |
List[TestDescription] |
400 |
Bad Request |
|
500 |
Something went wrong server internally |
|
0 |
The default error response |
getTestResults
GET /tests/runs/{testRunId}
get the results of a test run
Description
gets the results of a test run. This includes a global test result and the results for each test case. In case of failing tests, the failure message is also included.
postExecutionRequest
POST /tests/runs
request the execution of a selection of tests
Description
sends a request for the execution of a selection of tests. The tests to be executed are specified with a TestExecutionRequest which includes uniqueIds, tags and file paths. The execution request is queued for execution and will be executed as soon as any previously running tests finish. The response includes the id of the test run and the url where to find the results of the execution.
Parameters
| Name | Description | Required | Default | Pattern |
|---|---|---|---|---|
TestExecutionRequest |
test execution request TestExecutionRequest |
X |
postExecutionRequestAllTests
POST /tests/runs/all
request execution of all tests
Description
sends a request for the execution of all tests. The execution request is queued for execution and will be executed as soon as any previously running tests finish. The response includes the id of the test run and the url where to find the results of the execution.
9.2. Models
9.2.1. Error
Default error object with information about the occurred error
| Field Name | Required | Nullable | Type | Description | Format |
|---|---|---|---|---|---|
errorCode |
X |
String |
A code identifying this error |
||
errorMessage |
X |
String |
A readable message describing the error |
9.2.2. ExecutionResult
the result of an executed test
| Field Name | Required | Nullable | Type | Description | Format |
|---|---|---|---|---|---|
result |
X |
Enum: PENDING, RUNNING, SUCCESSFUL, ABORTED, FAILED, |
|||
failureMessage |
String |
9.2.3. TestDescription
The description of a test case
| Field Name | Required | Nullable | Type | Description | Format |
|---|---|---|---|---|---|
uniqueId |
String |
unique identifier of the tests which is generated by the test platform. |
|||
sourceFile |
String |
source file from where the test was discovered |
|||
displayName |
String |
display name of the test |
|||
tags |
Set of [string] |
tags associated with the test as specified in the feature file |
9.2.4. TestExecutionInformation
information of which tests were started and where to find the results of the test run
| Field Name | Required | Nullable | Type | Description | Format |
|---|---|---|---|---|---|
testRunId |
UUID |
uuid |
|||
resultUrl |
URI |
uri |
|||
testsToExecute |
List of TestDescription |
9.2.5. TestExecutionRequest
Request the execution of a subset of tests. Multiple specifications will be combined with AND. If one of the tags, sourceFiles, or testUniqueIds is an empty list, it will not be considered in the selection of tests. If all are empty, all tests are selected.
| Field Name | Required | Nullable | Type | Description | Format |
|---|---|---|---|---|---|
tags |
List of [string] |
||||
sourceFiles |
List of [string] |
||||
testUniqueIds |
List of [string] |
the unique ids generated by the test platform. See the endpoint `GET /tests` for the available tests. |
9.2.6. TestExecutionResult
the result of the executed tests
| Field Name | Required | Nullable | Type | Description | Format |
|---|---|---|---|---|---|
testRunStarted |
Date |
date-time |
|||
testRunFinished |
Date |
date-time |
|||
result |
|||||
tests |
10. Maven Plugin Deep Dive
This section is for the ones that love to know all the details. Here the Tiger maven plugin and the FailSafe plugin are explained in detail.
10.1. Maven plugin details
10.1.1. Tiger maven plugin
This plugin allows to dynamically generate the JUnit driver classes that are then used in the Surefire plugin to start the test runs.
And replaces the serenity maven plugin to generate Serenity BDD test reports.
Generate Drivers goal
| You may decide to manually write your own JUnit driver classes in which case you can omit this plugin. |
To activate this feature in your maven project add the following plugin block to your <build><plugins> section:
      <!-- optional plugin to dynamically create JUnit driver classes on the fly.
            You may omit this plugin if you have written your driver classes manually.
            -->
      <plugin>
        <groupId>com.mycila</groupId>
        <artifactId>license-maven-plugin</artifactId>
        <configuration>
          <skip>true</skip>
        </configuration>
      </plugin>
      <plugin>
        <groupId>de.gematik.test</groupId>
        <artifactId>tiger-maven-plugin</artifactId>
        <version>${version.tiger}</version>
        <executions>
          <execution>
            <id>generate-tiger-drivers</id>
            <goals>
              <!-- mandatory -->
              <goal>generate-drivers</goal>
              <!-- optional. This will attach the Tiger-Agent to the VM running the
                            tests. This, in turn, enables tiger to access and store masterSecrets of TLS
                            connections. This can be used to decipher TLS-traffic in wireshark. -->
              <goal>attach-tiger-agent</goal>
            </goals>
            <phase>generate-test-sources</phase>
            <configuration>
              <!-- optional -->
              <glues>
                <glue>de.gematik.test.tiger.glue</glue>
                <!-- add your packages here -->
              </glues>
              <!-- optional -->
              <featuresDir>${project.basedir}/src/test/resources/features</featuresDir>
              <!-- optional -->
              <includes>
                <include>**/*.feature</include>
              </includes>
              <!-- optional -->
              <driverPackage>de.gematik.test.tiger.examples.bdd.drivers</driverPackage>
              <!-- optional -->
              <!--suppress UnresolvedMavenProperty -->
              <driverClassName>Driver${ctr}IT</driverClassName>
              <!-- optional, defaults to the templated located at
                            /src/main/resources/driver4ClassTemplate.jtmpl
                            in the tiger-maven-plugin module.
                            This template will create a junit4 compliant driver class.
                            Use separate template file if you have spring boot apps to test
                            or need to do some more fancy set up stuff.
                            <templateFile>${project.basedir}/..../XXXX.jtmpl</templateFile>
                            -->
              <!-- optional -->
              <skip>false</skip>
            </configuration>
          </execution>
          <execution>
            <id>generate-tiger-report</id>
            <goals>
              <goal>generate-serenity-reports</goal>
            </goals>
            <configuration>
              <!-- optional - directory where serenity reports are created -->
              <reportDirectory>${project.build.directory}/site/serenity</reportDirectory>
              <!-- optional - directory with the .feature files being executed -->
              <requirementsBaseDir>src/test/resources/features</requirementsBaseDir>
              <!--optional - when set to true, the serenity report is automatically open in the default browser -->
              <openSerenityReportInBrowser>false</openSerenityReportInBrowser>
              <!-- optional - A comma separated list of report types to be generated. -->
              <reports>html,single-page-html,json-summary</reports>
            </configuration>
          </execution>
        </executions>
</plugin>-
List[glue] glues (mandatory)
list of packages to be included as glue or hooks code
-
List[include] includes (mandatory)
list of include patterns for feature files in Ant format (directory/**.feature) -
String featuresDir (default: local working directory)
root folder from where to apply includes and excludes -
List[exclude] excludes (default: empty)
list of exclusion patterns for feature files in Ant format (directory/**.feature) -
boolean skip (default: false)
flag whether to skip the execution of this plugin -
String driverPackage (default: de.gematik.test.tiger.serenity.drivers)
package of the to be generated driver class -
String driverClassName (default: Driver${ctr})
Name of the to be generated driver class.
|
The ctr token ${ctr} is mandatory! For more details see section below |
-
String templateFile (default: null which means that the plugin will use the built-in template file)
Optional path to a custom template file to be used for generating the driver Java source code file.-
The plugin currently supports the following list of tokens:
-
${ctr}
counter value that is unique and incremented for each feature file. -
${package}
will be replaced with package declaration code line of the driver class.
Either empty or of the pattern "package xxx.yyy.zzz;" where xxx.yyy.zzz is replaced with the configured driverPackage configuration property. -
${driverClassName}
name of the driver class (with the ctr token already being replaced with the incrementing counter value). -
${feature}
path to the feature file(s). -
${gluesCsv}
comma separated list of glue/hook packages without curly braces.
-
-
Manually creating driver classes
For each feature (or use wildcards / directories for single driver class) you can implement a driver class based on the example code below.
package de.gematik.test.tiger.integration.YOURPROJECT;

import static io.cucumber.junit.platform.engine.Constants.FILTER_TAGS_PROPERTY_NAME;
import static io.cucumber.junit.platform.engine.Constants.GLUE_PROPERTY_NAME;
import static io.cucumber.junit.platform.engine.Constants.PLUGIN_PROPERTY_NAME;

import org.junit.platform.suite.api.ConfigurationParameter;
import org.junit.platform.suite.api.IncludeEngines;
import org.junit.platform.suite.api.SelectClasspathResource;
import org.junit.platform.suite.api.Suite;

@Suite
@IncludeEngines("cucumber")
@SelectClasspathResource("features/YOURFEATURE.feature")
@ConfigurationParameter(key = FILTER_TAGS_PROPERTY_NAME, value = "not @Ignore")
@ConfigurationParameter(key = GLUE_PROPERTY_NAME, value = "de.gematik.test.tiger.glue,ANY ADDITIONAL PACKAGES containing GLUE or HOOKS code")
@ConfigurationParameter(
    key = PLUGIN_PROPERTY_NAME,
    value = "io.cucumber.core.plugin.TigerSerenityReporterPlugin,json:target/cucumber-parallel/1.json")
public class Driver1IT {}
Generate Reports goal
The second execution block in the example XML section above will trigger the report creation.
With the parameter reports you can configure which reports get generated.
The following reports types are available
-
html- A fancy detailed overall report (index.html) -
single-page-html- A simple HTML single page report for emailing (serenity-summary.html) -
json-summary- A summary report in json format, useful for displaying in CI tools (e.g.: Jenkins)
By setting the parameter openSerenityReportInBrowser to true, the html report will automatically open in the default browser.
Start Tiger test environment in standalone mode
Adding the plugin as shown below will allow you to start a test environment in standalone mode by starting mvn as follows: mvn tiger:setup-testenv
Please be aware that this is a blocking call, you may specify a timeout configuration property autoShutdownAfterSeconds
This is a Maven plugin configuration/system property, not a property from the tiger yaml file.
To prematurely stop the process either press Ctrl+C in your console or kill it with operating system specific kill commands / tools.
In order to customize the tiger yaml to be used either set the environment variable TIGER_TESTENV_CFGFILEtiger.testenv.cfgfile
<plugin>
     <groupId>de.gematik.test</groupId>
     <artifactId>tiger-maven-plugin</artifactId>
     <version>${version.tiger}</version>
 </plugin>
10.2. Failsafe plugin
The failsafe plugin will trigger the test run.
It is important to activate the testFailureIgnore property, to ensure that even if the test fails, the serenity report is created.
To filter the scenarios/features to be run you may pass in the Java system property cucumber.filter.tags.
You can do so either within the <systemPropertyVariables> tag or via the command line using -Dcucumber.filter.tags
The "not @Ignore" is the default setting for maven verify as well as for IntelliJ, therefore scenarios that should be ignored are to be tagged with @Ignore.
If the user uses the cucumber option "-Dcucumber.options" to set own tags then the default setting of "not @Ignore" is overridden.
The same counts for own tag settings in the IntelliJ run configuration.
For more details about how to use filter tags see https://cucumber.io/docs/cucumber/api/#tags
      <!-- Runs the tests by calling the JUnit driver classes -->
      <!-- To filter features / scenarios use the system property
                 -Dcucumber.filter.tags -->
      <plugin>
        <groupId>org.apache.maven.plugins</groupId>
        <artifactId>maven-failsafe-plugin</artifactId>
        <version>${version.maven.failsafe}</version>
        <configuration>
          <includes>
            <!-- adapt to the class names of your driver classes -->
            <include>**/Driver*IT.java</include>
          </includes>
        </configuration>
        <executions>
          <execution>
            <goals>
              <goal>integration-test</goal>
              <goal>verify</goal>
            </goals>
          </execution>
        </executions>
</plugin>| We do not recommend the parallel test execution with Tiger at the moment. |
Reason is that when using Tiger Proxies with the Tiger test library validation feature parallel execution may lead to messages from different threads / forked processes ending up in the wrong listening queue making it very complicated to make sure your validations are working as expected in different timing situations.
10.3. IntelliJ
We recommend to use latest version of IntelliJ at least version 2021.1.
10.3.1. Run/Debug settings
To be able to successfully start scenarios/features you first need to configure the Run/Debug settings of your project:
-
Main class: io.cucumber.junit.TigerCucumberRunner
-
Glue:
-
de.gematik.test.tiger.glue
-
net.serenitybdd.cucumber.actors
if you are using the screenplay pattern (PREFERRED!) -
additional packages specific to your test suite
-
-
VM Options:
-
Java proxy system properties (see Proxy configuration below)
-
-
Environment variables:
-
Proxy environment variables (see Proxy configuration below)
-
Best is to add these settings to the Configuration Templates for Cucumber Java.
Depending on the version of IntelliJ these settings are located either on the top icon bar or at the bottom left as link.
Else you would have to apply these settings to any new Debug/Run Configuration, like when you start a new scenario, which was never executed before.
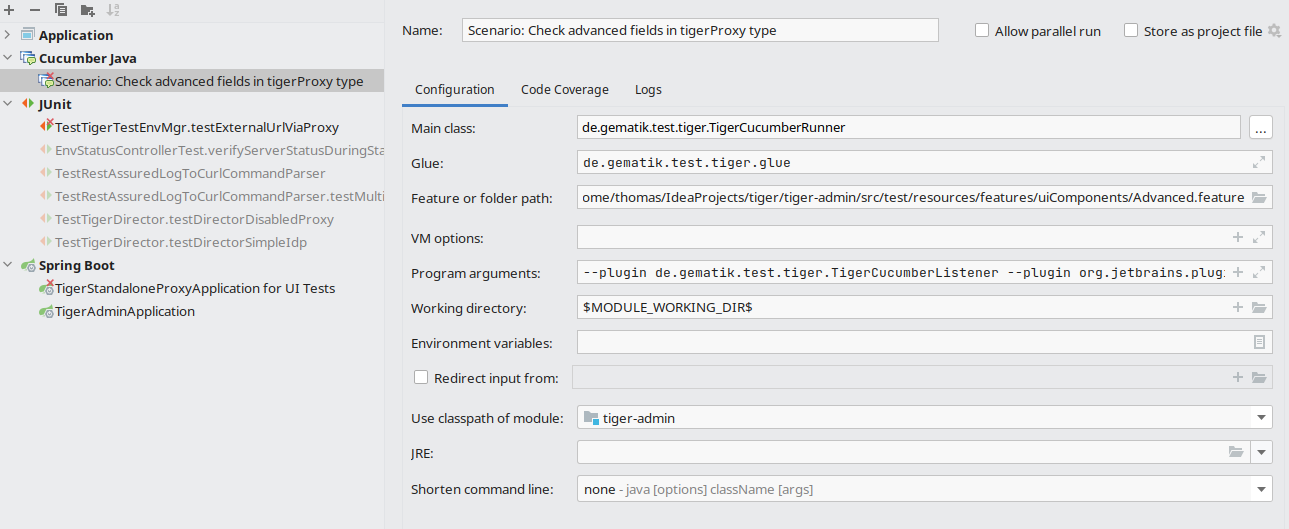
10.3.2. Proxy configuration
If you are located behind a proxy please make sure to set the environment variables HTTPS_PROXY and HTTP_PROXY as well as the Java system properties http.proxyHost, http.proxyPort, https.proxyHost and https.proxyPort appropriately so that the internet connections are routed properly through your company proxy.
Please also make sure IntelliJ has its proxy settings configured appropriately for HTTP and HTTPS so that it can download the dependencies for the IntelliJ build environment too.
| BOTH settings (environment variables and system properties) are required as Maven and Java code and HTTP client libraries use both settings. |
11. Links to test relevant topics
-
3-Amigos
-
presumably first mentioned in George Dinwiddie’s blog (2009)
-
-
Cucumber
-
SOLID
-
Screenplay Pattern
-
FIRST principle for Unit tests
12. Frequently asked questions
12.1. Maven
12.1.1. FM01 Which Serenity are we currently using?
You can find the Serenity compatible with each Tiger version in the [ReleaseNotes](ReleaseNotes.md)
12.1.2. FM02 When using maven, no tests are executed.
Please first make sure that either the surefire or failsafe plugin is enabled and shown as running in the console.
If you use Junit4 test annotations, you have to make sure that the junit vintage engine from the Junit5 library is included in the dependencies.
<dependency>
    <groupId>org.junit.vintage</groupId>
    <artifactId>junit-vintage-engine</artifactId>
    <version>${version.junit5}</version>
</dependency>
12.1.3. FM03 When running tests in Tiger, the test run aborts with a java.lang.NoSuchMethodError.
More specifically, the error is as follows:
Exception in thread 'main' java.lang.NoSuchMethodError: 'java.util.Set org.json.JSONObject.keySet()'This is due to a dependency conflict which may be solved by an exclusion in the tiger-test-lib:
<exclusion>
    <groupId>com.vaadin.external.google</groupId>
    <artifactId>android-json</artifactId>
</exclusion>
12.1.4. FM04 I don’t see any log output, there are only warnings about outdated versions at the beginning
Apparently you included SLF4J V2 dependencies.
We currently use the logback classic 1.2.x branch, which is delivered in the most recent SpringBoot version.
This is not compatible to SLF4J 2.x.x.
12.1.5. FM05 There are selenium version conflicts when I want to run my project with SpringBoot and tiger with selenium
SpringBoot deploys an outdated selenium version.
To solve the conflicts, please use the versions stated in the release notes via dependency managent in the maven pom.xml.
12.1.6. FM06 When using Scenario Outlines, the tests are not displayed with the scenario name in the JUnit report, but e.g. as Examples.Example #1.1.
The system property cucumber.junit-platform.naming-strategy.short.example-name (usually in the junit-platform.properties file) is probably set to something other than "pickle".
If this property has not been explicitly set, Tiger will automatically set it to "pickle".
12.2. Extensions
12.2.1. FE01 When I start a docker image in tiger.yaml, the TestenvironmentManager’s startup fails
Please make sure that you added the tiger-cloud-extension dependency in the most recent version.
<dependency>
    <groupId>de.gematik</groupId>
    <artifactId>tiger-cloud-extension</artifactId>
    <version>x.y.z</version>
</dependency>
12.2.2. FE02 When using the tiger-cloud-extensions, healthcheck at docker servertypes in Gematik SW factory fails
Tiger expects that Docker Daemon starts the container locally.
However, if this is not the case, you may use the environment variable TIGER_DOCKER_HOST to share on which server instance the container is started and the HealthcheckURL is adjusted accordingly.
For purposes of the Gematik SW-factory, the following code snippet is recommended for the pipeline script:
stage('Test') {
    environment {
        TIGER_DOCKER_HOST = dockerGetCurrentHostname()
    }
    steps {
        mavenVerify(POM_PATH)
    }
}
12.2.3. FE03 Can I run a Docker image or CANOPY without the tiger-cloud-extension?
Yes. Since Tiger 4.3, tiger-testenv-mgr ships built-in docker and canopy server types (Testcontainers-backed, single-container scope). For a docker-compose-style multi-service env or Kubernetes/Helm, keep using tiger-cloud-extension; for ad-hoc images and CANOPY DNS interception, the in-tree types are enough.
servers:
  myProxy:
    type: tigerProxy
    tigerProxyConfiguration:
      adminPort: 9000
      proxyPort: 9090
  myCanopy:
    type: canopy
    canopy:
      image: gematik1/tiger-canopy-image:latest
      # tigerProxyUrl, controlMode and dependsUpon are auto-wired from myProxy
  app:
    type: docker
    docker:
      image: my-org/my-app:1.2.3
      exposedPorts: [8080]
      # dnsServers is auto-prepended with myCanopy's IP; opt out with injectDns: false
      waitStrategy: { kind: HTTP, httpPath: /health, timeoutSeconds: 60 }
See the tiger-testenv-mgr user-manual section "Built-in container server types" for the full configuration schema and the placeholders these types publish.
12.3. Workflow UI
12.3.1. FW01 In the workflow UI scenarios are listed twice and are refreshed the same time (as if they ran parallely)
Usually, this only happens when the test suite is started in intellij and TigerCucumberListener is delivered as a plugin in TigerCucumberListener.
This is no longer necessary since v1.3 because the listener is added automatically.
Due to this manual adjustment, two listeners are running that communicate the scenarios twice to the workflow UI.
If this happens in a mvn call, please check the tiger-maven-plugin configuration or the generated driver classes in terms of additional plugins in CucumberOptions.
12.3.2. FW02 After having pressed shutdown in the workflow UI, I cannot see messages in RbelLog Details Pane anymore
By stopping the test runs, the workflow UI backend is terminated as well.
You may recognize this by the light-red color of the side bar.
However, navigating in the RbelLog Details Pane requires a running backend.
In addition, RbelPath- and JEXL inspect dialogues are not working.
12.4. Other topics
12.4.1. FO01 How can I change the logging levels of loggers used by Tiger
Inside the tiger.yaml file, you can add a section logging.level: and add a list of packages / classes and the desired logging level.
logging:
  level:
    de.gematik.test.tiger.testenvmgr.TigerTestEnvMgr: TRACE
    de.gematik.test.tiger.lib.TigerDirector: TRACE
    de.gematik.test.tiger.proxy: TRACE
    localTigerProxy: TRACE
12.4.2. FO02 Docker container creation fails
Use the command below to remove all unused containers.
Or look for containers starting with "tiger", stop and remove them.
docker system pruneLast resort:
netcfg -dand restart docker
12.4.3. FO03 Adding alternative names programmatically throws SSLException
When using directly the method de.gematik.test.tiger.proxy.TigerProxy.addAlternativeName() to add multiple alternative names to the TLS certificate of the tiger proxy the following exception may come up:
12:17:48.604 [MockServer-EventLog13] ERROR o.mockserver.log.MockServerEventLog - 58165 exception creating SSL context for serverfailed to set certificate and key
javax.net.ssl.SSLException: failed to set certificate and key
The tiger proxy uses a mockserver internally which creates a SSLContext when handling the first request.
Adding additional names after the first request will not update the created SSLContext and the exception will be thrown.
A workaround for this behaviour is to explicitly restart the internal mockserver after adding an alternative name.
E.g.:
TigerProxy proxy = TigerDirector.getTigerTestEnvMgr().getLocalTigerProxyOrFail();
proxy.addAlternativeName(host);
proxy.restartMockserver();
12.4.4. FO04 How do I get rid of "alias hell" in my docker-compose setup?
If your test environment uses static networks.<net>.aliases (or extra dns: entries) just so a
container thinks api.example.com lives at the Tiger proxy IP, you’ve probably hit the limits of
that pattern: routing is fixed at compose-up time, every scenario change forces an environment
restart, and debugging is painful.
The tiger-canopy module replaces that with a tiny programmable DNS server. Point your
containers' dns: at it and it will:
-
answer queries for hostnames you have registered with the Tiger proxy IP,
-
forward everything else to the system upstream resolvers.
The list of registered hostnames is mutable at runtime via a REST API
(/api/v1/proxied-hosts) and via Cucumber glue steps shipped in tiger-test-lib (CanopyGlue):
Given TGR set CANOPY base URL to http://canopy:8080
When  TGR add the following proxied hosts to CANOPY:
  | host             | matchType |
  | api.example.com  | EXACT     |
  | example.com      | SUFFIX    |
Then  TGR CANOPY contains proxied host api.example.com
See tiger-canopy/README.md for the full REST reference, configuration options and a ready-to-run
docker-compose.example.yaml.